Marketo
- 16 Jun 2023
- 17 Minutes to read
-
PDF
Marketo
- Updated on 16 Jun 2023
- 17 Minutes to read
-
PDF
Article Summary
Share feedback
Thanks for sharing your feedback!
Purpose
The Cloudingo Marketo Integration Web Service API provides Enterprise customers the ability to use the Cloudingo platform from their own Marketo instances. The power to find duplicates, merge data into records, and manage data does not have to be done from the Cloudingo website alone.
System Design
The Cloudingo platform runs in its own cloud, separate from Salesforce. The setup and configuration involves connecting Cloudingo to your Salesforce cloud and creating endpoints in Cloudingo for your Marketo instance to connect to.
Proprietary Indexing
Cloudingo leverages its own indexes for finding duplicates. These proprietary indexes allow for more complex duplicate scenarios than can be supported in Salesforce Apex and SOQL. The Cloudingo system is also unrestricted by Salesforce governance (CPU limits, query result sizes, looping maximums) because indexes on the Cloudingo cloud servers are used to perform searches.
Newly created or modified records in Salesforce result in index updates in the Cloudingo platform. The speed at which these updates occur is dependent on the system load for both the Salesforce and Cloudingo servers, as well as the Cloudingo synchronization mode being used for your account. An understanding of index updates is fundamental to understanding results. Usually, the timing of index updates is not an issue, but when data is flowing into Salesforce from multiple sources simultaneously, duplicate detection will depend on the indexes being up-to-date.
Web Service Technologies
The Cloudingo Web Service API is provided to customers via standard web services technologies. Cloudingo supports both REST and SOAP technologies. However, for Marketo Integration, REST is recommended and examples below will be provided using REST as a result.
Dual Support for REST/JSON and SOAP/XML
The dual support for REST and SOAP allows customers to program against our platform in the most comfortable way for that customer. The REST endpoints use JSON as the data format, as is the most common convention in modern web programming. The SOAP endpoints use XML as the data format. SOAP provides WSDL definitions of the web service interface which can be used by tools to generate proxy code. These proxies are convenient for interacting with the web service in a way that is natural to the programming language being used by our customers.
Note About License Requirements
Access to the Cloudingo Marketo Integration API is limited to Cloudingo customers with an Enterprise level license. To establish a Cloudingo license, visit http://cloudingo.com/. Once an organization has an Enterprise level Cloudingo license, Data Integration can be setup and configured via the Cloudingo web portal.
Navigation
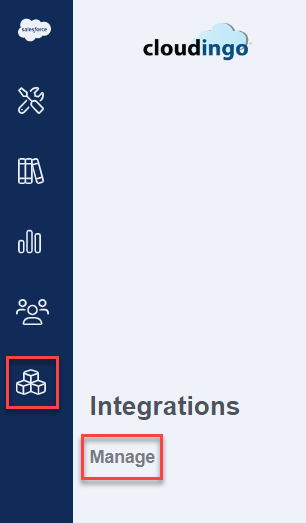
- The Cloudingo Integration dashboard can be accessed by logging into https://app.cloudingo.com. Once logged in, the user is presented with the Dedupe dashboard by default. To access the Cloudingo integration dashboard, choose the 'Integrations' → 'Manage' option from the left-hand-side navigation window.
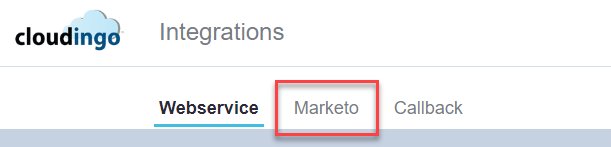
- At the top of the page, choose the 'Marketo' tab.
- If no integrations have previously been created, the screen will automatically display an option to 'Create New'. The option is also available under the 'Actions' menu.
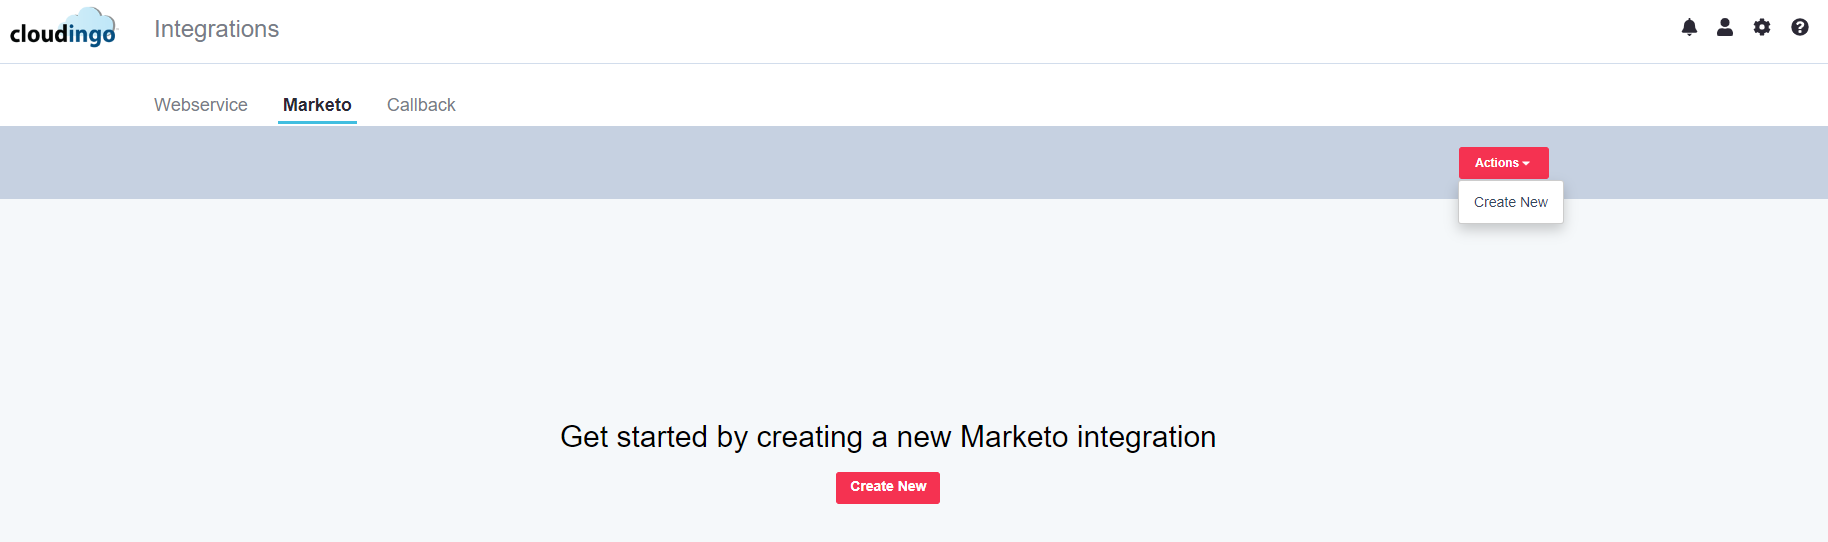
- After choosing the option to create a new Marketo Integration, you will be taken to the Marketo Integration Create screen.
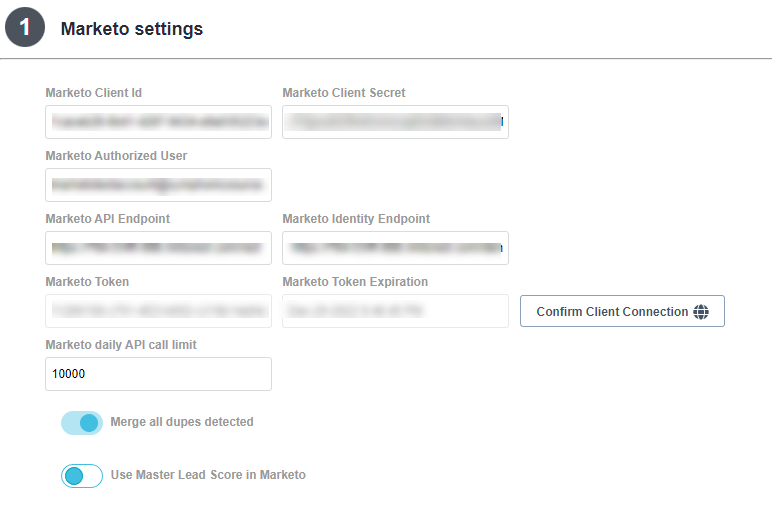
Step 1: Marketo Settings
Open Marketo:
It is recommended to open Cloudingo and Marketo simultaneously while working through Step 1.
Open Marketo and navigate to the 'Admin' → 'Integration' section in the left-hand-side navigation window.
- In Marketo, create a new custom webservice and capture details.
- Navigate to the 'Admin' → 'Integration' → 'LaunchPoint' section in the left-hand-side navigation window and create a new custom webservice.
- Keep this page open to gather details for Cloudingo.
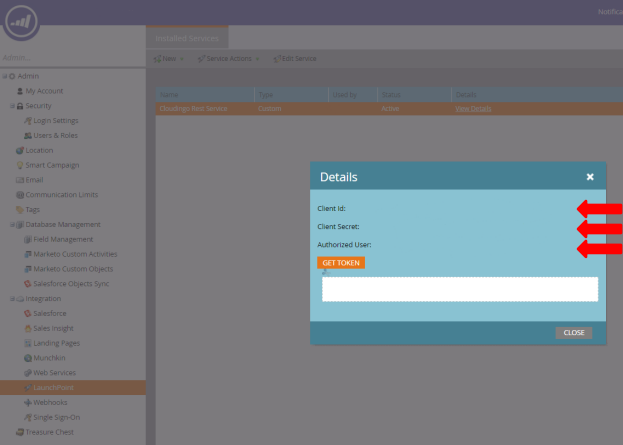
- Keep this page open to gather details for Cloudingo.
- In Cloudingo:
- Marketo Client ID: Populate the Client ID from Marketo.
- Marketo Client Secret: Populate Client Secret from Marketo.
- Marketo Authorized User: Populate the Authorized User from Marketo.
- Navigate to the 'Admin' → 'Integration' → 'LaunchPoint' section in the left-hand-side navigation window and create a new custom webservice.
- In Marketo, gather webservice details.
- Navigate to 'Web Services' from the Integration section in the left-hand-side navigation window.
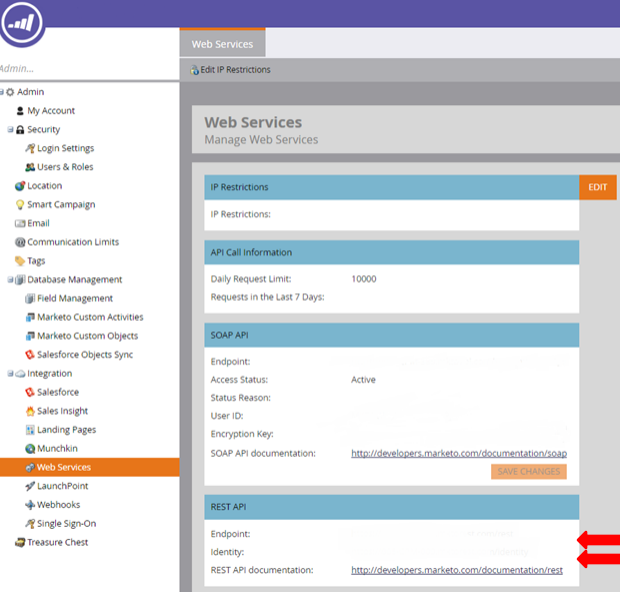
- In Cloudingo:
- Marketo API Endpoint: Populate the REST API Endpoint as provided in Marketo under the Web Services Integration.
- Marketo Identity Endpoint: Populate the REST API Identity Endpoint as provided in Marketo under the Web Services Integration.Note:
The remaining steps below are set in Cloudingo.Creating and testing the webhook is explained later in this article where the Cloudingo Integration Key and Password will be needed to plug into Marketo.
- Navigate to 'Web Services' from the Integration section in the left-hand-side navigation window.
- Marketo Token: This value will automatically populate with the Marketo Identity Token from the last successful Marketo connection established for the Cloudingo Integration.
- Value is read-only and will get populated when the connection is tested.
- Marketo Token Expiration: This value will automatically populate the current expiration for the latest Marketo Identity Token.
- Value is read-only and will get populated when the connection is tested.
- Confirm Client Connection: Choose this option to test the Cloudingo connection to Marketo with the identity endpoint and credentials provided.
- If the connection is successful, the Marketo Token and Marketo Token Expiration will be updated automatically.
- Marketo daily API call limit (optional): Value can be adjusted downward to limit the number of API calls Marketo can use within a 24-hour period.
- The limit cannot exceed the default maximum established for your Account.
- Merge all dupes detected: Choose this option to have Cloudingo merge all duplicates detected with the incoming record.
- The standard/default behavior if deselected will merge the incoming record with only the Master record duplicate detected.
- Use Master Lead Score in Marketo: Choose this option to update the merged record with the lead score of the Master record.
- The standard/default behavior if deselected will sum the lead score value from all records merged.
Step 2: Cloudingo Settings
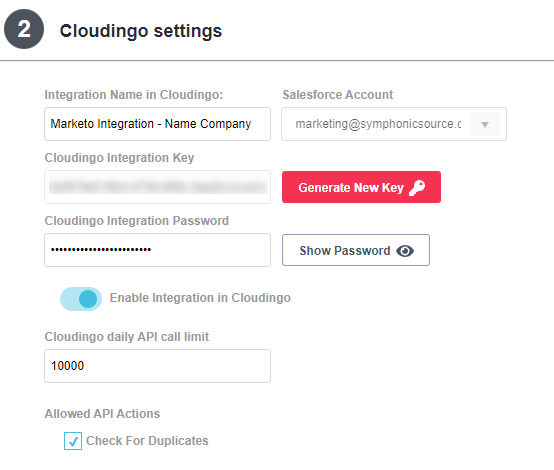
- Integration Name in Cloudingo: Give the integration a descriptive name.
- Salesforce Account: Choose the desired Account that the integration will apply.
- If only one org is connected to Cloudingo, it will default automatically.
- Cloudingo Integration Key: This is the unique identifier for the integration.
- A key will be populated by default but a new key can be regenerated if desired.
- This key will be sent as part of the headers when calling the Cloudingo Integration API.
- Cloudingo Integration Password: Enter any password.
- Password entries will be automatically encrypted.
- Plain text version of the password is never exposed but can be viewed from the integration configuration using the 'show password' icon.
- In conjunction with the Cloudingo Integration Key, the (encrypted) Integration Password will authenticate any incoming API calls.
- Password entries will be automatically encrypted.
- Enable Integration in Cloudingo: Choose this option to enable the integration.
- Deselect to disable the integration.
- Cloudingo daily API call limit: Value can be adjusted downward to limit the number of API calls that Cloudingo can use within a 24-hour period.
- API call limit cannot exceed the default maximum established for the Account.
- Allowed API Actions:
- Currently, there is only one option for Marketo Integrations and the 'Check for Duplicates' option must be selected.
- The action listed below is enabled by default when a new Cloudingo Marketo Integration has been created.
- Available actions for a particular integration can be limited via the Cloudingo Integration Wizard.
- HTTP Post should be used for all actions.
| Action | Input | Output | Version |
|---|---|---|---|
| MarketoCheckForDuplicates | Set of fields and values for the record to evaluate. The duplicate criteria can be set up on the Cloudingo Integration Wizard. | Integration Action Status Code, along with a list of potential duplicates per object based on the configuration. Also responds with if a duplicate was found along with address information if configured. | 1.0 |
Step 3: Duplicate search settings
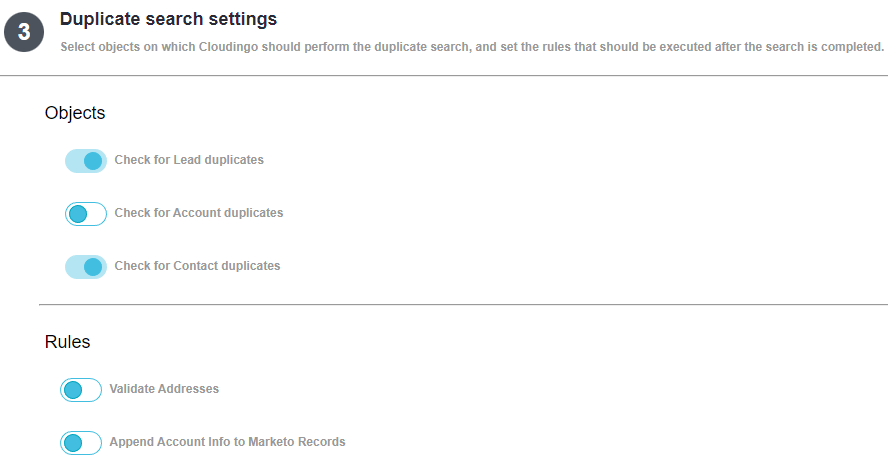
- Check for Lead duplicates: Choose this option to scan incoming records against existing Leads in Salesforce to identify a match.
- Check for Account duplicates: Choose this option to scan incoming records against existing Accounts in Salesforce to identify a match.
- Check for Contact duplicates: Choose this option to scan incoming records against existing Contacts in Salesforce to identify a match.
- Validate Addresses: Choose this option to perform the validate addresses process on the incoming and/or billing address records.
- Validated address will be included as part of the API response so that it can be mapped to update the Marketo record.
- Validation credits/tokens must be purchased to use this feature.
- Append Account Info to Marketo Records: Choose this option to have the API add/append any available Account data from Salesforce based on the company name provided and Account search options selected.
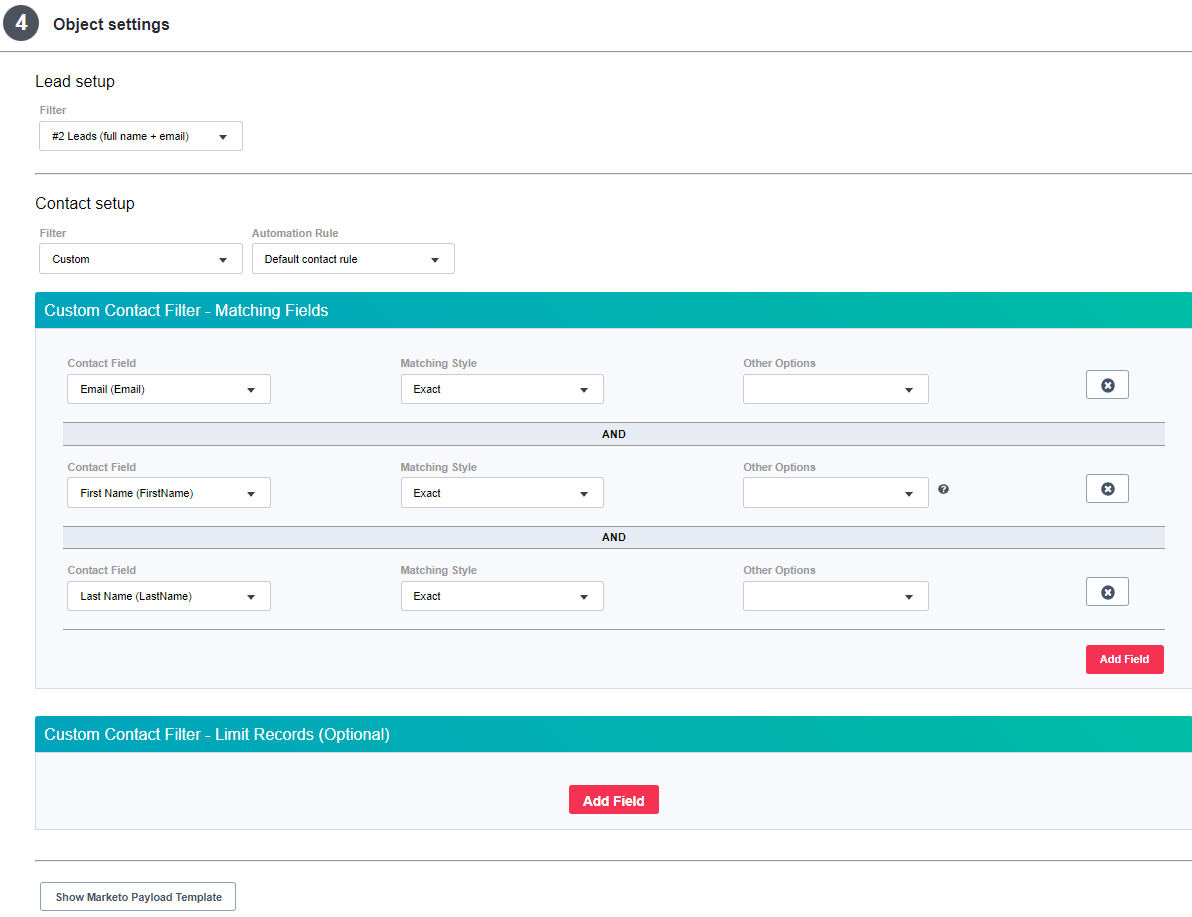
Step 4: Object settings
Account setup
- Options only appear if 'Check for Account Duplicates' is enabled in Step 2.
- Filter: Choose an existing filter or create custom filter logic to use to identify duplicate matches.
- Existing: Choose an existing dedupe filter. The filter name & user dashboard where the filter is located will be displayed for easy selection. The rule already assigned to the pre-configured filter will automatically get applied for merging logic (master and field selections).
- Filters using 'Match on Empty' in any of the matching criteria will not appear. API does not support Match on Empty.
- Custom: Choose 'Custom' in the drop box to build new filter logic. Matching criteria and options are limited. If needing to use options other than 'Exact' and 'Ignore Case', pre-build a dedupe filter and choose the filter from the list.
- Automation Rule: Choose a rule from the drop box to tell Cloudingo how to merge the records (master and field selections).
- Custom Account Filter - Matching Fields: Choose the 'Add Field' option to add matching criteria.
- Account Field: Choose a field for matching criteria in the drop box.
- Matching Style: Choose a matching style (Exact).
- Other Options: Choose desired options (Ignore Case).
- Repeat steps until all matching criteria are defined.
- Custom Account Filter - Limit Records (Optional): Choose the 'Add Field' option to add limit criteria.
- Account Field: Choose a field in the drop box.
- Condition: Choose a condition (Ex: Equals, Not Equals, Has a Value, Has no Value).
- Repeat steps until all limits are defined.
- Existing: Choose an existing dedupe filter. The filter name & user dashboard where the filter is located will be displayed for easy selection. The rule already assigned to the pre-configured filter will automatically get applied for merging logic (master and field selections).
Lead setup
- Options only appear if 'Check for Lead Duplicates' is enabled in Step 2.
- Filter: Choose an existing filter or create custom filter logic to use to identify duplicate matches.
- Existing: Choose an existing dedupe filter. The filter name & user dashboard where the filter is located will be displayed for easy selection. The rule already assigned to the pre-configured filter will automatically get applied for merging logic (master and field selections).
- Filters using 'Match on Empty' in any of the matching criteria will not appear. API does not support Match on Empty.
- Custom: Choose 'Custom' in the drop box to build new filter logic. Matching criteria and options are limited. If needing to use options other than 'Exact' and 'Ignore Case', pre-build a dedupe filter and choose the filter from the list.
- Automation Rule: Choose a rule from the drop box to tell Cloudingo how to merge the records (master and field selections).
- Custom Lead Filter - Matching Fields: Choose the 'Add Field' option to add matching criteria.
- Lead Field: Choose a field for matching criteria in the drop box.
- Matching Style: Choose a matching style (Exact).
- Other Options: Choose desired options (Ignore Case).
- Repeat steps until all matching criteria are defined.
- Custom Lead Filter - Limit Records (Optional): Choose the 'Add Field' option to add limit criteria.
- Lead Field: Choose a field in the drop box.
- Condition: Choose a condition (Ex: Equals, Not Equals, Has a Value, Has no Value).
- Repeat steps until all limits are defined.
- Existing: Choose an existing dedupe filter. The filter name & user dashboard where the filter is located will be displayed for easy selection. The rule already assigned to the pre-configured filter will automatically get applied for merging logic (master and field selections).
Contact setup
- Options only appear if 'Check for Contact Duplicates' is enabled in Step 2.
- Filter: Choose an existing filter or create custom filter logic to use to identify duplicate matches.
- Existing: Choose an existing dedupe filter. The filter name & user dashboard where the filter is located will be displayed for easy selection. The rule already assigned to the pre-configured filter will automatically get applied for merging logic (master and field selections).
- Filters using 'Match on Empty' in any of the matching criteria will not appear. API does not support Match on Empty.
- Custom: Choose 'Custom' in the drop box to build new filter logic. Matching criteria and options are limited. If needing to use options other than 'Exact' and 'Ignore Case', pre-build a dedupe filter and choose the filter from the list.
- Automation Rule: Choose a rule from the drop box to tell Cloudingo how to merge the records (master and field selections).
- Custom Contact Filter - Matching Fields: Choose the 'Add Field' option to add matching criteria.
- Contact Field: Choose a field for matching criteria in the drop box.
- Matching Style: Choose a matching style (Exact).
- Other Options: Choose desired options (Ignore Case).
- Repeat steps until all matching criteria are defined.
- Custom Contact Filter - Limit Records (Optional): Choose the 'Add Field' option to add limit criteria.
- Choose 'Add Field'.
- Field: Choose a field in the drop box.
- Condition: Choose a condition (Ex: Equals, Not Equals, Has a Value, Has no Value).
- Repeat steps until all limits are defined.
- Existing: Choose an existing dedupe filter. The filter name & user dashboard where the filter is located will be displayed for easy selection. The rule already assigned to the pre-configured filter will automatically get applied for merging logic (master and field selections).
Show Marketo Payload Template
- At the bottom of Step 4, an option is available to view a payload template.
- This will provide a JSON string which can be used when setting up the Marketo Webhook.
- The template is built on the basis of duplicate search rules and filters selected.
Integration Dashboard
After a Marketo Integration has been created, it will display on the Integration dashboard similarly to the following:
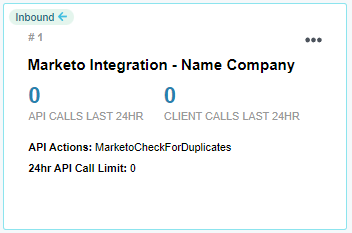
This will provide a brief summary of the configured integration including the following:
- The name of the integration.
- The actions that have been selected.
- The current status of the integration.
- The current API call limit for the integration.
- The number of calls made for the integration in the last 24 hours.
- The number of calls made to the connection system in the last 24 hours.
Step 5: Create Marketo Webhook
- Create a custom field in Marketo for the webhook to update the incoming record.
- In Marketo, navigate to the 'Admin' → 'Database Management' → 'Field Management' → 'New Custom Field' option.
- Give the field a descriptive name and set it to be a Boolean field type.
- Field value returned confirms if the record is a duplicate or not (true/false).
- Create a Marketo webhook to initiate the call to the Cloudingo Integration.
- In Marketo, navigate to the 'Admin' → 'Integration' → 'Webhooks' section in the left-hand-side navigation window.
- Create a new webhook to call the Cloudingo MarketoCheckForDuplicates service.
- The webhook will provide a record-level check to allow for Cloudingo duplicate prevention as part of Marketo workflows.
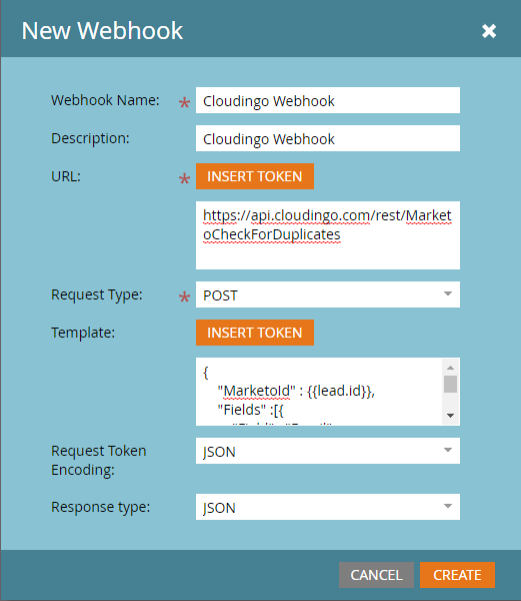
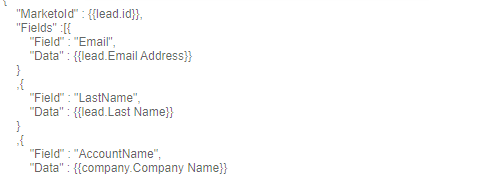
- The template will be customized for the dedupe filters but should follow the structure of the input for the Marketo CheckForDuplicates method (shown below).
- At minimum, field values chosen for filtering criteria should be sent to the webhook as well as the MarketoId.
- Use the 'Show Marketo Payload Template' option in Step 4 within Cloudingo Integration configuration to obtain content for this template.
- The webhook will provide a record-level check to allow for Cloudingo duplicate prevention as part of Marketo workflows.
- Add a response mapping to update the custom Boolean field in Marketo.
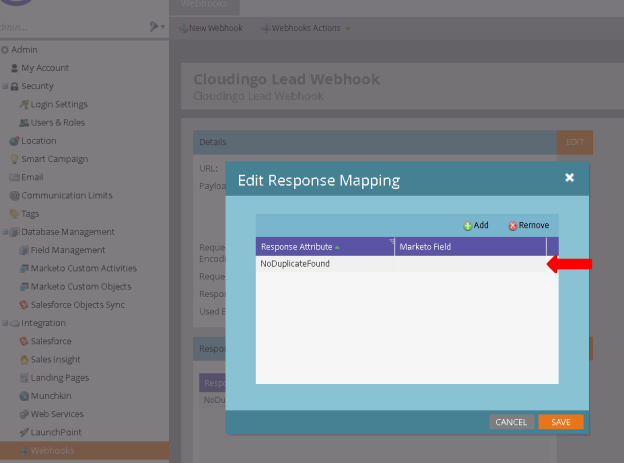
- If using the Validate Addresses feature, include additional response mappings for the Lead address and/or Company billing address.
- Set up a custom header to allow for authentication between Marketo and Cloudingo.
- Navigate to 'Admin' → 'Integration' → 'Webhooks' → 'Webhook Actions' → 'Set Custom Header'.
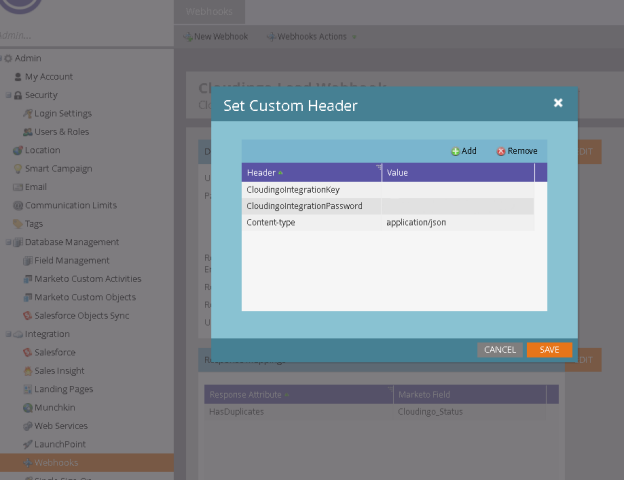
- In this screen the following 3 headers should be added:
- Cloudingo Integration Key: This will be displayed within the Cloudingo Integration configuration in Step 1.
- Cloudingo Integration Password: This will displayed within the Cloudingo Integration configuration in Step 1.
- Content-Type: this should be set to application/json assuming that JSON is the communication option chosen.
- Navigate to 'Admin' → 'Integration' → 'Webhooks' → 'Webhook Actions' → 'Set Custom Header'.
Step 6: Create Marketo Workflows
- Create two Smart Campaigns. It is recommended to create a separate Program in Marketo for these Smart Campaigns.
- The first will initiate the call to the webhook and perform the duplicate check and respond if an existing duplicate record was detected.
- The second will allow for the sync to Salesforce if no duplicate is detected.
Example (other workflows can be established as desired):
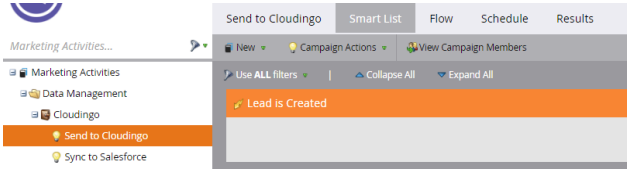
- Send to Cloudingo:
- Smart List: Select the Lead is Created option to determine the Leads that qualify to be sent to Cloudingo. This will cause any newly created Lead to initiate the workflow.
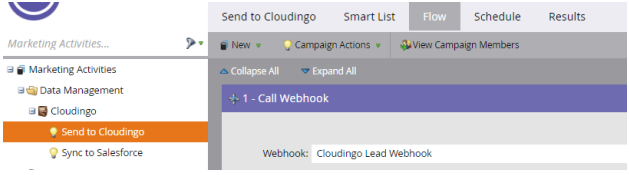
- Flow: Select the option to Call Webhook and select the Webhook created to call Cloudingo in order to dedupe the new Lead record.
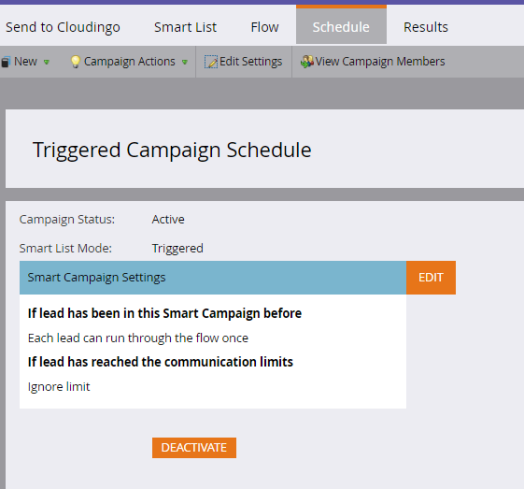
- Schedule: Set for each Lead to run through the workflow once in order to avoid unnecessary overhead on Leads that have already been deduped, and activate the campaign workflow.
- Smart List: Select the Lead is Created option to determine the Leads that qualify to be sent to Cloudingo. This will cause any newly created Lead to initiate the workflow.
- Sync to Salesforce: Once the Cloudingo API call completes, the custom Boolean field will be updated with a True/False to indicate if a duplicate was found according to the response mapping for the Marketo Webhook.
- Smart List: A Data Value Changes trigger should be added to initiate the workflow when the custom Boolean value is changed.
- If the value is True (No duplicate found), then the record has been deduped by Cloudingo and the record qualifies to be synced to Salesforce.
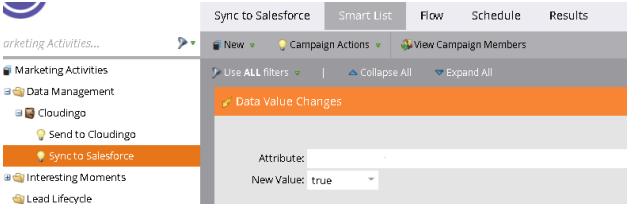
- If the value is True (No duplicate found), then the record has been deduped by Cloudingo and the record qualifies to be synced to Salesforce.
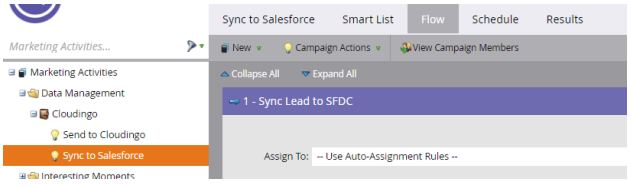
- Flow: The Sync Lead to SFDC option should be added to move the record to Salesforce since the record does not have a current duplicate in Salesforce.
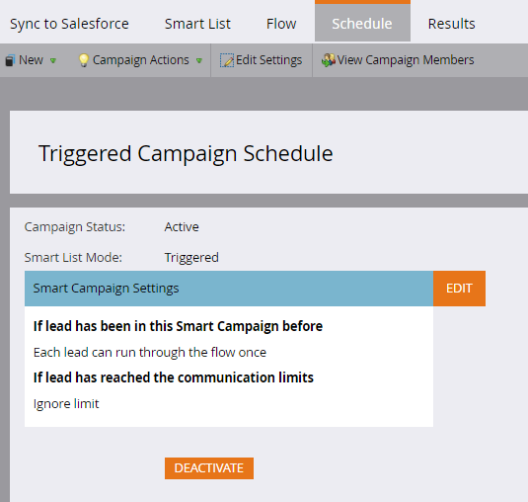
- Schedule: Set for each Lead to run through the workflow once in order to avoid unnecessary overhead on Leads that have already been deduped, and activate the campaign workflow.
- Smart List: A Data Value Changes trigger should be added to initiate the workflow when the custom Boolean value is changed.
More Information:
Endpoints
The Cloudingo Integration API is currently available via SOAP (XML based) or REST (JSON based) service endpoints. The functionality and methods available for both are identical, however the end point as well as the manner for initiating the call and handling return values will vary based on the type of service. All endpoints are handled over SSL.
REST Endpoints
Production Environment: https://api.cloudingo.com/rest/MarketoCheckForDuplicates
SOAP Endpoints
Prod Environment: https://api.cloudingo.com/soap/
Prod Environment WSDL: https://api.cloudingo.com/wsdl
Security
Only SSL (https) communication is available for the Marketo Integration API. Security for the Marketo Integration API is handled via a combination of the Cloudingo Integration Key and the Cloudingo Integration Password which should be added to the headers of any REST or SOAP service call. The following headers should be applied as HTTP headers.
Service Call Headers
CloudingoIntegrationKey
The auto-generated GUID provided by the Cloudingo Integration Dashboard within the Cloudingo web portal.
CloudingoIntegrationPassword
The supplied password to be used to authenticate the caller in combination with the integration key. The password can be entered on the Cloudingo Integration Dashboard and the value will be encrypted. The encrypted value should be passed in the header.
CloudingoApiVersion (optional)
The version of the API to call. If you are planning on continuing with the version available during setup, this should be supplied with all calls. If not provided, this will default to the latest version of the API. Therefore, if not provided, a new API version release will result in all calls automatically upgrading to the latest API. If this is not desired, the version can be supplied so when to upgrade the API version is controlled by the caller.
Content-type
applicaton/json
Available Actions (Detailed Inputs, Outputs, Response Codes)
We previously described the available actions in this article. This section will detail the inputs, outputs, & method specific response codes for each action.
MarketoCheckForDuplicates
Will evaluate the current data in your organization based on the inputs to determine any possible duplicates using configured duplicate definition. If configured:
- Inputs:
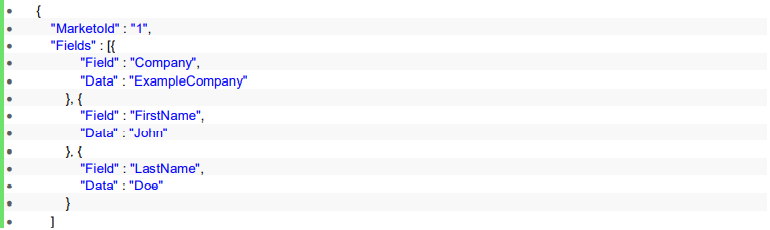
- Marketo RecordInfo: Name value pairs of fields and their corresponding values for the new record along with the current Marketold being evaluated.
- JSON Example:

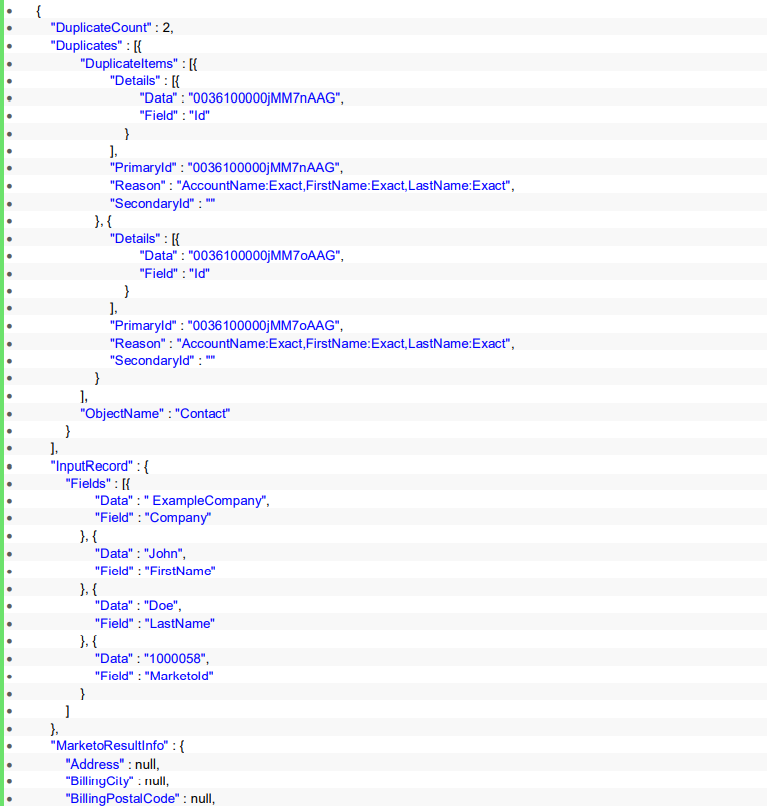
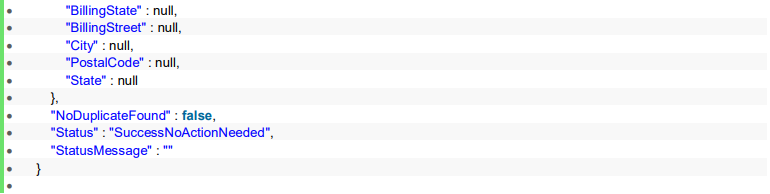
- Outputs:
- An Integration status code and message for the overall operation.
- The inputs provided for the duplicate check
- A list of potential duplicates
- Marketo Result Info object providing values from address validation if configured to validate addresses.
- Boolean flag to identify if a duplicate was found
- JSON Example:
- Method Specific Response Codes(Detailed below):
- SuccessNoActionNeeded
- ActionCannotBeCompleted
- ErrorMergeFailed
Action Workflows
The following section provides details on the overall workflows for particular Cloudingo API actions. While separate actions are provided, in some scenarios the actions work together in order to provide overall functionality depending on each client’s usage pattern.
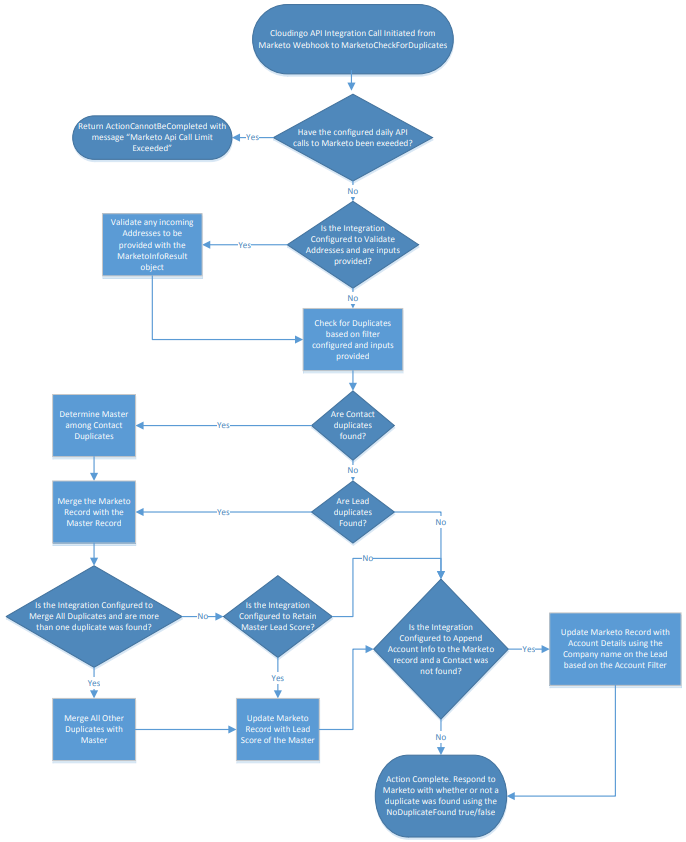
Marketo Duplicate Check and Merge Workflow
Limits and Conditions
There are a number of checks that occur with each API call as well as Cloudingo API limits and Salesforce API limits. As a result, there is an overall process flow involved with performing actions through the Cloudingo Integration API when these checks come into play and a number of potential return messages if limits or conditions are met. The following is a list of the primary call limits:
- Daily API Call Limit: based on a 24-hour rolling period. The exact value will depend on the level purchased.
- 5-minute period: limited to 1000 API calls in any 5 minute period.
- Concurrent API Calls: limited to 100 API calls processing at any given time.
Limits and Conditions Workflow
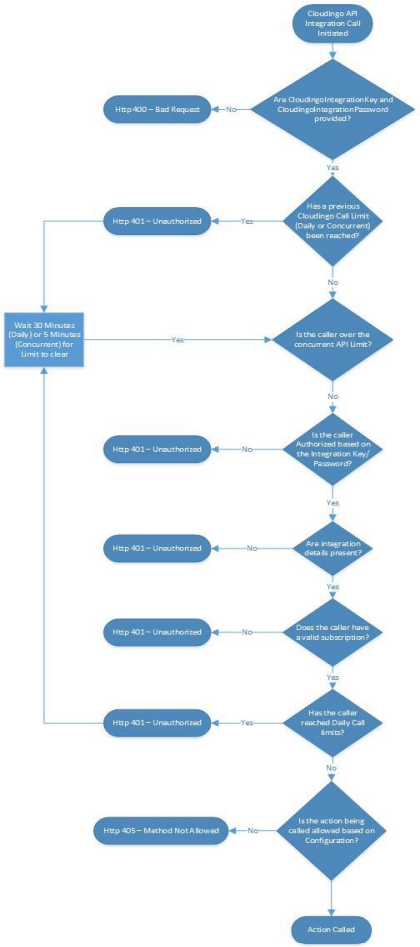
Return Statuses
The return details will be provided with each return method. Those listed below without a corresponding action apply to any action. Any method level error response will have the same structure as shown below. Non-method level errors will be listed in the corresponding status and status message as a part of the response object for the specific method. General Error Response JSON:
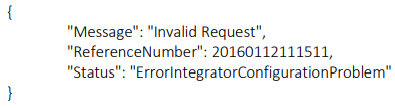
For SOAP, exceptions will all be WebFaultExceptions of type CloudingoApiError which will include a Message, ReferenceNumber, and Status.
| Action | Reason | Http Status | Status | Message |
|---|---|---|---|---|
| Any | Missing Integration Key | 400 | ErrorIntegratorConfigurationProblem | Invalid Request |
| Any | Missing Integration Password | 400 | ErrorIntegratorConfigurationProblem | Invalid Request |
| Any | Concurrent API Limit Exceeded | 401 | ErrorCloudingoConcurrentApiLimitReached | Interval Request Limit Exceeded |
| Any | Cloudingo Daily Limit Exceeded | 401 | ErrorCloudingoApiLimitReached | Cloudingo API Call Limit Exceeded |
| Any | Cloudingo Subscription Expired | 401 | ErrorContactCloudingoSupport | Cloudingo Subscription Expired |
| Any | Unable to Authenticate Integration Key or Password | 401 | ErrorIntegratorConfigurationProblem | Unauthorized Request |
| Any | Success - The requested action was not needed | 200 | SuccessNoActionNeeded | |
| Any | Success Action Complete | 200 | SuccessActionComplete | |
| CheckRecordForDuplicates, CheckForDuplicates | Success - Record Inserted | 200 | SuccessRecordAdded | |
| CheckRecordForDuplicates, CheckForDuplicates | Success - Existing record updated | 200 | SuccessRecordUpdated | |
| Any | Error during the requested process. Contact Cloudingo for assistance | 400 | ErrorContactCloudingoSupport | Corresponding error message |
| CheckForDuplicates | More records passed to the requested action than are allowed | 400 | ErrorInputLimitReached | Max Inputs (#) Reached |
| Any | Requested action is not configured as accessible | 400 | ErrorActionDisabled | Action Not Allowed |
| Any | Error during requested method | 500 | ErrorCloudingoSystemProblem | Corresponding error message |
| CheckRecordForDuplicates, CheckForDuplicates | Missing Data prevented record from being created | 200 | ErrorRecordCreateFailedMissingData | Required fields causing the issue |
| CheckRecordForDuplicates, CheckForDuplicates | Invalid field prevented record from being created | 200 | ErrorRecordCreateFailedInvalidField | Invalid fields causing the issue |
| CheckRecordForDuplicates, CheckForDuplicates | Permission denied for creating or updating record | 200 | ErrorRecordCreateFailedPermissionDenied | Failure message |
| CheckRecordForDuplicates, CheckForDuplicates | Record create failed for general reason | 200 | ErrorRecordCreateFailed | Failure message |
| Any | Configured filter information could not be found | 200 | ErrorProvidedFilterNotFound | |
| DetermineMaster | Unable to determine a master for provided duplicates | 200 | ErrorUnableToDetermineMaster | |
| CheckRecordForDuplicates, CheckForDuplicates | Invalid field prevented record from being updated | 200 | ErrorRecordUpdateFailedInvalidField | Invalid fields causing the issue |
| CheckRecordForDuplicates, CheckForDuplicates | Record update failed for general reason | 200 | ErrorRecordUpdateFailed | Failure message |
| MergeDuplicates | Merge not allowed based on automation rules or exceptions | 200 | ErrorMergeNotAllowedBasedOnRules | |
| MergeDuplicates | Merge Failed for general reason | 200 | ErrorMergeFailed | Failure message |
Was this article helpful?
