Undo & Restore
- 21 Apr 2023
- 6 Minutes to read
-
PDF
Undo & Restore
- Updated on 21 Apr 2023
- 6 Minutes to read
-
PDF
Article Summary
Share feedback
Thanks for sharing your feedback!
Overview
Salesforce allows users to recover deleted records from the recycle bin within 15 days, but related object relationships will not be restored for merged or converted records. Converted leads cannot be recovered. Cloudingo offers an Undo and Restore feature that lets users revert merges and conversions to their previous state. The restore feature will restore the deleted record's data and reattach related object data. This feature is available with Professional or Enterprise licenses, and interested users should contact their account representative to enable it.
Navigation
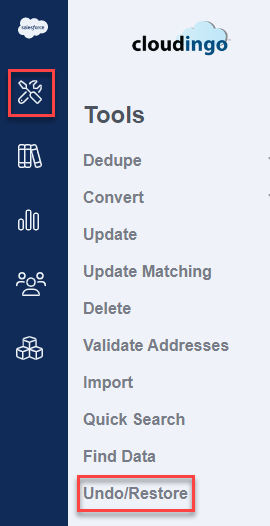
Choose ‘Tools’ → ‘Undo/Restore’ from the left-hand navigation window.
Enabling Undo/Restore
Enable/Disable (Backup Options)
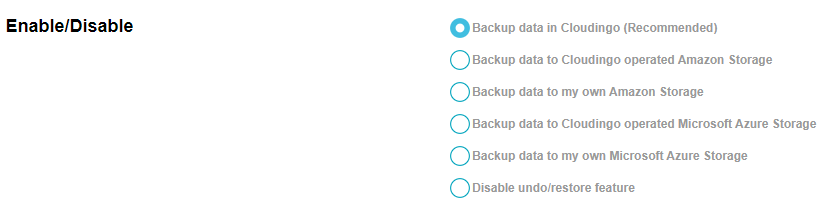
6 Backup Options:
- Backup data in Cloudingo (default & recommended): Performs backup on Cloudingo IBM servers located in the U.S. Data is stored for up to 45 days.
- Backup data to Cloudingo operated Amazon Storage: Data is stored for up to 45 days.
- Backup data to my own Amazon Storage: Data is stored as long as desired since storage is locally owned.
- Backup data to Cloudingo operated Microsoft Azure Storage: Data is stored for up to 45 days.
- Backup data to my own Microsoft Azure Storage: Data is stored as long as desired since storage is locally owned.
- Disable undo/restore feature: Disables the backup and restore process.
Create Plan Options
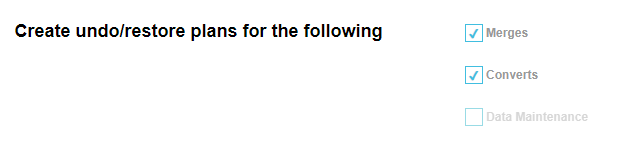
Create undo/restore plans for the following: Enable options for features the backup plan should apply to.
- Merges: Single object merges
- Converts: Cross-object Lead conversions
- Data Maintenance: (currently not yet available)
Objects

Select the objects for Cloudingo to track: Choose which objects and related objects to include as part of the backup/restore process. Options include:
- Account
- Case
- Contact
- Lead
- Opportunity
- Task
Notes and Attachments

- Quick: Tracks IDs of notes & attachments and attempts to re-parent any that were reassigned during merge (if they still exist in Salesforce).
- Basic: Tracks notes & attachments for the primary object. Ex: If merging Leads, only notes & attachments for Leads are tracked. Child record notes & attachments are not tracked, though they should still exist on the child records after merge. They would not be available if the child object needed to be restored later.
- Deep: Full tracking of notes & attachments for all objects. This option will impact merging speed.
Import Settings

- Skip creating a backup for import records(the default & recommended): Merges initiated through the import tool will not create a backup plan.
- Import process is the quickest.
- Imports can merge Salesforce records if more than one match is detected.
- Salesforce duplicates merged from an import will not be backed up.
- Only backup the top-level Salesforce object that the Import record is merging into or updating: A backup plan is created only for the primary object when a merge is initiated through the import tool.
- Example: If merging Accounts, Cloudingo will back up the Account records merging with the import but will not back up related object data (such as Contacts).
- Imports will process more slowly.
- Capture full backup of the Salesforce record during an Import(slowest): A backup plan is created on all objects involved when a merge is initiated through the import tool.
- Example: If merging Accounts, Cloudingo will back up the Account records merging and any related object data (such as Contacts).
- Imports will process significantly more slowly.
Note:
Dashboard filters are not impacted by Import Settings, even if included import records are in the matched groups.
Advanced Settings

Advanced Settings must be enabled by the Cloudingo Support Team. This is an either/or setting, and only one option can be enabled.
- Reparent other related objects: Cloudingo will query all related objects and track the related IDs.
- All objects are not backed up unless part of the 6 selected in the plan.
- On restore, Cloudingo reparents anything no longer associated with the object involved in the backup.
- Example: If merging Leads with a custom object associated, Cloudingo will not look at the custom object. Any records involved will be moved to the parent during merge.
- Cloudingo will not restore or reparent from the custom object.
- The custom object will be queried and related IDs are included in the backup, but the backup will not actually create backup plans for those objects entirely.
- This option is recommended for objects that store associated custom object IDs for all related custom objects.
- Track all related objects: Cloudingo will create a backup plan for all related objects.
- All objects are backed up, including custom objects (not just the associated ID for reparenting).
- Cloudingo will query a max of 6 objects.
- Cloudingo cannot determine ahead of time how many objects will be queried since it is determined by the schema check performed during backup.
- Example: If merging Leads with a custom object associated, any records on the object involved will be moved to the parent during merge.
- On restore, Cloudingo will query and include the data in the backup plan and reparent data from the custom object backup or re-create records that no longer exist.
Please Note & Be Aware:
Undo/Restore will increase the overall processing time for merges and converts. Further, advanced settings will significantly impact the speed of automation jobs and merging.
Retention Policy (Days)
- Choose the number of days to retain backups.
- Cloudingo-owned servers can be retained for up to 45 days.
- Storage options that are owned by your organization can be backed up as long as desired.
Restore Process
Merge/Convert Summary Report
- Access the ‘Merge/Convert Report’ directly from the top of Undo/Restore window or from ‘Reports’ → ‘Reports’ option from the left-hand navigation window.
- Go into the ‘Full Report’ and locate the group of records that the restore should be performed on.
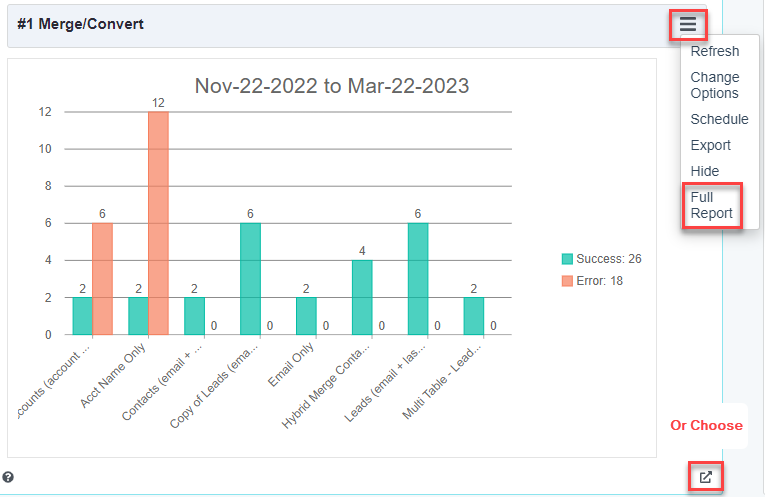
3. Specify a date range to search in the 'Search' drop box.- Choose 'Additional Options' to do an advanced search for a specific set of records.
- Under the 'Options' column, choose the menu option for a specific record.
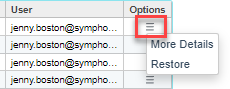
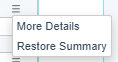
- More Details: Choose this option to view details of the merged records.
- Restore: Choose this option to restore deleted records for the group.
- A backup plan is only created for records merged after the undo/restore feature is enabled.
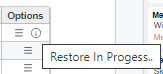
- ‘Restore’ will only be shown as an option if the group has a backup plan created. When chosen, an icon indicating the restoration is in progress until the restoration is complete. Choose 'Run' again periodically to re-run the report and check for an updated status.
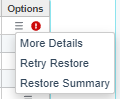
- If the restore fails, a red icon indicator will appear, and options to 'Retry Restore' or view the 'Restore Summary' will appear. See below for Restore Summary & Retry Restore details.
- If the restore succeeds, the option to view the 'Restore Summary' will appear. See below for Restore Summary details.
- If the restore fails, a red icon indicator will appear, and options to 'Retry Restore' or view the 'Restore Summary' will appear. See below for Restore Summary & Retry Restore details.
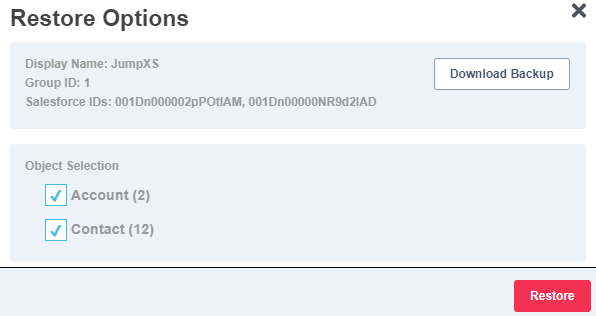
- Download Backup: Once the ‘Restore’ option is chosen, the backup files can be downloaded if desired.
- Files are encrypted during backup and decrypted during download.
- Files can be used to re-import data if the restore fails for any reasons that cannot be circumvented.
- Object Selection: An Object Selection box will pop up for related object data. Choose the object data to restore back to the record during recovery.
- It is recommended to choose all.
- Restore Summary: The options menu will display an icon indicating a restore summary is available once the restore process is complete. Choose this option to view a summary of the restoration process.
- Overview: Displays the object summary for the main and related objects to show how many records were restored. Check for errors and correct them as necessary.
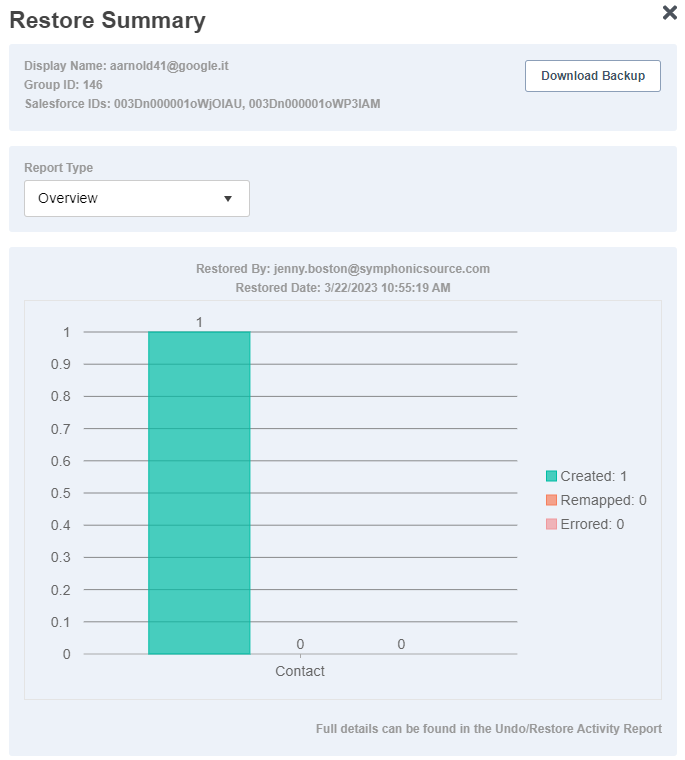
- Details: Displays the old and new IDs for restored records.

- During the restore, Cloudingo inserts a new record and populates data from the backup file. The record ID in Salesforce is changed from the original ID.
- Download Backup: Choose this option to download the decrypted backup files.
- Overview: Displays the object summary for the main and related objects to show how many records were restored. Check for errors and correct them as necessary.
- Retry Restore: Use this option to retry failed restores.
- This option only appears for groups of records where the restore process has failed.
- Failed restores can often require work before retrying the operation again. Visit the Restore Activity report to view error details.
- Restore options will appear again (the same options that appear during the 'Restore' process).
Additional Supporting Reports
- Backup Activity: Shows all records involved with the jobs performed (merges/updates) in Cloudingo and the backup plan for those records.
- Restore Activity: Shows all details involved with the restoration of records (re-mappings of record IDs).
Was this article helpful?
