Reports
- 30 Nov 2023
- 14 Minutes to read
-
PDF
Reports
- Updated on 30 Nov 2023
- 14 Minutes to read
-
PDF
Article Summary
Share feedback
Thanks for sharing your feedback!
Overview
Cloudingo offers a variety of built-in report options. The two most used post-dedupe reports are the Dedupe Audit and the Merge/Convert Summary.
The Activity Stream Error/Warning Report is critical for monitoring job failures (for both Dedupe and Data Maintenance jobs). When running automation jobs, the Automation Summary reports will provide real-time details on the job status.
Find a variety of options available from filter configurations, activity monitoring, user monitoring, and more.
Navigation
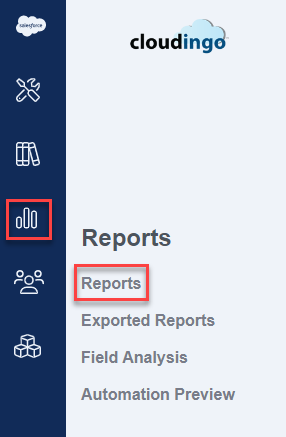
- Choose the ‘Reports’ → ‘Reports’ option from the left-hand-side navigation window.
- Tabs will appear across the top of the page for options.
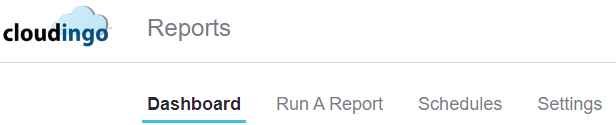
- Choose ‘Dashboard’ to view the graphical view reports enabled.
- Choose ‘Run A Report’ to run a specific report.
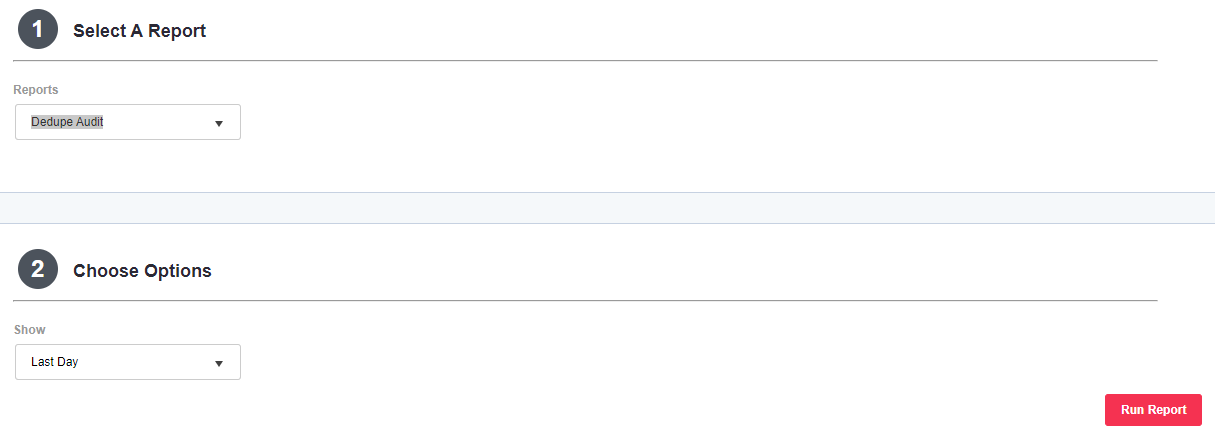
- Choose the desired report.
- Choose the date range and any other options required.
- Choose 'Run Report' to generate the report.
- Choose 'Schedules' to view/edit, add, or delete report schedules for any user and any report that can be scheduled (see report scheduling details below).

- Choose 'Add Schedule' to add a new report schedule.
- Choose 'Change Schedule' under the 'Actions' menu options to view/edit any user's existing report schedule.
- Choose 'Delete Schedule' under the 'Actions' menu options to delete any user's existing report schedule.
- Choose ‘Settings’ to default the preferred dashboard view for display.
Dashboard
Actions
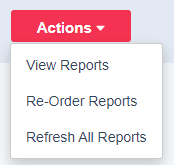
- View Reports (Enable Reports): Enable or disable reports for viewing in the Dashboard.
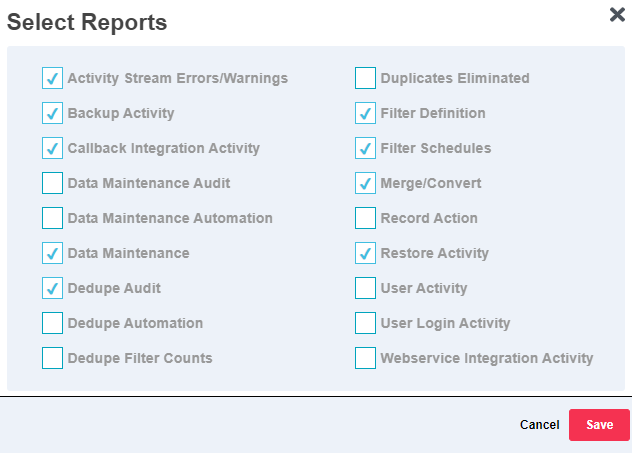
- Choose the checkbox next to any report to enable for view in the Dashboard and ‘Save’.
- Deselect the checkbox next to any report to hide from the dashboard view and ‘Save’.
- Deselect the checkbox next to any report to hide from the dashboard view and ‘Save’.
- Choose the checkbox next to any report to enable for view in the Dashboard and ‘Save’.
- Re-Order Reports: Choose to re-order reports in the displayed Dashboard view.
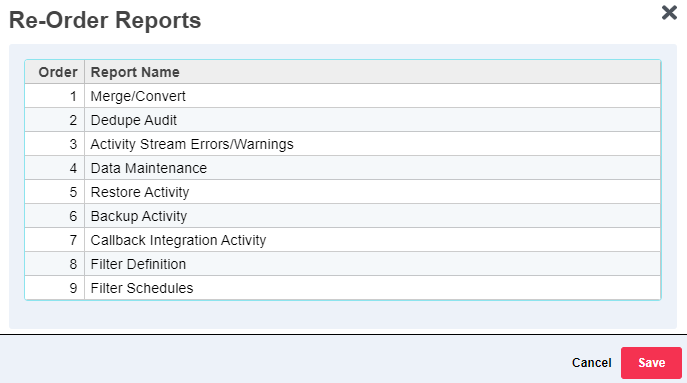
- Drag & drop reports in order as desired for display and ‘Save’.
- Drag & drop reports in order as desired for display and ‘Save’.
- Refresh All Reports: Choose to recalculate the results for all displayed reports at one time.
Dashboard Reports & Menu Options
Many reports on the Dashboard will display using a graphical view. Each report has a menu option at the top, right.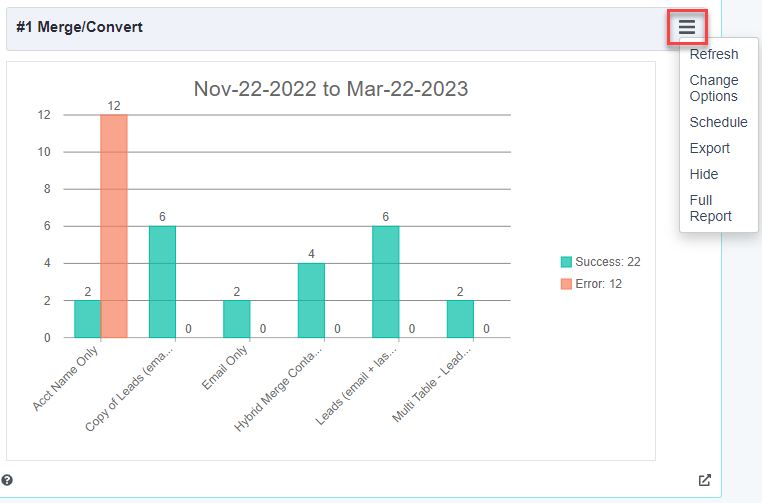
- Refresh: Choose to update results for the selected report.
- Change Options: Change the date range specified or set a custom date range.
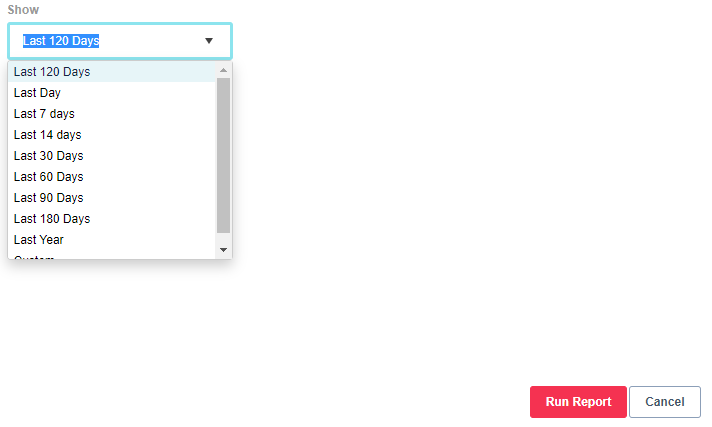
- Some reports will not allow a custom date range from the graphical view. Consider using ‘Full Report’ if applicable (see below for more details).
- Choose the 'Run Report' option to refresh the selected report using the date range specified.
- Schedule: Set up a schedule to email report results to user-defined email addresses. When chosen, scheduling options will appear.
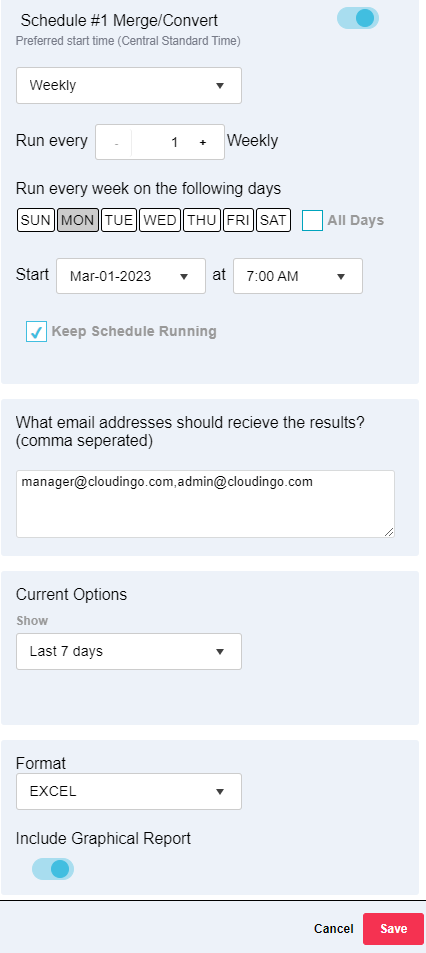
- Toggle the schedule option to the right to enable the schedule.
- Choose schedule frequency email one time, daily, or weekly.
- Set the desired daily or weekly frequencies if applicable.
- Choose a start date and time to begin sending the report.
- The time set will be the time the schedule sends future reports.
- Choose ‘Keep Schedule Running’ to allow the emailed reports to continue sending.
- Specify the email addresses that should receive the report emails.
- Separate by a comma.
- Current Options: Choose how far back the data in the report should be displayed.
- Format: Choose the desired report format (Excel or PDF).
- Include Graphical Report: Toggle the setting to the right to enable and include the graphical report with the report data.
- Save.
- Export: Choose to export the report. Exporting will only include a graphical report or graphical report with metric counts only. To export full report details, use ‘Full Report’ instead (see below). Options include:
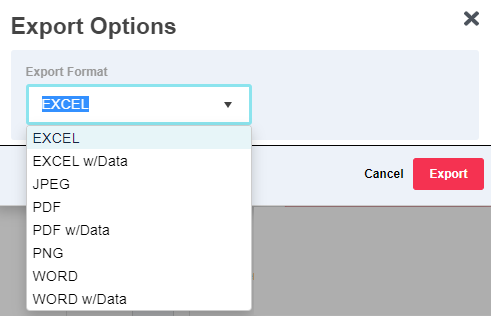
- EXCEL: Graphical report only.
- EXCEL w/Data: Graphical report with Metric Counts only.
- JPEG: Graphical report only.
- PDF: Graphical report only.
- PDF w/Data: Graphical report with Metric Counts only.
- PNG: Graphical report only.
- WORD: Graphical report only.
- WORD w/Data: Graphical report with Metric Counts only.
- Hide: Hides the report from the dashboard.
- Report(s) can be re-enabled through the 'Actions' → 'View Reports' setting.
- Report(s) can be re-enabled through the 'Actions' → 'View Reports' setting.
- Full Report: Only available on select reports. An export with underlying data is available in the Full Report. See below for more details.
Full Report
After choosing the 'Full Report' option from the dashboard report's menu options, new report options will appear.
- Choose a date range in the ‘Search’ top left drop box.
- Run: Runs the report for the selected criteria.
- Additional Options: Opens a search window where criteria can be narrowed down by Action, Success, Display Name, Salesforce ID, Object, User, or Filter Name.
- Only available on select reports.

- Only available on select reports.
- Undo/Restore: Only available on select reports and if the undo/restore feature is included with the Cloudingo license.
- Opens the undo/restore settings page.
- Export: Choose to generate a CSV file download of the underlying data provided in the report details.
- Choose ‘Export’.
- When the export is complete, the ‘Export’ button will turn green.

- Choose ‘Export’ again to download the CSV file.
- The exported CSV will display at the bottom left of the browser.

- Choose the arrow to see options to Open or Show in Folder (which opens the download folder where the report can be copied and moved to the desired save location).
- Options: The Merge/Convert History (Summary) report will have additional options related to undo/restore. See the specific report details below for more information.
Reports Available
*Output images below show the Full Report output if available.
Post Merge/Convert
- Activity Stream Errors/Warnings: Reports merge, convert, or data maintenance job failures.

- Use when the activity stream reports failures to see the full message details.
- Use when automating jobs to monitor for failures that need to be addressed.
- Details: Provides additional details from the Merge/Convert Summary (such as record IDs involved and which user processed the filter that returned the failure).
- Output Displays:
- Header: The group name.
- Text: The generic failure message (such as “convert failed”, “group skipped”, etc.)
- Error: The specific details of the error returned when the job failed.
- Source: The filter that was running when the job failed.
- Description: The type of job (merge, convert, etc.)
- Dedupe Audit Report: Reports specific records that have been merged or converted through a Cloudingo dedupe job for a specified time range.

- The Audit report can be customized to add additional fields.
- Configure a specific field rule and under the ‘Actions’ settings, enable the ‘Audit’ option.
- To ensure that the behavior of how the field value is chosen for merge/convert is not impacted, set the rule to ‘Inherit Default’ for both the rule and the override. This will allow configurations on the field for Auditing purposes only.
- Additional fields will display in a separate column within the report.
- Values displayed will be the values obtained from the records before the merge or conversion.
- The field rule for auditing must be configured before merging/converting to track the value. Records merged before enabling the audit rule will not display values for the audited fields.
- Original Output Displays:
- GroupID: The internal number for the group in Cloudingo that was updated/deleted.
- Action: The action that was performed on the records (merge, convert, etc.)
- FromType: The object the merged/deleted record came from.
- ToType: The object that the surviving/master record resided (and what object the other non-master records were merged into).
- Master: Returns a true or false value. The record ID displayed is the ‘master’ record.
- SalesforceID: The unique Salesforce Record ID for the record merged or converted.
- DisplayName: The Cloudingo Group Name for the group of records.
- MergeDate: The date & time that the merge or convert was performed.
- User: The user that performed the merge or convert.
- Dedupe Automation Report: Reports an overview of currently running or past dedupe automation jobs for the specified time range. Provides real-time feedback on jobs running to show which jobs are queued or scheduled.
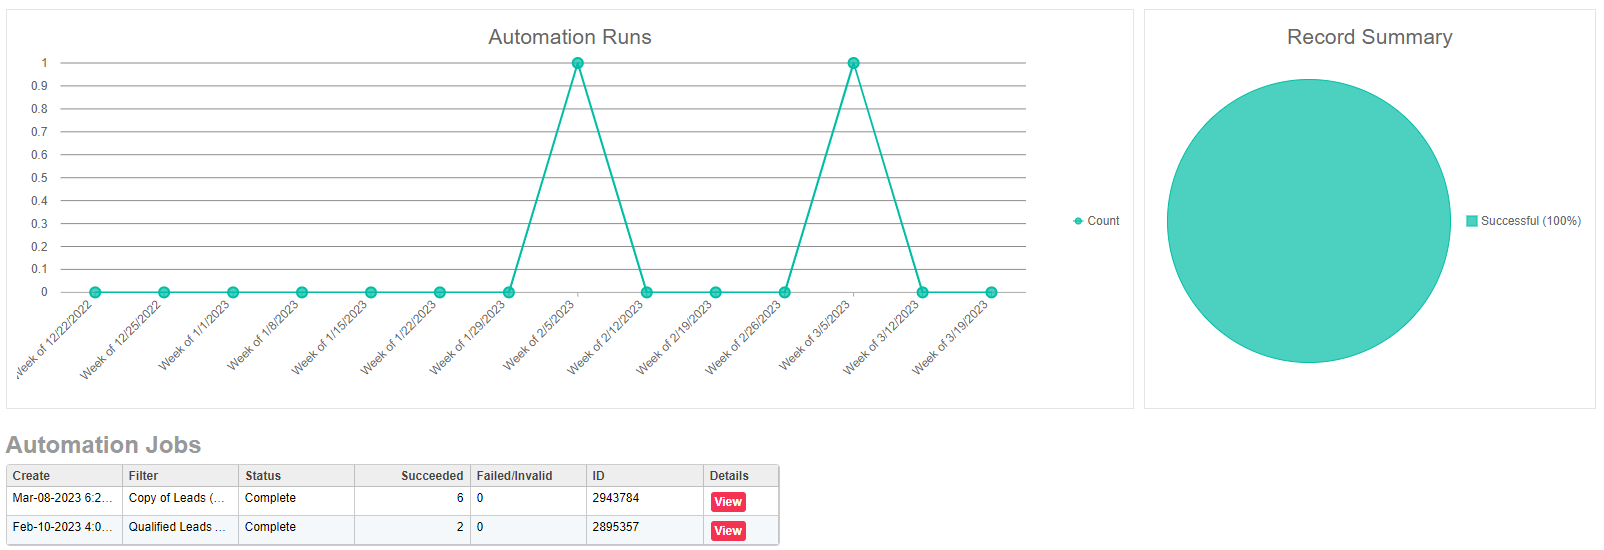
- Output Displays:
- Automation Runs: Shows a timeline of jobs that have run or are running. Hovering over the points on the line will provide additional details.
- Automation Jobs: Lists each job that has run or is running with the current status and results. The ‘View’ hyperlink provides specifics of an individual job.
- If a job is canceled without explanation, check the ‘View’ button to see details on why the job was canceled. Too many repetitive errors can cause automation to be halted to prevent wasting API resources. Resolve the errors and restart the job.
- Record Summary: Provides a real-time time graphical representation of the status of an automation job.
- Currently Running: Shows automation jobs in process. Stop a job by choosing the ‘Stop’ option.
- Upcoming/Queued Jobs: Lists any jobs that have not yet been started, but are planned.
- Output Displays:
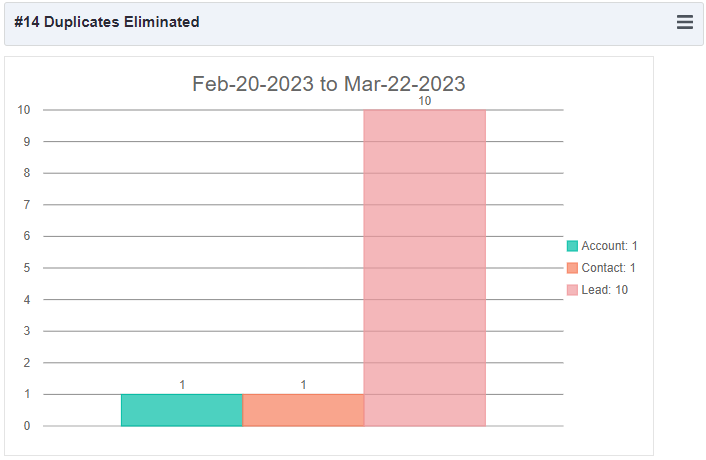
- Duplicates Eliminated Report: Reports the total count of duplicates per object that have been eliminated during the specified time range.
- Merge/Convert Report: Reports specific duplicates eliminated from within Cloudingo for the specified time range.
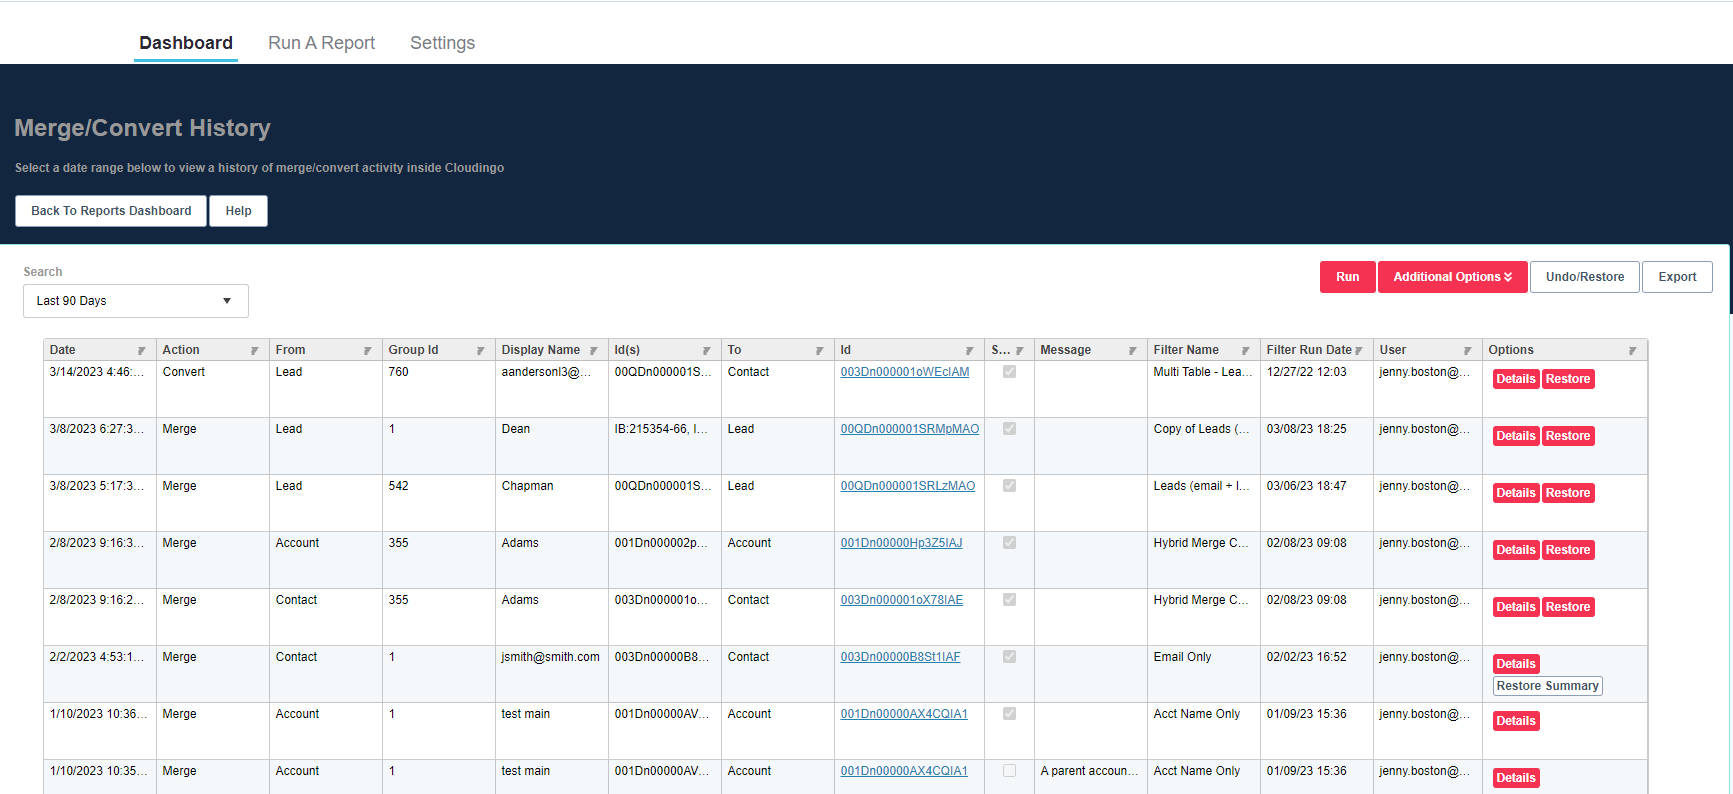
- The final record is listed as a hyperlink into Salesforce.
- Choose the report’s menu option to go to ‘Full Report’ to specify a date range and do extensive searches for a particular record.
- Undo/Restore: Opens the undo/restore settings page.
- Only available when the undo/restore feature is included in the Cloudingo license.
- In the full report, additional options will appear:
- Details: Displays details of a group of records that were merged.
- Restore: Restores merged records that have a backup plan created if the undo/restore feature is enabled. See the undo/restore help article for more details.
- Only available when the undo/restore feature is enabled.
- Download Backup: After choosing 'Restore', users will have the ability to download the backup files. The files are decrypted during the download process.
- Retry: If a restore fails, an option to retry the restore will appear.
- Output Displays:
- Date: Date of the merge or conversion.
- Action: The action that was performed on the records (merge or convert).
- From: The object the merged/deleted record came from.
- Display Name: The group name for the group of records.
- ID: The unique Salesforce Record ID for the record that was merged/deleted (the non-master ID).
- To: The object that the surviving/master record resided (and what object the other non-master records were merged into).
- ID: The unique Salesforce Record ID for the master/surviving record that the other record(s) were merged into.
- The first ID column is the list of ID(s) that were merged/deleted and the second ID column is the master/surviving record ID.
- If multiple records were converted into the same master record, the ‘From’ ID column will display all Salesforce Record IDs combined into one column.
- Success: Returns a true or false indicating that the merge or convert was completed successfully.
- Filter Name: The filter that was being used at the time the merge or convert was performed.
- Filter Run Date: The last time the filter calculation was performed before the merge or conversion.
- User: The user that performed the merge or convert.
- Record Action Report: Reports counts per job type (address validation, convert, merge, update, etc.) per day to show what type of activity is being performed within Cloudingo during the specified time range.
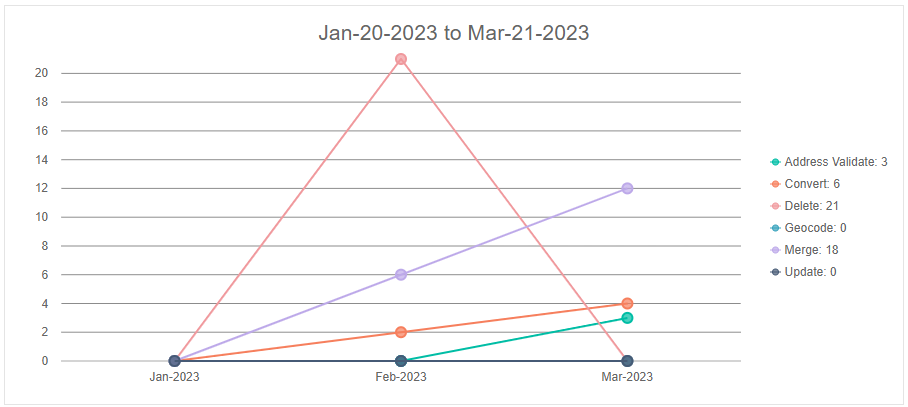
- Change Options: From within the report's menu options, in addition to date selection, additional filtering options by metric type, platform objects, Action Sources, and Display Method are available.
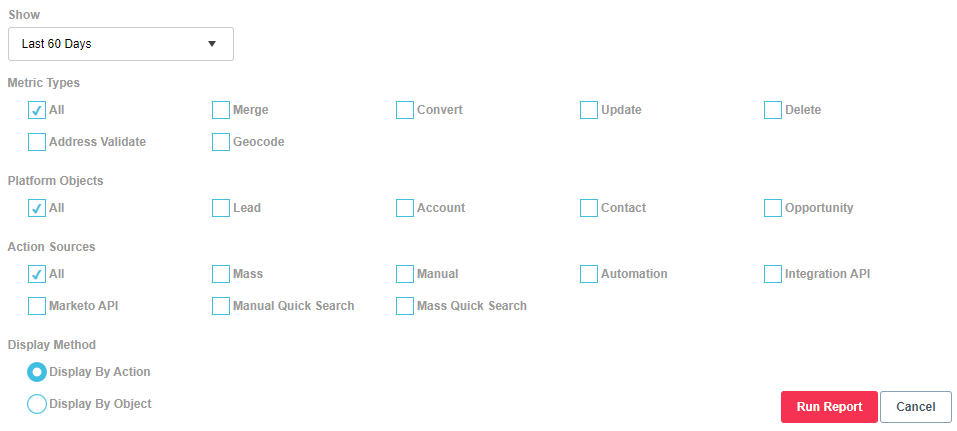
- Change Options: From within the report's menu options, in addition to date selection, additional filtering options by metric type, platform objects, Action Sources, and Display Method are available.
Data Maintenance
- Activity Stream Errors/Warnings Report: Reports merge, convert, or data maintenance job failures. See above for more information.
- Data Maintenance Audit Report: Reports specific records updated or deleted through a Cloudingo Data Maintenance job for the specified time range.

- Output Displays:
- GroupID: The internal number for the group in Cloudingo that was updated/deleted.
- Action: The type of job performed (Data Maintenance).
- FromType: The object that the filter was created on (Contact, Lead, Account, etc.) to obtain the records desired for update.
- ToType: The object that filter was created on (Contact, Lead, Account, etc.) for update.
- In most cases, the from type & to type will be the same on Data Maintenance jobs except Update Matching jobs.
- Master: Displays a True or False value.
- Record ID displayed is the ‘master’ record (or record chosen for update when evaluating Data Maintenance results).
- SalesforceID: The unique Salesforce Record ID for the record updated/deleted.
- DisplayName: The unique display name for Data Maintenance filter results.
- MaintenanceDate: Date Data Maintenance job was performed.
- User: indicates the user that was logged into Cloudingo performing the merge or convert.
- Output Displays:
- Data Maintenance Automation Report: Reports an overview of currently running or past data maintenance automation jobs for the specified time range. Provides real-time feedback on jobs running to show which jobs are queued or scheduled. Same display as the Merge/Convert Automation Report (see above).
- Output Displays:
- Automation Runs: Shows a timeline of jobs that have run or are running. Hovering over the points on the line will provide additional details.
- Automation Jobs: Lists each job that has run or is running with the current status and results. The ‘View’ hyperlink provides specifics of an individual job.
- Record Summary: Provides a real-time graphical representation of the status of an automation job.
- Currently Running: Shows automation jobs in process. Stop a job by choosing the ‘Stop’ option.
- Upcoming/Queued Jobs: Lists any jobs that have not yet been started but are planned.
- Output Displays:
- Data Maintenance Report: Reports specific records that have been updated from Salesforce through a Cloudingo Data Maintenance job for a specified time range. Additional search options are available under the 'Additional Options' option.
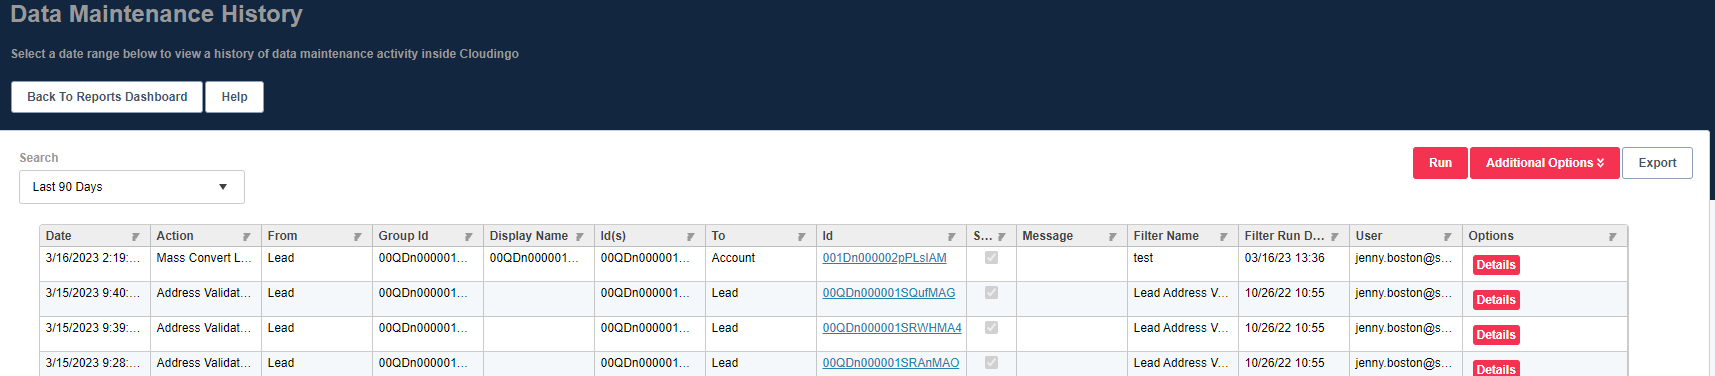
- Output Displays:
- Date: The date records were updated or deleted.
- Action: The action that was performed on the records (update, delete, etc.)
- From: Indicates the master record object the updated record/value came from; or the object for the record that was deleted.
- ID: The unique Salesforce Record ID for the master record that was providing the update/value; or the ID for the record that was deleted.
- To: Indicates the non-master record object that the updated record resided; or the object for the record that was deleted.
- ID: The unique Salesforce Record ID for the non-master record(s) that were updated; or the ID for the record that was deleted.
- The ‘From’, ‘ID’, and ‘To’ fields will most likely be the same for this report on records that have been updated or deleted using Data Maintenance filters, except for Update Matching jobs.
- Success: Returns a true or false value indicating that the merge or convert was completed successfully.
- Message: The message reason for failed updates/deletes.
- Job Name: The filter that was being used at the time the update or delete was performed.
- Job Run Date: The last time the filter calculation was performed before the update or delete.
- User: The user that was logged into Cloudingo performing the update or delete.
- Output Displays:
Filters
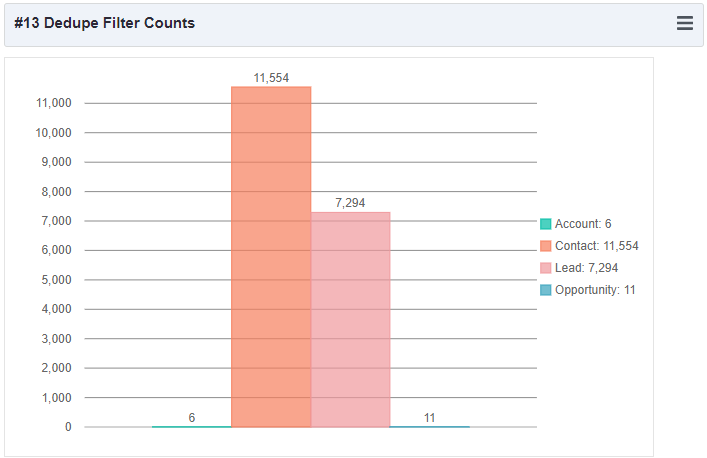
- Dedupe Filter Counts Report: Reports current counts for all dedupe dashboard filters. Filters may need to be recalculated to reflect the change in counts.
- Filter Definition Report: Reports filter configuration details for all filters and users (matching criteria, record/group limit criteria, rules assigned, and more).

- Filter Schedules Report: Reports all filters actively scheduled.

- Output Displays:
- Filter Name: The name of the filter that is scheduled.
- Email Address: The email of the user's dashboard that the filter is scheduled under.
- Platform: The Platform name of the connected environment where the filter is scheduled.
- Run Automation: 'True' means that the schedule is configured to run the job not just calculate. If 'False', the schedule is configured to recalculate the results only, but not process the job.
- Occurrence Type: The schedule's recurring setting (daily, weekly, monthly, etc.)
- Interval: The schedule's recurring interval based on the Occurrence Type (Run every '1' day, every '2' days, etc.).
- Occurrence Inclusion: The schedule's specified run details if populated based on Occurrence Type (ex: run every week on the following days 'Monday', 'Tuesday', etc.).
- Start Date: The date the schedule was set to start.
- Next Run Date: The date the schedule is set to run next based on the specified schedule.
- End Date: The date the schedule is configured to end (if not set to 'Keep it going').
- Filter Calculated Date: The date the filter was last calculated.
- Last Automation Run Date: The date the filter was last run via an automation job.
- Output Displays:
Undo/Restore
Undo features are utilized through the Merge/Convert Summary report detailed in the Post Merge/Convert or Data Maintenance section above. Other reports include:
- Backup Activity: Reports the backup plan details on groups of records merged when the undo/restore feature is enabled.

- Output Displays:
- BackupPlan: The name of the backup plan assigned.
- BackupJobID: An internal auto-assigned ID on the batch job performed on any given group of records (one ID per backup job).
- Backup Name: An internal auto-assigned name on the batch job performed on any given group of records (one Name per backup job).
- Object Name: The name of the Object associated with the backup job.
- There may be multiple objects related to the backup, so it is not uncommon to see related objects in addition to the main object in the backup plan.
- Backup Date: The date that the merge/convert/update/delete was performed and when the backup plan was generated for the group of records.
- Backed up By: The user that performed the merge/convert/update/delete that triggered the backup plan for the group of records.
- Output Displays:
- Restore Activity Report: Reports back all restoration details on groups of records using the Undo/Restore feature. Details are only captured on jobs performed after the feature has been enabled.

- Output Displays:
- BackupPlan: The name of the backup plan assigned for your organization.
- Object Name: The name of the Object associated with the backup job (there may be multiple objects related to the backup, so it is not uncommon to see related objects in addition to the main object in the backup plan).
- Original ID: The Salesforce record ID on the record before deletion/restoration (there may be multiple objects related to the backup, so it is not uncommon to see related objects in addition to the main object in the restoration details).
- New ID: The Salesforce record ID that was created after restoration (Cloudingo creates a copy of the previously backed up record and inserts a new record during the restore process using the data from the backup - the record ID does physically change during the restoration process).
- Success: ‘True’ indicates that the restoration was successful; ‘False’ indicates that the restoration failed.
- RestoreMessage: If the restoration failed, details reported back from Salesforce on why the restore plan failed will be provided (the error message returned from Salesforce).
- Restored Date: The date that the restore request was initiated.
- Restored By: The user that initiated the request to restore the group of records.
- Output Displays:
Integrations
- Callback Integration Activity: Only needed when API Callback Integration is configured and enabled.
- Webservice Integration Activity: Only needed when API Webservice Integration is configured and enabled.
User & Activity Monitoring
- User Activity Report: Reports back all user activity within Cloudingo.
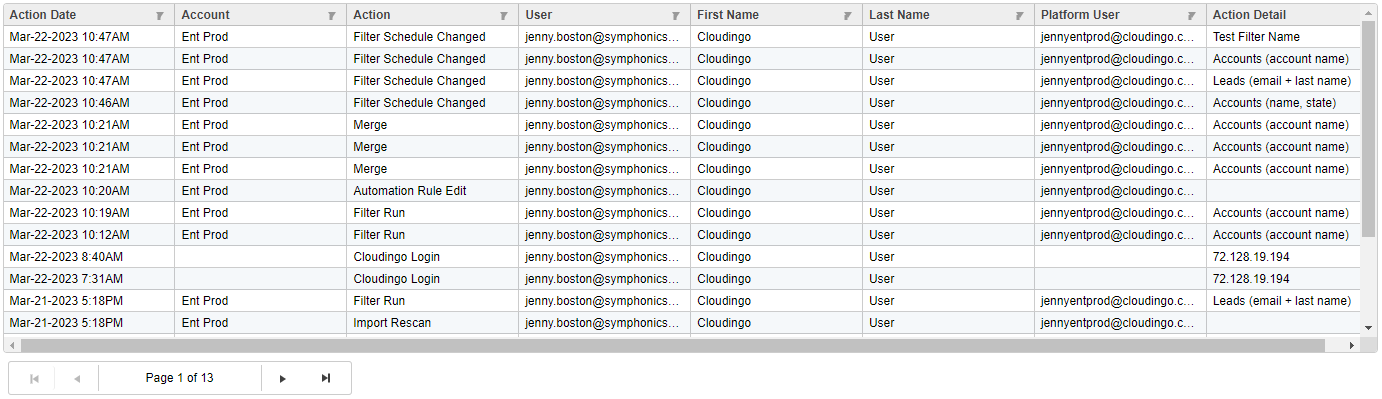
- Limited to multi-user licenses and Admin users.
- Limited to multi-user licenses and Admin users.
- User Login Activity Report: Reports back all Cloudingo dates & times for user logins.

- Limited to multi-user licenses and Admin users.
Was this article helpful?
