Import Basics
- 02 Jul 2024
- 4 Minutes to read
-
PDF
Import Basics
- Updated on 02 Jul 2024
- 4 Minutes to read
-
PDF
Article summary
Did you find this summary helpful?
Thank you for your feedback!
Overview
Importing in Cloudingo consists of uploading a CSV file, scanning the file using a filter to identify the matches, merging the file duplicates into the existing records, and pushing any remaining records that do not have a match into Salesforce as new. When merging, choose to override existing data or keep existing data based on the rule selected. Attach the records to a campaign and rescan the file against as many filters as desired to identify all potential matches.
4 Tips Before Getting Started with Import
Before you get started with the Cloudingo import tool, learn these four tips first:
- Know the Rule Requirements: If the file data is more valuable than the existing data detected, set up Import Rules to override the data during the merge.
- Example: To retain more up-to-date phone numbers, set up a field-level rule in the Import Rule for the Phone field using the ‘Incoming Record (import or API value)’ and ‘Always override master with a value’ settings.
- To update only blank fields with file data, rules should already accommodate this. If previewing import results deems undesired results for blank values, create an import rule and set the Default field rule to ‘override the master when blank’ settings. For more information on setting up import rules, visit the Creating Filters & Rules for Import help article.
- Keep the Import Wizard Clean: To avoid skewing the dedupe results, complete the import process or delete the uploaded file if not needed.
- By default, dedupe dashboard filters will detect matches with incomplete import records.
- New upload files can detect matches with other incomplete import records.
- File Limitations: There are a few import file limitations.
- The Import Wizard allows importing CSV or tab-delimited files of up to 20 MB.
- Cloudingo works with UTF-8 characters, but some special characters may cause limitations.
- Convert to UNICODE using by saving the file in Excel as "Unicode Text".
- Copy/paste the file data into Notepad and save as UTF-8. Save with a file name extension of .csv (Yes, we know that it really is not a CSV file, but it works.)
- Associating Campaigns: Cloudingo import allows for campaign assignment to both new and existing Contacts and/or Leads.
Steps for Importing
- Choose Data:
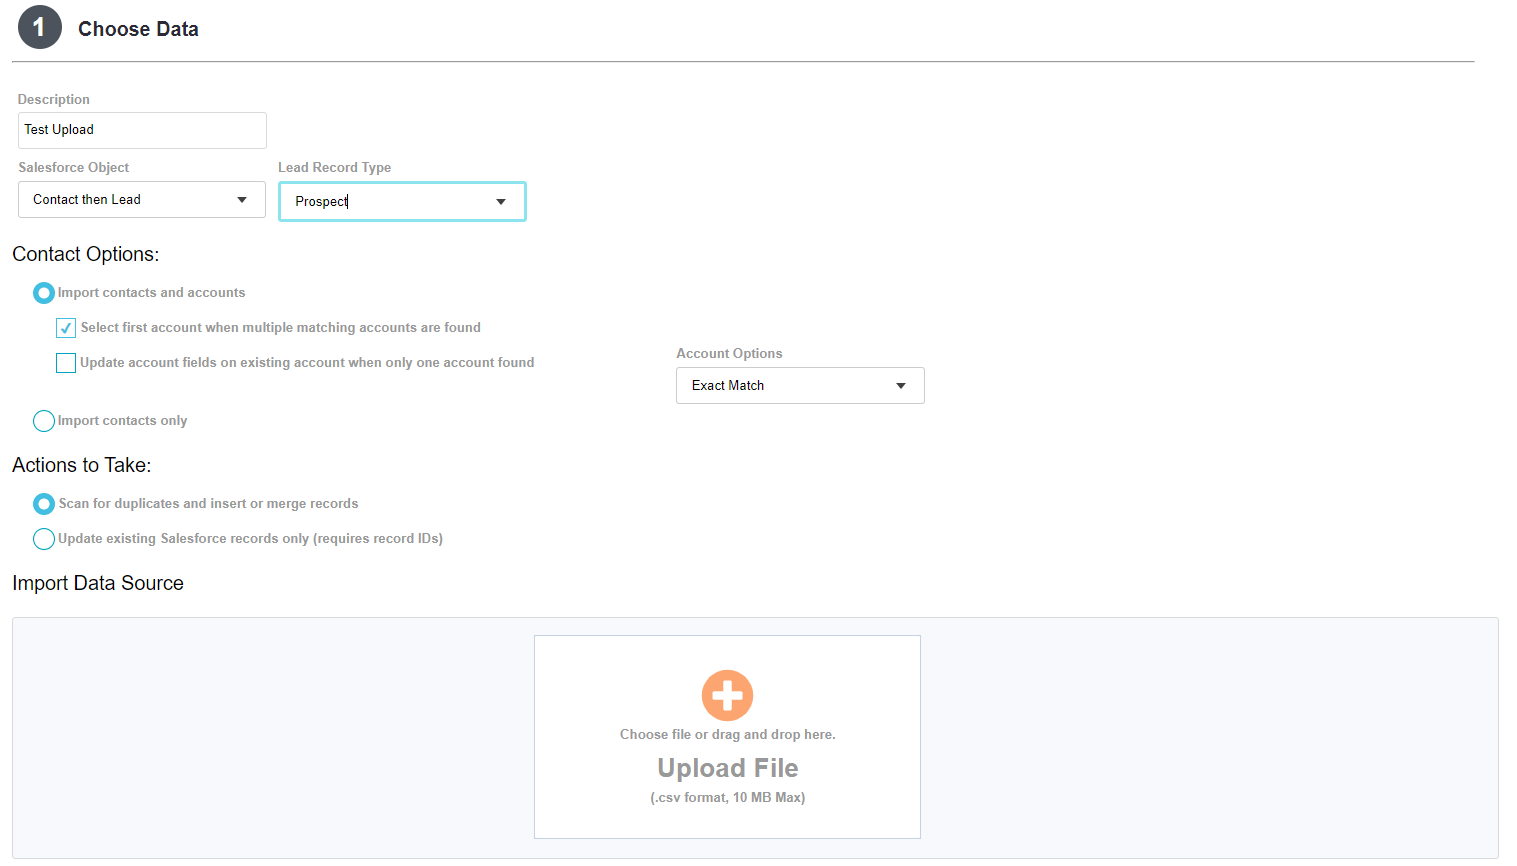
- In the 'Salesforce Object' dropdown, choose the object for import.
- Select 'Contact then Lead' to scan Contact/Account + Lead objects with one upload.
- Under the 'Account Options' dropdown, choose 'Exact' or 'Company Name Cleaned' to tell Cloudingo how to scan for matching accounts.
- This option only applies for imports running against Contacts.
- This option only applies for imports running against Contacts.
- In the 'Salesforce Object' dropdown, choose the object for import.
- Add Tracking (optional):
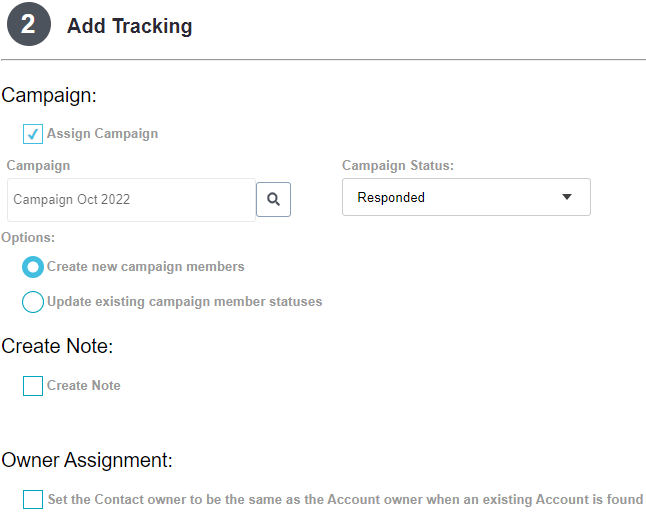
- Choose the 'Assign Campaign' checkbox.
- Choose the campaign using the search icon to search the campaign list.
- Choose the campaign status for the members in the upload.
- Choose the 'Create new campaign members' option to create new members not already assigned to the campaign during the merge and push process.
- Choose the 'Update existing campaign member statuses' option to update the status for any existing campaign members already associated with the campaign.
- Both options can be enabled.
- Campaign assignment applies to all records merged or pushed.
- Map Columns: In Step 3, map the file columns to the corresponding Salesforce fields.
- Map Contact fields first and then Lead fields if scanning both objects.
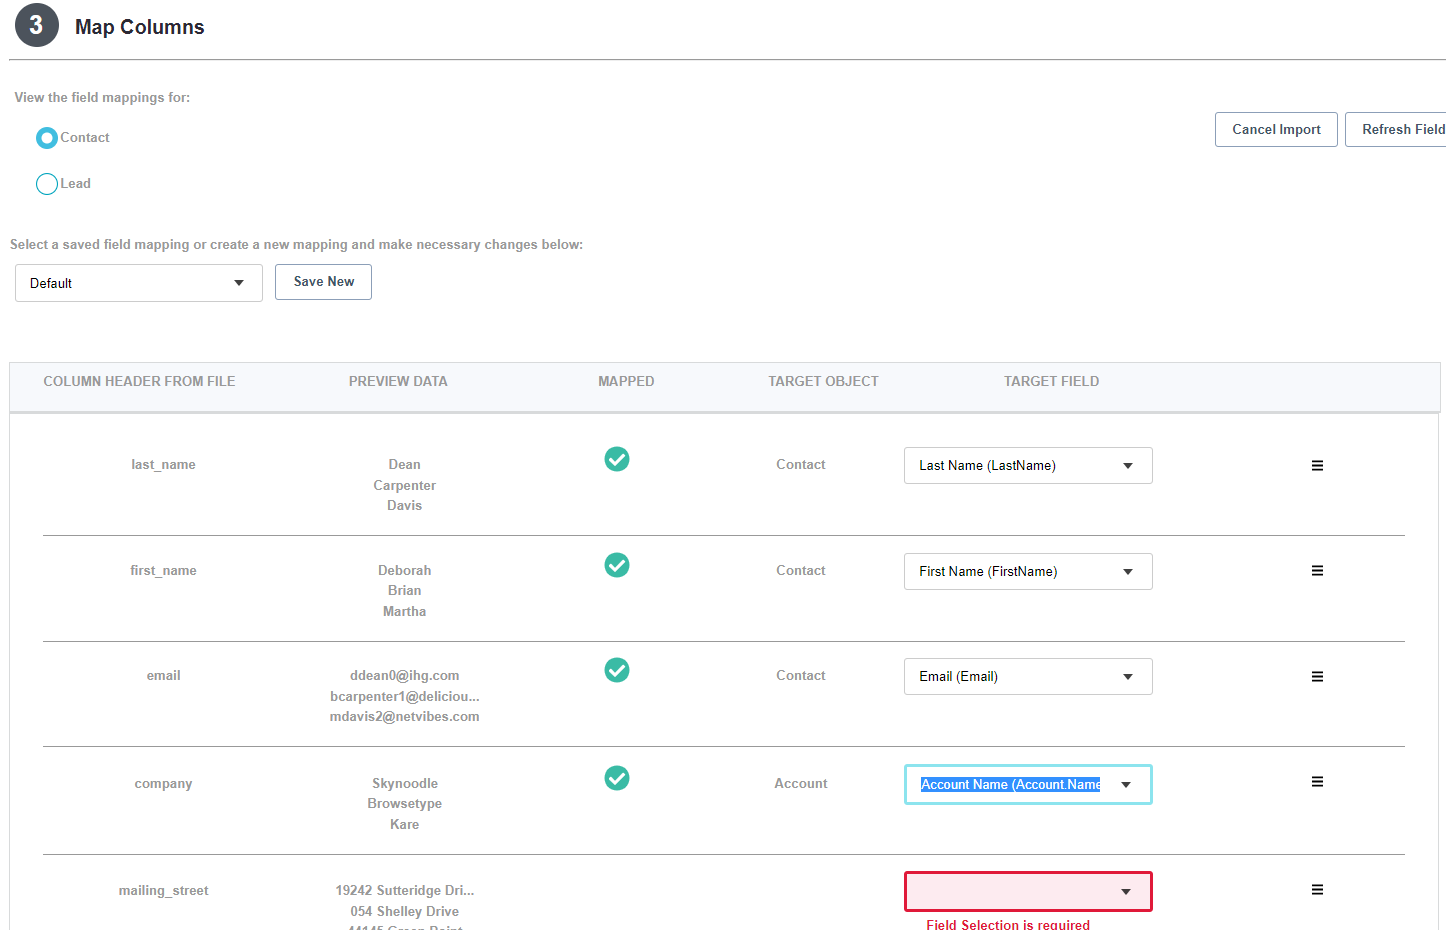
b. Switch between the Contact and the Lead field mapping screens by selecting the radio buttons near the top of Step 3 if scanning both objects.
- Map Contact fields first and then Lead fields if scanning both objects.
- Preview import data and mappings in Step 4.
- Cloudingo will perform pre-validation checks to detect any errors detected and display an alert. Correct data issues using in-line editing.
- Cloudingo will perform pre-validation checks to detect any errors detected and display an alert. Correct data issues using in-line editing.
- Scan for Duplicates, merge detected matches, and push in new records to Salesforce: In Step 5 and Step 6, run filters and scan for duplicates. Scan and rescan as many times as needed to find and manage duplicates. Then push in the unique records.
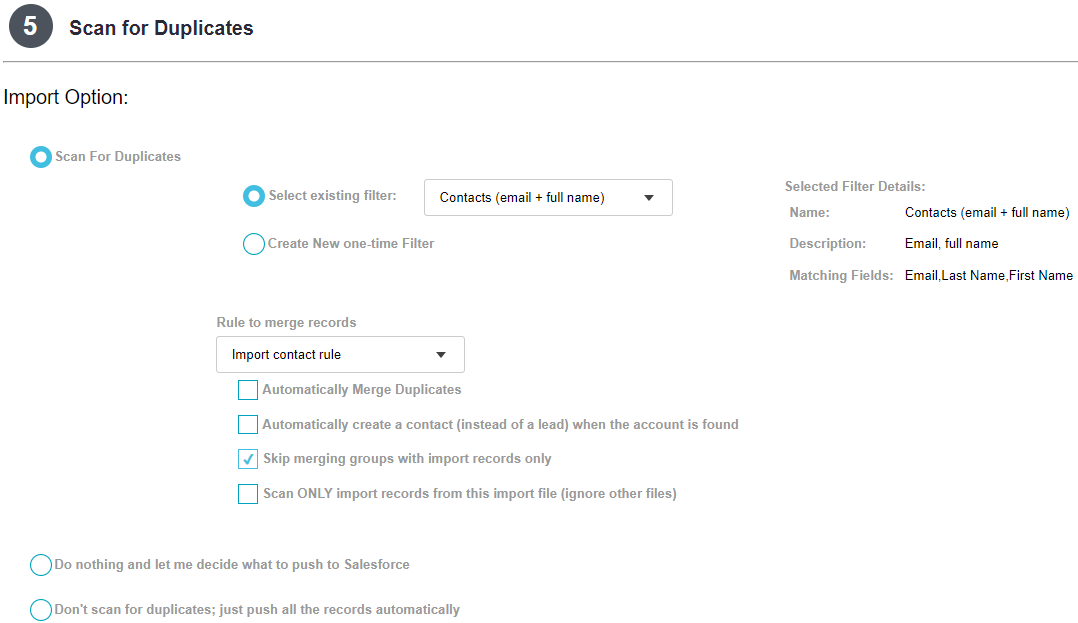
- First Scan:
- Start by using the tightest filter on the first scan of the import file in Step 5 of the Import Wizard.
- Review results for accuracy and ensure values are overriding (or not overriding) as expected.
- Merge the duplicates detected.
- Rescan (optional):
- Select all remaining records, then use the Rescan option from Step 6 to go back to Step 5 to scan the file against additional filters.
- On additional passes, use looser filters or different fields to scan for duplicates.
- Find duplicates using “OR” logic by rescanning the file against additional filters using different matching criteria.
- Push Records to Salesforce:
- After completing the scanning and merging process, select ‘Push’ to send the unique records to Salesforce.
- First Scan:
Note Regarding Multi-Object Imports:
Scan Contacts first, merge, then use Rescan to scan Leads.
- In Step 5, uncheck the ‘Create a Contact (instead of lead) when the account is found’ checkbox so that new contacts with an associated account are not automatically inserted until after all scans have been completed. Do a final scan against the Contacts with this option chosen to create records as new Contacts instead of Leads if Cloudingo detects an Account match.
- Alternatively, push in all remaining records without a match in as Leads and mass convert any with a Contact or Account match later.
Exporting Results

- In Step 4, select records to re-export into a new CSV file and click the Export button if desired.
- In Step 6, export a list of selected records, including the record status, duplicate information, and mapped fields.
Warning!
Cloudingo automatically deletes all file uploads after 30 days. Recommended practice is to export all import results to CSV and store them locally.
This is just an overview of Import Basics. For more detailed information on import filters, rules, and the process, refer to the import-specific help article.
Was this article helpful?
