Overview
Cloudingo's Find Data feature allows users to upload data from a spreadsheet to search for matching data in Salesforce for any object and field. The uploaded file can be scanned to check if related records already exist in Salesforce. Users can specify the field values they want to retrieve from Salesforce if a match is found, including related object data. The search results can be downloaded in a .csv file format for further processing, importing, or updating Salesforce records.
Navigation
- Open the Import window. Choose the ‘Tools’ → ‘Find Data’ option from the left-hand-side navigation window.

- Choose ‘Start Wizard’ to upload a new file.
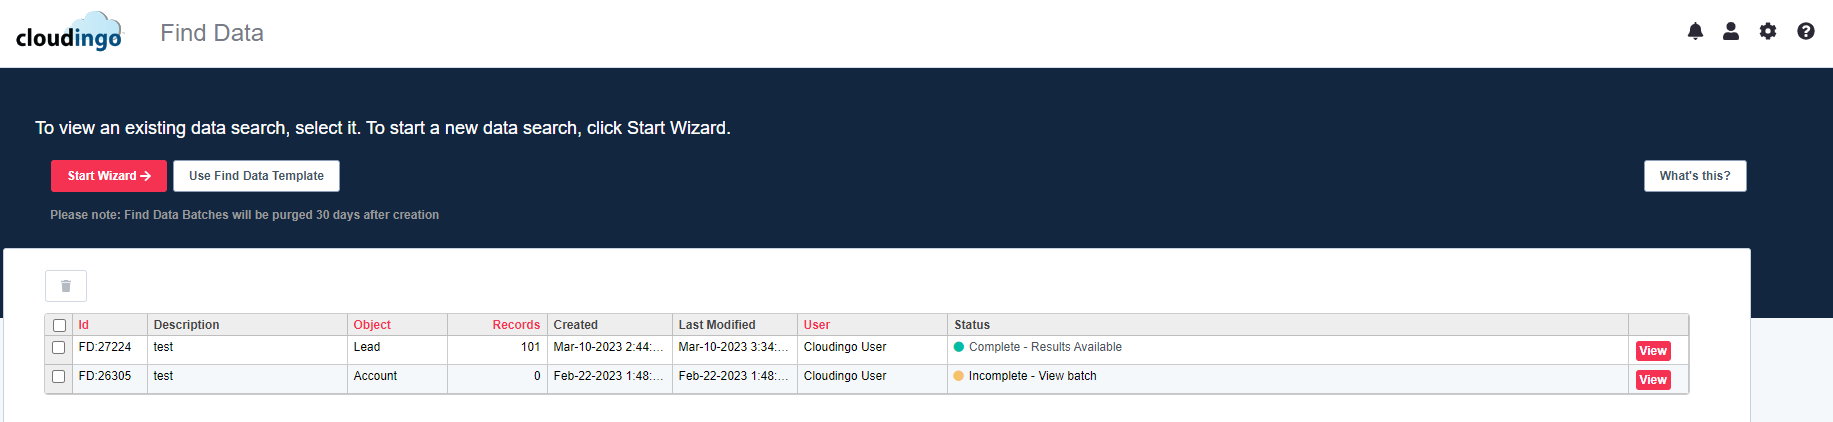
- ‘Use Find Data Template’ can be used after a prior Find Data job has been created and saved as a template for later use (see step 4 below for saving jobs as a template). If templates have been saved, the option allows users to upload a file using pre-built definitions to search and pull back data.
- After choosing this option, upload the file.
- After the file is uploaded, choose the template that should be used to process the file and hit 'Start'.
- ‘Use Find Data Template’ can be used after a prior Find Data job has been created and saved as a template for later use (see step 4 below for saving jobs as a template). If templates have been saved, the option allows users to upload a file using pre-built definitions to search and pull back data.
- Choose ‘View’ from a specific import on the far right to get back into an existing upload.
- To delete a prior job, click the checkbox next to the job and hit the delete icon.
- Choose ‘Start Wizard’ to upload a new file.
Step 1: Choose Object and Upload File
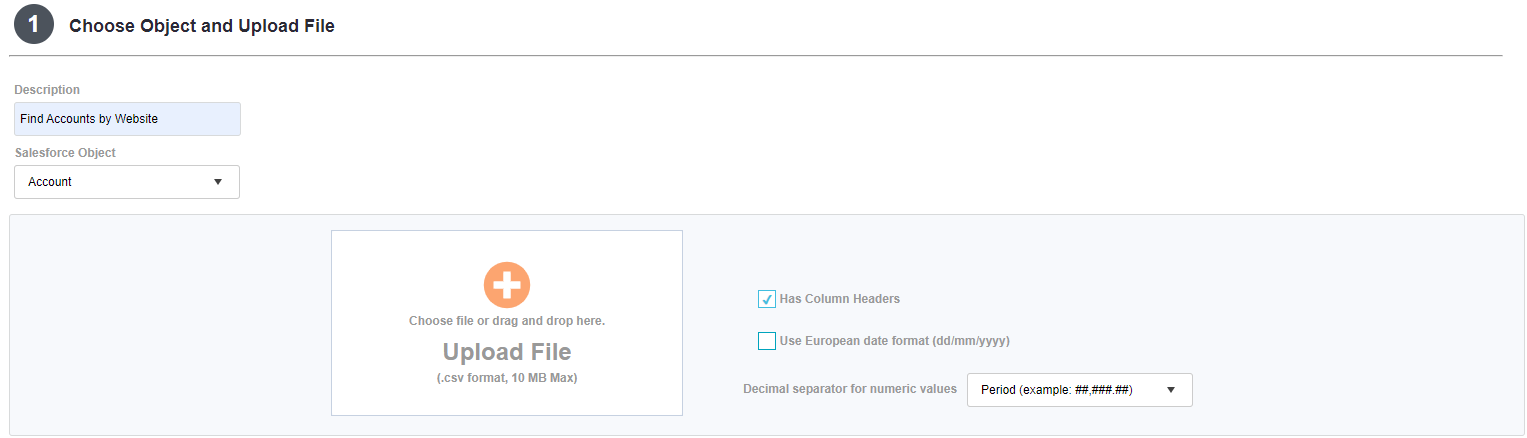
- Description: Give the upload a descriptive name.
- Salesforce Object: Choose the object that the file will be searching against to identify matches.
- Upload File: Choose the plus sign to browse for the file or drag and drop the file to the selected area. File must be in CSV format, and less than 10MB in size.
- Has Column Headers: Leave selected if the file contains a header row.
- Use European date format (dd/mm/yyyy): Default is US date format (mm/dd/yyyy).
- Decimal separator for numeric values: Enable to use a non-US format for numeric values (ex: 1.000,00 for currency vs 1,000.00).
Step 2: Select & Map Fields
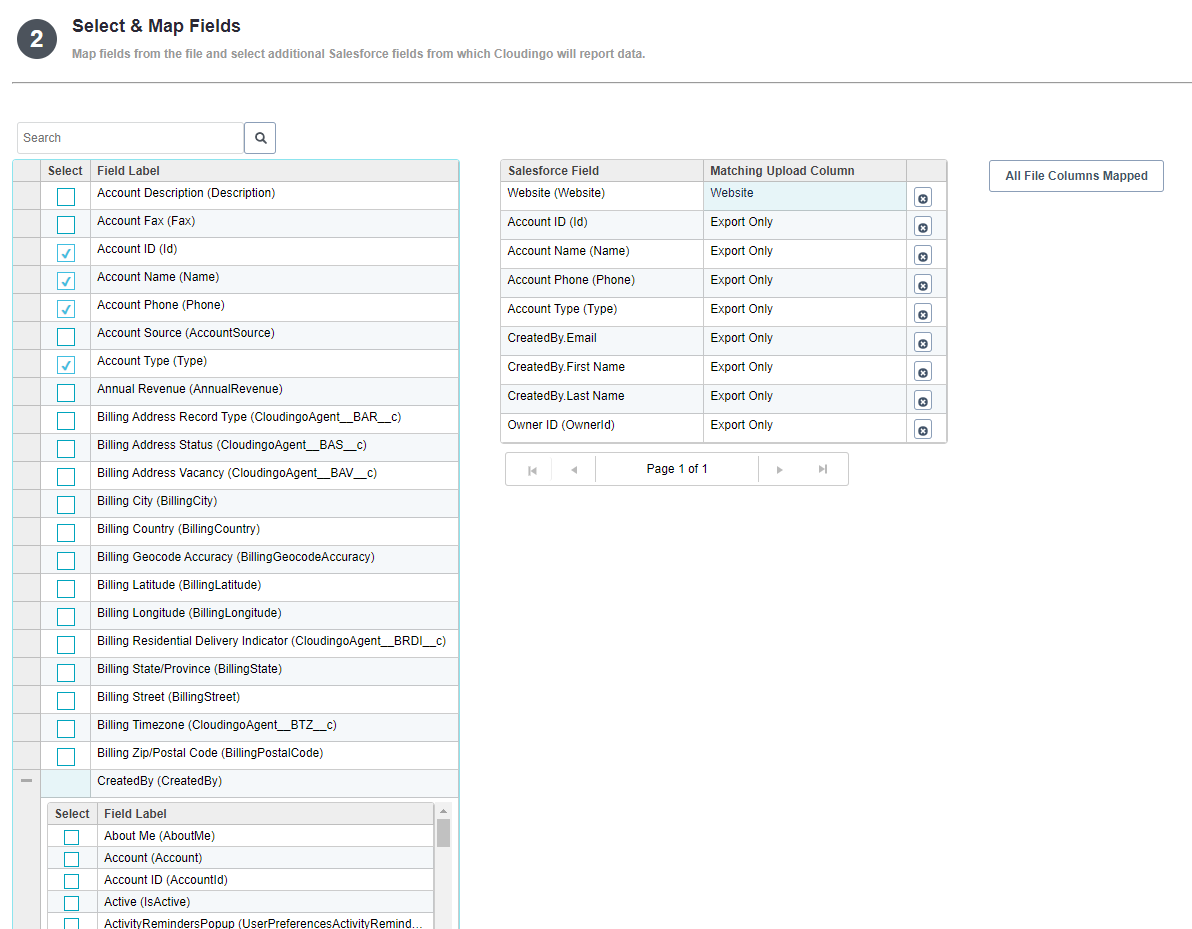
- Cloudingo will attempt to automatically map columns where the column header name is the same as the Salesforce field name. Verify accuracy on auto-mapped fields.
- Fields being used for matching criteria must be mapped. All other fields can be set to ‘Export Only’ to pull back the record data from Salesforce if a matched record is detected.
- Mapped fields will retain the import column data in the exported data.
- At least one field must be mapped with a corresponding Salesforce field.
- Fields being used for matching criteria must be mapped. All other fields can be set to ‘Export Only’ to pull back the record data from Salesforce if a matched record is detected.
- Add any additional fields to the job by clicking the checkbox next to the field name. The field will be added to the selected list and set to ‘Export Only’.
- To choose a field from a related object, choose the plus sign to expand the related object field list and choose the desired fields.
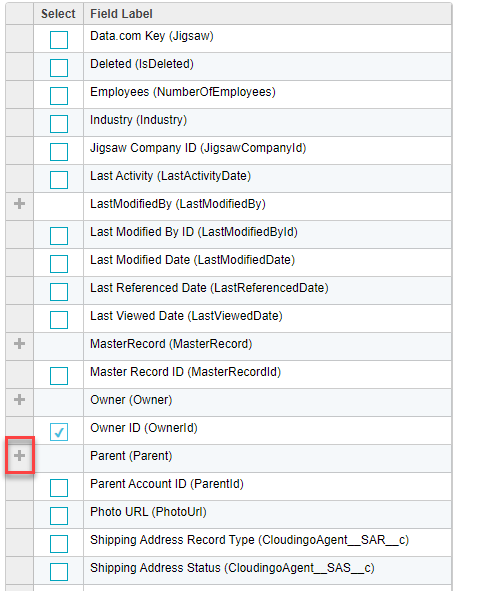
- To choose a field from a related object, choose the plus sign to expand the related object field list and choose the desired fields.
- To un-map a field and make it export only, click into the field’s ‘Matching Upload Column’ box and change the field name to ‘Export Only’.
- To remove a field from the mappings and from export, click the ‘x’ next to the selected field on the right side.
- Fields provided in the file that are unmapped will appear in a red box labeled ‘Upload Column(s) not Mapped’. Choose this option to view unmapped fields.
Step 3: Limit Results (optional)
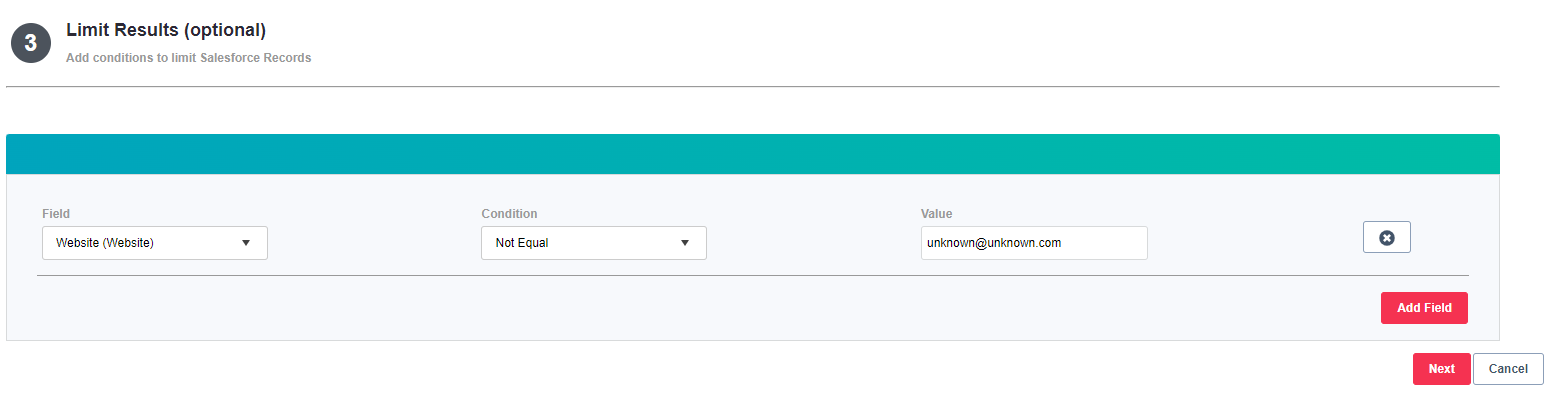
- Define criteria to limit the records results to a specific subset (such as Record Type).
- Choose ‘Add Field’.
- Choose a field in the ‘Field’ drop box.
- Set a condition in the ‘Condition’ drop box (such as Equal, Contains, Has a value).
- Specify a value for the criteria if required. Not all conditions require a value.
- Repeat steps until all limits are set as desired.
Step 4: Match Criteria
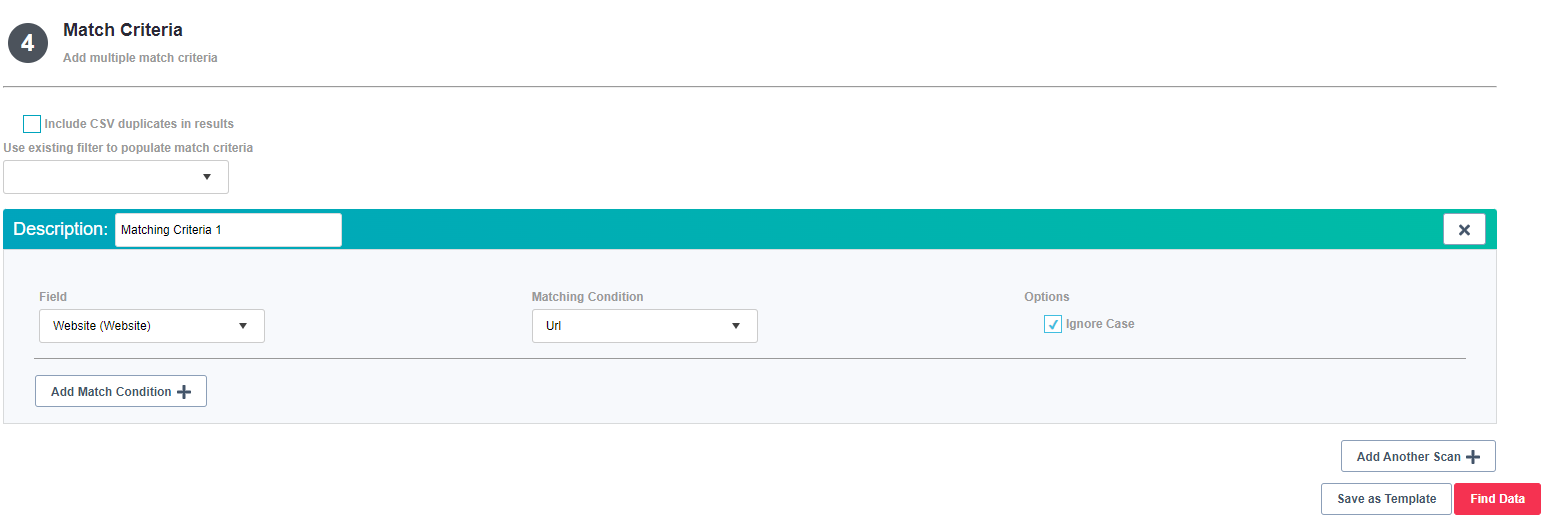
- Include CSV duplicates in results: Enable to include original rows from the file (even if no match detected).
- Select existing filter: Instead of building filter criteria from scratch, choose the ‘Use existing filter data’ to choose a pre-built dedupe filter from the drop list to serve as a template for the matching criteria. Adjust criteria as necessary.
- See the Creating Filters & Rules for Import article for more guidance.
- Make sure if using a pre-built filter that the fields are properly mapped in step two. Unmapped fields will show an error when trying to be used for matching criteria.
- Matching Criteria: Build filter criteria on the flyinstead of using a pre-built filter. If building a filter using fields that have not yet been indexed, in some cases Cloudingo may force a re-index on the object before the Find Data job can be started.
- Choose the ‘Add a Scan’ option.
- Choose the Field, Matching Condition, and Options settings.
- Continue using the ‘Add Match Condition’ to add additional matching criteria.
- To have Cloudingo perform an additional scan using a different filter to identify matches, use the ‘Add Another Scan option’ and set up a second set of filtering criteria. Cloudingo will use ‘or’ logic when scanning (ex: first filter on Email match, 2nd filter on phone match, results will return results where email or phone is a match, but not necessarily both are a match).
- Repeat adding additional scans until all filters have been configured.
- Choose the ‘Add a Scan’ option.
- Save as Template: Choose the ‘Save as Template’ to save all steps to a template for later use.
- Find Data: Choose the ‘Find Data’ button to start the scan.
Step 5: Results
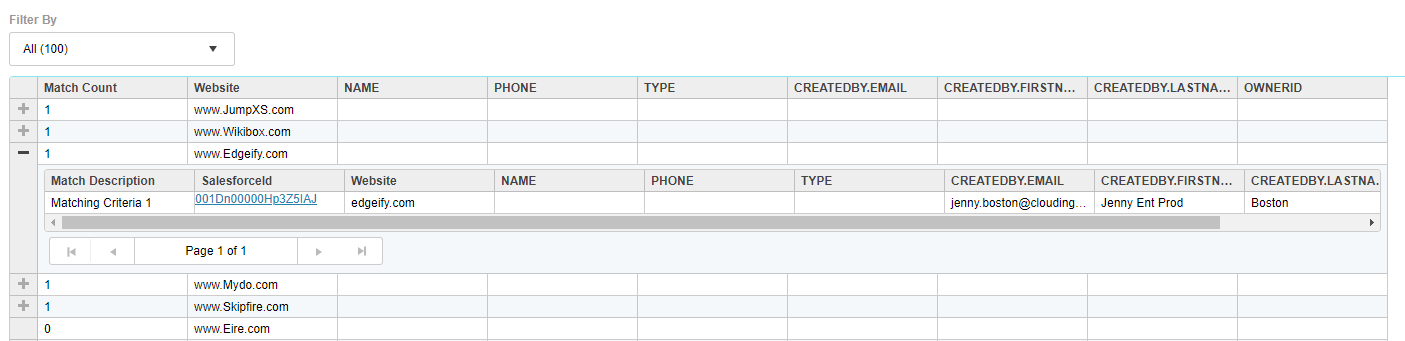
- All columns from the original upload are included in the output.
- Additional columns chosen for ‘Export Only’ are included in the output if a match is detected.
- Choose a 'Filter By' option to filter:
- All: All records in the file matched or unmatched.
- Unmatched: All records in the file that did not detect a match.
- All Matches: All records in the file and all matches detected.
- Single Match: All records in the file that only detected on record match.
- Multiple Matches: All records in the file that detected more than one record match.
- Choose the plus sign next to any record showing a 'Match Count' greater than '0' to expand the results view for a particular record.
- Choose ‘Export’ at the bottom of the page to export all data to a new CSV file.
- Output can then be manipulated in Excel and re-saved to CSV for import as necessary.