Overview
Cloudingo's import tool allows users to check for existing records before importing from a CSV file and merge the data if a match is detected. Imports can be processed against Leads, Contacts, Accounts, Person Accounts, any custom object enabled for merge, and multi-object imports (Contacts then Leads while performing Account lookups). The tool also uses rules to determine which data will override existing records. Before importing, decide how Cloudingo should find and merge duplicates, and if necessary, create new filters and automation rules. Multiple scans can be performed against filters to find all possible matches. The import process has six steps. If there is a need to scan a CSV file for potential matches without merging or inserting new records, use the Find Data tool.
Navigation
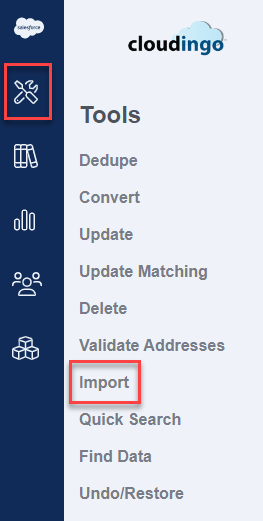
- Open the Import window. Choose the ‘Tools’ → 'Import' option in the left-hand navigation window.
- Choose ‘Start Wizard’ to upload a new file.
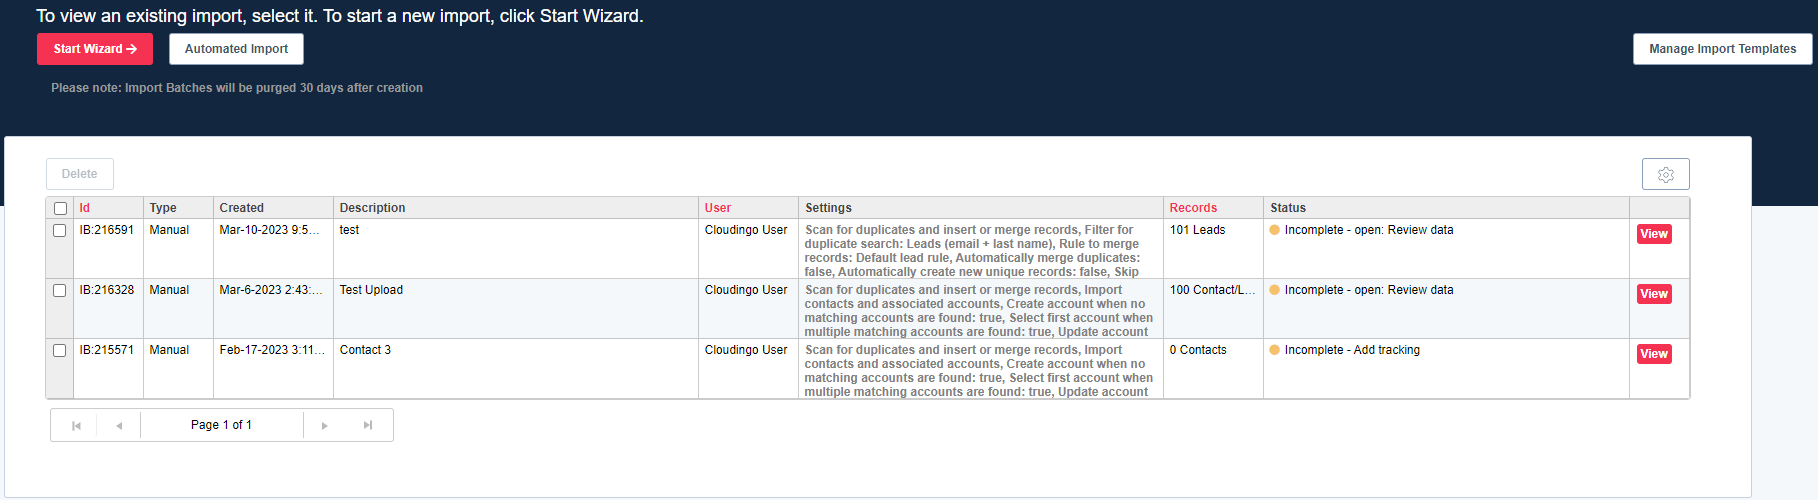
- ‘Automated Import’ and ‘Manage Import Templates’ are available for Professional or Enterprise level licenses and are discussed in the Import Templates article.
- Choose ‘View’ from a specific import on the far right to get back into an existing upload.
- Choose ‘Start Wizard’ to upload a new file.
Import Dashboard
- Files will be automatically deleted from the Import dashboard after 30 days.
- Completed imports should be exported if desired.
- Incomplete imports in the wizard should be completed or deleted. See more details in the Import Basics help articles.
- The Settings button to the right will bring up an Import Settings box where the Import batch size can be reduced. The default setting is 200.

- The batch size does not have any impact on how many records a user can submit during the import process. This is a backend setting that controls how many records the Cloudingo server submits to Salesforce in a single data chunk. Users can submit all records in the file in one job.
- These settings should not be changed unless specified to do so by Cloudingo Support or if pushing new records is causing max limit CPU errors.
- The default can only be reduced not increased. The max is 200.
Step 1: Choose Data
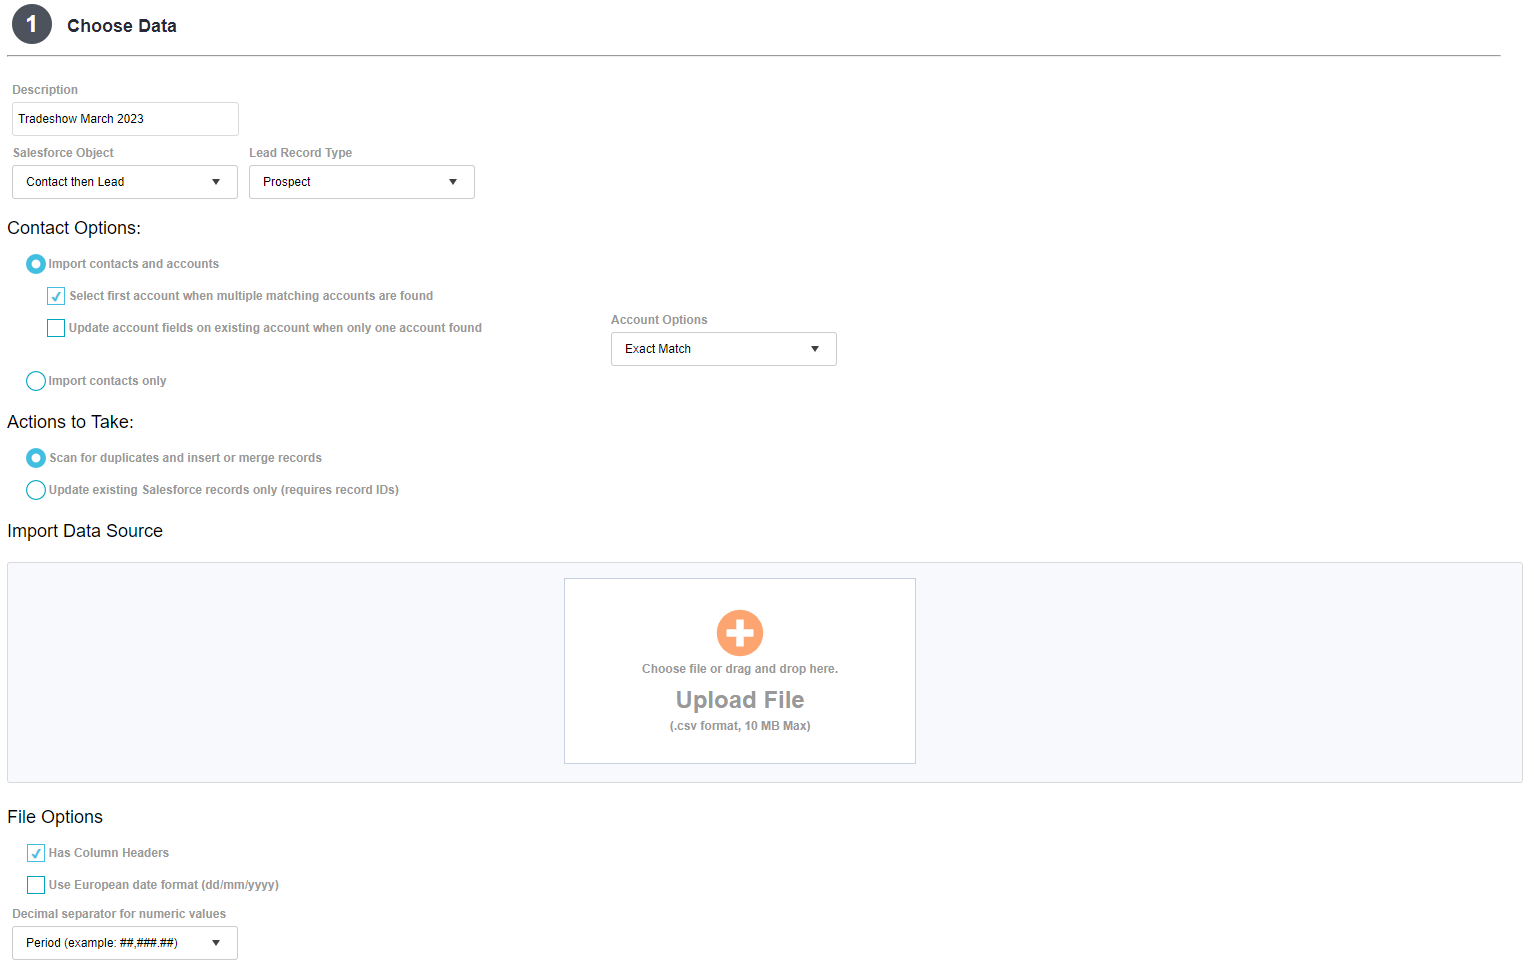
- Description: Give the upload a descriptive name.
- Salesforce Object: Choose the object that the import will be running against. Objects allowed are Lead, Contact, Account, Person Account, and any custom object enabled for dedupe.
- To scan the file against all objects (Contacts/Accounts, and Leads), choose ‘Contact then Lead).
- Record Type: Choose the default record type to apply to newly created records.
- This option only appears if the organization uses record types for the object chosen.
- If the file includes record type, the column data will be used when merging or creating new records vs. the setting chosen here.
- Contact Options:
- These options only appear if ‘Contact’ or ‘Contact then Lead’ is chosen as the Salesforce Object.
- Import contacts and accounts: Searches for existing Accounts based on Account Name
- Create account when no matching accounts are found: Selected by default and recommended.
- This option appears if ‘Contact’ is chosen as the Salesforce object.
- If an Account match is not detected (based on Name + City & State if provided – see Account Options below), and if a new Contact is created, Cloudingo will create both the new Contact and the new Account in Salesforce.
- Select first account when multiple matching accounts are found: Selected by default and recommended.
- This option appears if ‘Contact’ or ‘Contact then Lead’ is chosen as the Salesforce object.
- If more than one Account match is detected, and if a new Contact is created, Cloudingo will create the new Contact under the first identified Account Match (match by Name + City & State if provided). See Account Options below.
- Update account fields on existing account when only one account found: Applies updated values from the file to override existing Account data.
- This option appears if ‘Contact’ or ‘Contact then Lead’ is chosen as the Salesforce object.
- Update is only applied to file data that has been mapped to Account fields.
- Update is only applied if a matched Account is identified.
- Account Options:
- This option appears if ‘Contact’ or ‘Contact then Lead’ is chosen as the Salesforce object.
- Cloudingo will search for existing Accounts based on Account Name (exact or clean as specified in the drop box) + City & State if provided in the file and mapped to the Account city & state fields.
- Additional Account fields for scanning can be customized by our development team if necessary. Contact your Account Representative for details.
- In Step 6 of the import process, if a Contact match is not identified, but an Account match is detected, the Account’s Salesforce record ID will appear in the details for quick access to the Account record for viewing.
- If a new Contact record is created, the Contact will get created under the matched Account identified.
- Create account when no matching accounts are found: Selected by default and recommended.
- Import contacts only:
- This option appears if ‘Contact’ or ‘Contact then Lead’ is chosen as the Salesforce object.
- Assumes the file already contains the desired Salesforce Account ID (instead of Name to be used for lookup); or that Contacts will not be inserted with an Account associated if Account data is not tracked on Contacts within Salesforce (rare).
- Actions to Take:
- Scan for duplicates and insert or merge records:
- Scans the file for matched Contact records in Salesforce. Duplicates can be merged, and new records pushed in new.
- Update existing Salesforce records only (requires record IDs):
- The file data must contain the record IDs that should be updated and any other columns for field values to update the record.
- Scanning for matched records is not performed. This option does a straight update to the Salesforce records with the values in the file.
- Scan for duplicates and insert or merge records:
- Import Data Source:
- Choose the plus sign to browse for the upload file.
- Or drag and drop the upload file to the area.
- The file must be in CSV Format and cannot be larger than 10MB.
- File Options:
- Has Column Headers: Leave selected if the file contains a header row.
- Use European date format (dd/mm/yyyy): Default is US date format (mm/dd/yyyy).
- Decimal separator for numeric values: Enable this option to use a non-US format for numeric values (ex: 1.000,00 for currency vs 1,000.00).
Step 2: Add Tracking (optional)
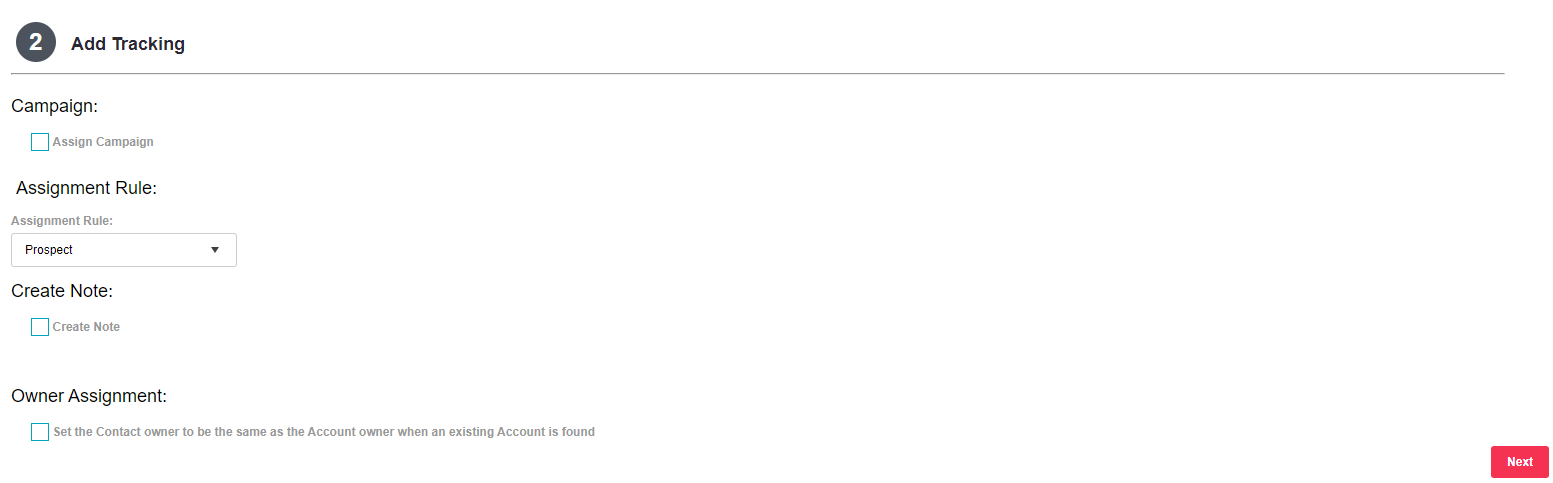
- Assign Campaign:
- This option only appears if ‘Lead’, ‘Contact’, ‘Contact then Lead’, or ‘Person Account then Lead’ is chosen as the Salesforce Object.
- Choose the 'Assign Campaign' option.
- Choose the campaign using the search icon to search the campaign list.
- Choose the campaign status for the members in the upload.
- Choose the 'Create new campaign members' option to create new members not already assigned to the campaign during the merge and push process.
- Choose the 'Update existing campaign member statuses' option to update the status for any existing campaign members already associated with the campaign.
- The new campaign member and the status options can be applied simultaneously.
- Campaign assignment applies to all records merged or pushed.
- Assign Rule:
- This option only appears if ‘Lead’, ‘Contact then Lead’, or ‘Person Account then Lead’ is chosen as the Salesforce Object.
- This option only appears if using Lead Assignment Rules in Salesforce.
- If more than one Lead Assignment rule is configured, the active lead assignment rule in Salesforce is the rule set by default.
- Assignment rules are applied to newly created Leads.
- If assignment rules should be applied to merged records, please contact the Cloudingo Support Team.
- Select Default Status:
- This option only appears if ‘Lead’, ‘Contact then Lead’, or ‘Person Account then Lead’ is chosen as the Salesforce Object.
- Cloudingo will use the Salesforce default lead status automatically if no option is chosen.
- Choose the ‘Select Default Lead Status’ option.
- Choose the desired Lead status to apply to all records pushed in new.
- Create Note:
- Choose the ‘Create Note’ option.
- Type in the desired message.
- Notes will appear for all records merged or pushed in new under the ‘Notes’ or ‘Notes & Attachments’ section in Salesforce.
- Notes take up space, use up additional API calls, and are not searchable in Salesforce.
- Owner Assignment:
- This option only appears if ‘Contact’ or ‘Contact then Lead’ is chosen as the Salesforce object.
- Choose the ‘Set the Contact owner to be the same as Account owner when an existing Account is found’ option to automatically set ownership when a new Contact gets created.
- This setting does not apply to merged records. To override existing records with import records if a match is detected, set up a field rule in the Import rule to take the incoming record during the merge. Set the rule to 'Incoming record (import or API value)' and 'Always override the master with a value'.
Step 3: Map Columns
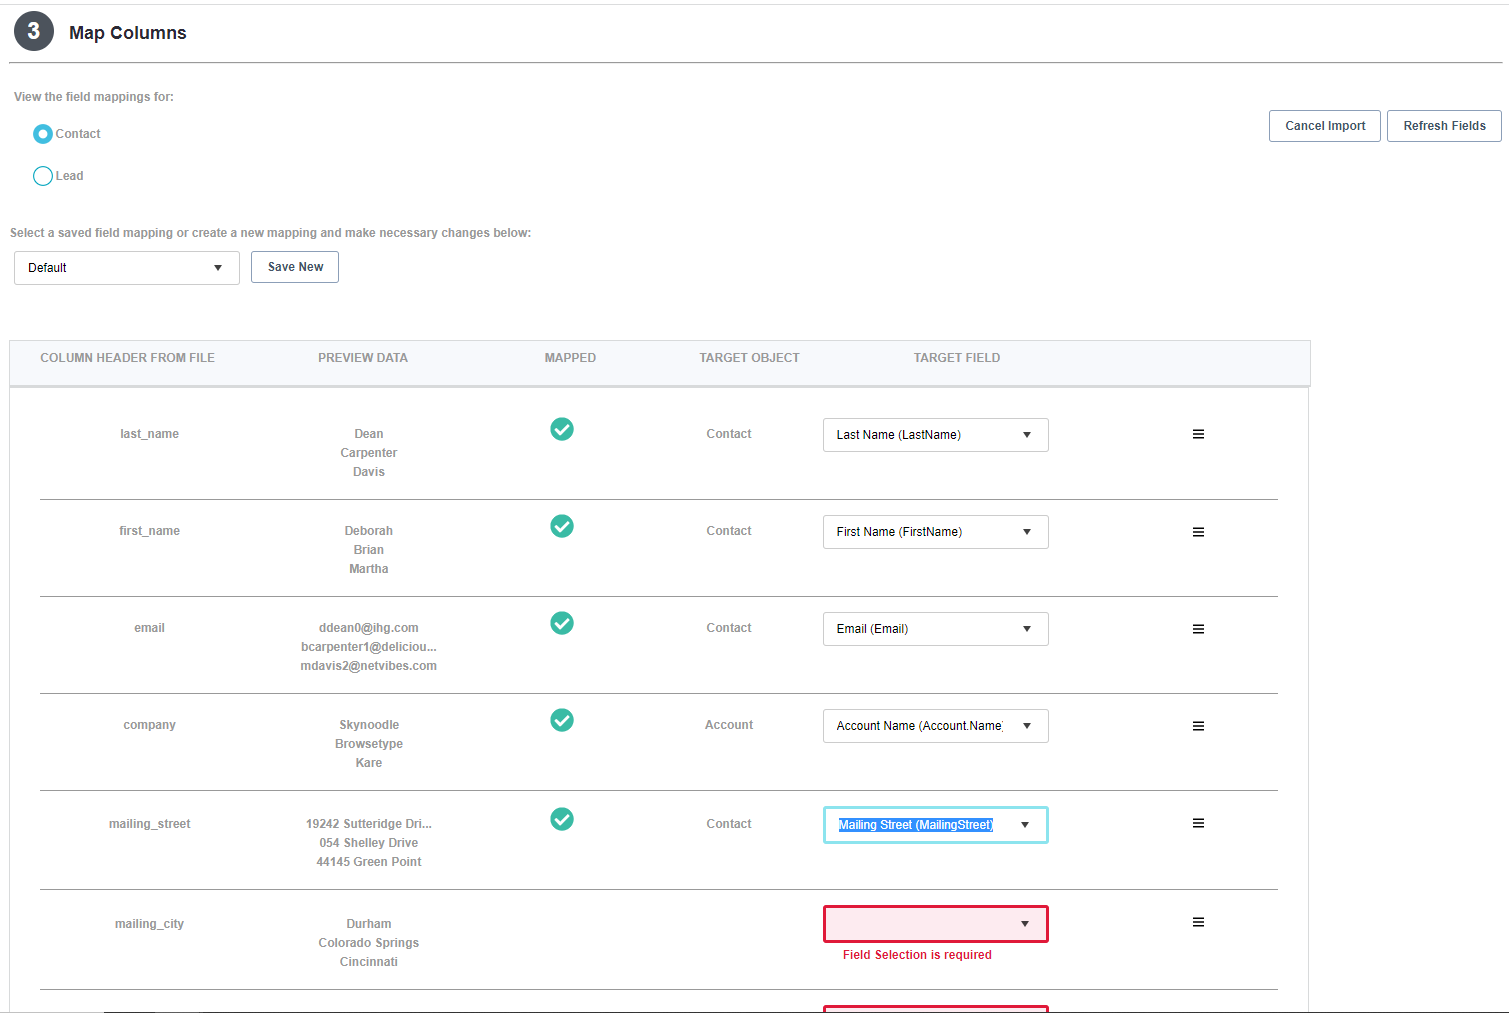
- Map column headers to the corresponding Salesforce fields.Notes:
- When ‘Contact’ is chosen as the Salesforce Object, file data can be mapped to both Contact and/or Account fields.
- Map all Contact fields that should be included in the Contact record creation.
- Map any Account fields for override (if selecting to override Account data in Step 1)
- Map any Account fields required for Account lookup (Name + City & State and any additional fields if custom development work has been done for your organization to perform more extensive Account lookups during the Contact import scan).
- When ‘Contact then Lead’ or ‘Person Account then Lead’ is chosen as the Salesforce Object, Contact/Person Account & Lead fields must both be mapped.
- Map Contact/Person fields first. When choosing ‘Next’, Cloudingo will automatically force you to the Lead fields for mapping.
- Toggle between the two mappings using the mapping options at the top of the page.
- After mappings are set, save field mappings for re-use in future uploads by choosing the ‘Save New’ button at the top of Step 3.
- Saved mappings will be available in the drop box at the top of Step 3 with the next import performed.
- Cloudingo will attempt to automatically map columns where the column header name is the same as the Salesforce field name. Verify accuracy on auto-mapped fields.
- To un-map a field, choose the Salesforce field drop box and choose the ‘Choose a Salesforce field’ option.
- Use the ‘Refresh Fields’ button at the top of step 3 if a field is not showing in the target field box.
- Fields that are not editable or hidden in Salesforce cannot be mapped.
- The menu option at the far right of any field mapping is used to configure Transforms. Transform options include:
- Text formatting: upper, lower, or title case.
- Phone formatting: area code in parentheses, dashes only, spaced, or compacted.
- Extension: X Prefix, Ext Prefix, and Allow Extension.
- Lookup: Performs an ID value lookup if the file contains a text value for a corresponding object field when Salesforce expects an ID value. Specify the Object & Field that the ID will be pulling in from.
- If no match is detected, choose to either clear the field value or allow null or empty.
- Address: Standardizes states and/or countries from the spelled-out version to the code (or vice versa).
- State Name to State Code.
- State Code to State Name.
- Country Name to Country Code.
- Country Code to Country Name.
- If any fields are intentionally left unmapped, those fields will not be included in the upload and cannot be merged into existing records or inserted with new records.
- Fields unmapped will display in red.
- To ignore the unmapped fields and continue to the next step, choose the "Don't import data of unmapped columns" checkbox at the bottom of the mapping page (just above the "Next" button).
- When ‘Contact’ is chosen as the Salesforce Object, file data can be mapped to both Contact and/or Account fields.
Step 4: Preview and Edit
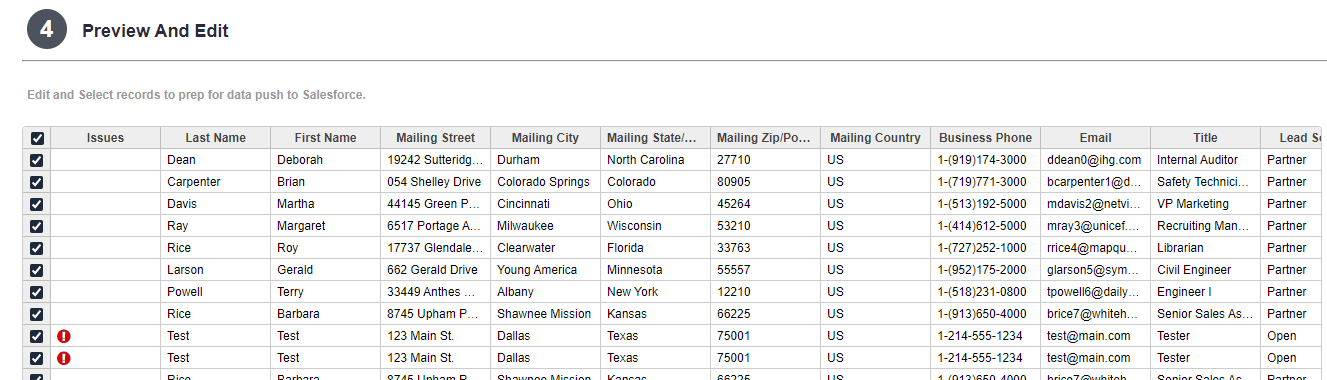
- Cloudingo performs pre-validation checks on the field values. Any potential errors will be reported.
- Use in-line editing to edit any field value and hit enter to save.
- Use ‘Copy to All Rows’, ‘Copy to Selected Rows’, ‘Clear for All Values’, and ‘Clear for Selected Rows’
- For copy options, type in the desired value on the first record in view, right-click in the cell and choose the desired copy options. Make sure to select only the records that the copy should apply to in the checkbox column.
- Use ‘Copy to All Rows’, ‘Copy to Selected Rows’, ‘Clear for All Values’, and ‘Clear for Selected Rows’
- Delete: Delete any records from the import.
- Choose the select all button in the top left above all checkboxes.
- Or choose the checkbox for each individual record to delete.
- Choose the ‘Delete’ option at the top right.
Step 5: Scan for Duplicates
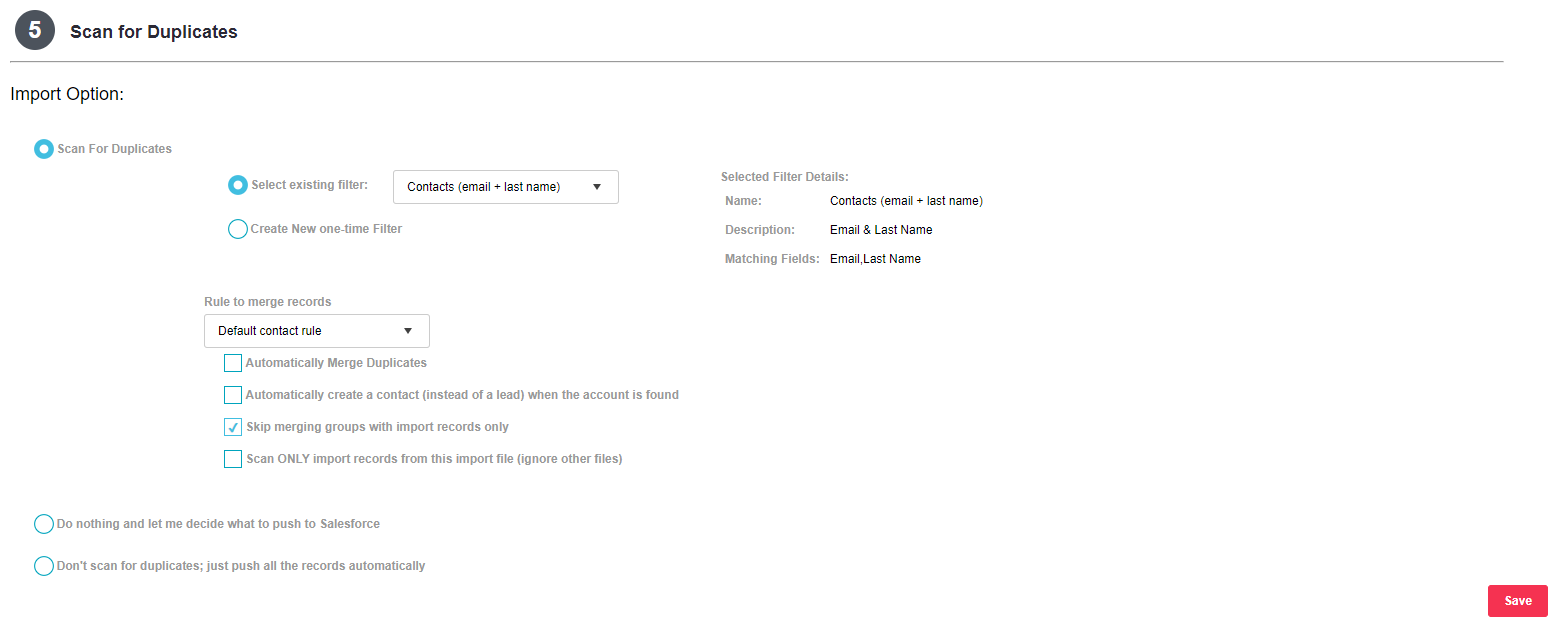
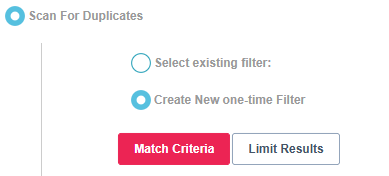
- Scan For Duplicates: Choose an existing dedupe filter or create a one-time filter to scan the file against.
- Select existing filter: Choose a pre-built dedupe filter from the drop list.
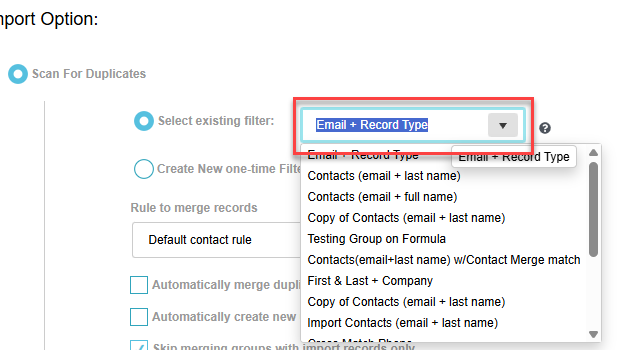
- See the Creating Filters & Rules for Import article for more guidance.
- Create New one-time Filter: Build filter criteria on the fly instead of using a pre-built filter.
 Note: If building a filter using fields that have not yet been indexed, Cloudingo may force a re-index on the object before the import can be started.
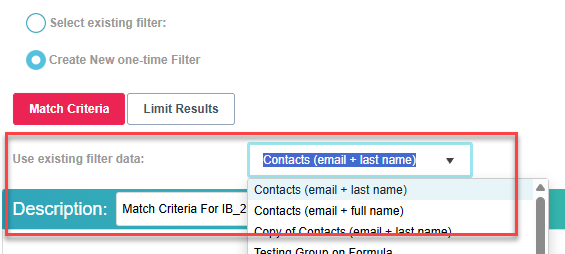
- ‘Match Criteria’ will be selected first.
- Choose a pre-built filter from the drop list to serve as a template for the matching criteria and adjust as necessary.
- Or, choose the ‘Add Match Condition’ option to start building the filter matching criteria.
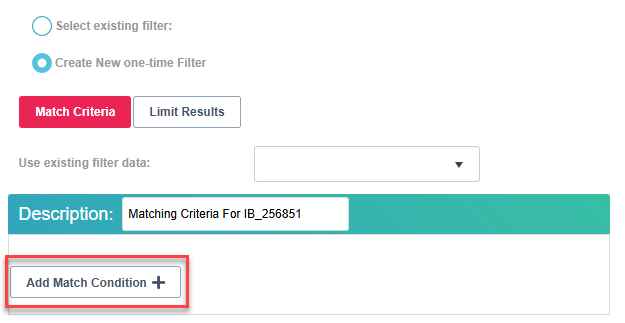
- Choose the Field, Matching Condition, and Options settings.

- Continue using ‘Add Match Condition’ to add additional matching criteria.
- Toggle to the ‘Limit Results’ option to set any additional filter limits and to review for any field limits that may have pre-populated from a pre-selected filter. Adjust limits as necessary.
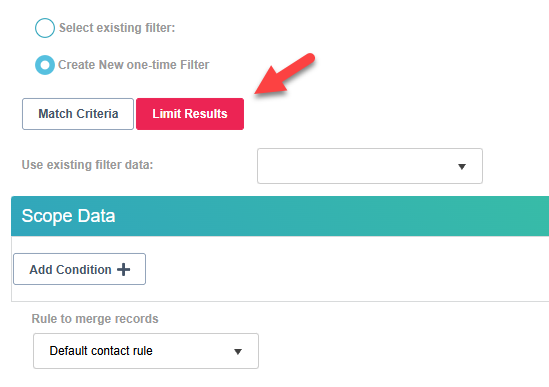
- Choose the ‘Add Condition’ option to start building filter limits (e.g., restricting matches to a specific record type).
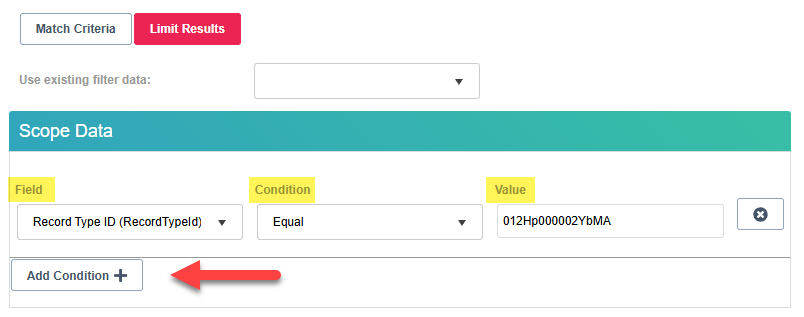
- Choose the Field, Condition, and Value if required (e.g., Record Type = {desired record type}.
Note: Only mapped fields will be available for limiting conditions. Ensure that the required field data is provided in the file before uploading & mapping. - Continue using ‘Add Condition’ to add additional limits to the criteria.
- See more details regarding limits and imports in the Creating Filters & Rules for Imports help article.
- Choose the ‘Add Condition’ option to start building filter limits (e.g., restricting matches to a specific record type).
- Rule to merge records: Choose a rule to apply to the import records for merging data.
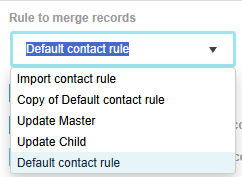
- The rule determines which master record is chosen and which field values get overwritten with the import merge.
- See the Creating Filters & Rules for Import article for more guidance.
- Choose appropriate Merge/Push settings for the import job.

- Automatically merge duplicates:
- Leave this option deselected to preview results for accuracy in Step 6. Deselecting this option is recommended for users just starting with the Import tool or when starting with a new file format not previously tested.
- Automation can be started from Step 6 after previewing the results for accuracy.
- Choose this option to start automation immediately after scanning for matches. The merging process will begin.
- Leave this option deselected to preview results for accuracy in Step 6. Deselecting this option is recommended for users just starting with the Import tool or when starting with a new file format not previously tested.
- Automatically create new unique records:
- Leave this option deselected to preview results for accuracy in Step 6.
- Deselecting this option is recommended for users just starting with the Import tool or when starting with a new file format not previously tested.
- Pushing new records can be performed manually (in bulk) from Step 6 after previewing results for accuracy.
- If ‘Contact’ is chosen as the Salesforce Object, the Contact will get created under the matched Account.
- If ‘Contact then Lead’ is chosen as the Salesforce Object, an option will appear to 'Push Contact instead of Lead'. If a matched Account is identified, the Contact will be created under the matched Account.
- Pushing new records can be performed manually (in bulk) from Step 6 after previewing results for accuracy.
- Choose this option to push/insert new/unique records into Salesforce automatically after scanning completes. The push process will begin for records without a match detected.
- Automatically create a contact (instead of a lead) when the account is found:
- This option only appears if 'Contact then Lead' is chosen as the object.
- Leave this option deselected to preview results for accuracy in Step 6.
- Deselecting this option is recommended until all scans against Leads & Contacts have been completed.
- Choose this option to automatically push new records in as Contacts (instead of Leads) during the Contact scan.
- It is recommended to only enable it on the final scan. Complete all Contact & Lead scans first. Then, do a final scan against Contacts to enable this option.
- Alternatively, push records in as Leads and run the dedupe convert filters afterward.
- Skip merging groups with import records only:
- Option is enabled by default (recommended).
- If Cloudingo detects a duplicate match in the file upload(s) with no Salesforce match, the file duplicates will be left unmanaged so that the user can address the file duplicates manually before pushing the records in new.
- If deselected, duplicate import records will be merged and pushed in as new records to Salesforce with the merge process.
- If ‘Contact’ is chosen as the Salesforce Object, and if a matched Account is identified, the Contact will get created under the matched Account.
- If ‘Contact then Lead’ is chosen as the Salesforce Object, the object being scanned at the time of merge will determine how the import file duplicates are merged/pushed (as a Contact or Lead).
- If merged/pushed during a Contact scan, the Contact will get created under the matched Account.
- Scan ONLY import records from this import file (ignore other files):
- Enable this option to only include duplicates detected in Salesforce or within the file being worked on. This option is recommended.
- Disable this option to include duplicates detected in Salesforce or with other incomplete files left in the Cloudingo import wizard.
- Automatically merge duplicates:
- Select existing filter: Choose a pre-built dedupe filter from the drop list.
- Do nothing and let me decide what to push to Salesforce: The scanning process is not performed. Step 6 will appear where the user can choose to rescan the records, push selected records to Salesforce, or export the file.
- Do not scan for duplicates; just push all the records automatically: Quickly push all records in the file to Salesforce as new records. The scanning process is not performed.
Step 6: Review Data
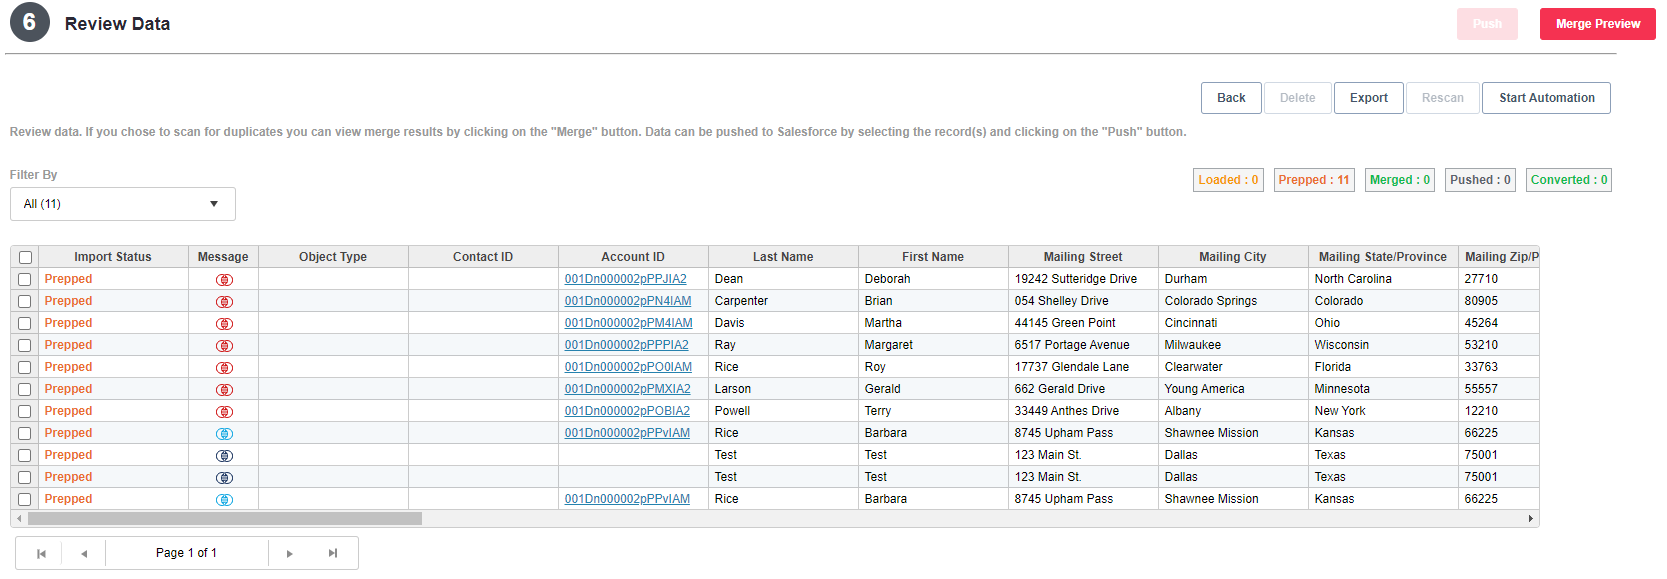
Choosing the 'Back' option will allow users to preview prior steps, but changes cannot be made. Use the 'Rescan' option to get back to Step 5 where the file can be rescanned.
Filtering
Filter By: Filter records displayed for viewing and managing results.
- All: Displays all unique and duplicates.
- Unique: displays non-duplicates that do not exist in Salesforce.
- Total Duplicates: displays all records that have a duplicate detected in either Salesforce or within an import file.
- Salesforce Duplicates: displays all records that have a Salesforce match detected without an import record match.
- File Duplicates: displays all records that do not have a Salesforce match detected but are duplicated within an import file.
- Duplicates found in Salesforce and Import File Duplicates: displays all records that have a Salesforce match but also identified a duplicate within an import file.
- Errors: displays all records that contain an error alert.
Import Status
- Loaded: record is loaded but not analyzed for deduplication. If the file does not move past this status, delete the file from the import wizard and try uploading the file again. If the file still does not move past this status, contact Cloudingo Support.
- Prepped: record is analyzed and ready to be managed. Records have not been merged or pushed.
- Records Prepped with a red duplicate indicator indicate Salesforce match detected.
- Records Prepped with a blue icon indicate an import file match detected (no Salesforce match).
- Records Prepped without any icon indicate unique records (no match detected).
- Records Prepped with an alert icon indicate an error was detected.
- Merged: status will display Merged when the import record has been merged with the corresponding matched record(s) detected.
- Pushed: status will display Pushed when the import record has been pushed into Salesforce as a new record.
- Delete: Removes the selected record(s) from the import file.
- Export: Exports the filtered selection to a new CSV file. See details in the Import Basics help article regarding exporting completed files.
In-Line Editing
- Inline editing can be used in Step 6.
- Make any changes to the file data before merging or pushing records into Salesforce.
- Choose records to delete from the upload using the checkboxes and the 'Delete' option.
Merge Preview
- Preview the import results for accuracy.
- Ensure that the filter has pulled in good matches.
- Ensure that the rule has assigned the master record and field values correctly before merging.
Start Automation
- After reviewing the results for accuracy before merging, automation can be started from Step 6.
- Choose ‘Start Automation’ to begin the merging process for all duplicates detected.
Rescan
- Rescan the file against as many filters as desired to identify all potential matches.
- After merging duplicates detected from the first scan, choose the ‘Rescan’ option to go back to Step 5 and choose a different filter.
- Merge the duplicates detected from the second scan.
- Continue rescanning until all filters have been processed and all duplicates are merged.
- When ‘Contact then Lead’ or ‘Person Account then Lead’ is chosen as the Salesforce Object:
- Scan the Contact/Person Account filter(s) first.
- When choosing ‘Rescan’, choose to scan against additional ‘Contact’/’Person Account’ filters or choose ‘Lead’ to begin scanning against Lead filters.
Push in New Records
- Once all duplicate scans have been performed and each scan has merged all duplicates detected, push the remaining new unique records into Salesforce.
- Choose records using the ‘Unique’ filter option.
- Choose ‘Push’.
- The file should move to ‘complete’ status once all records have been managed.
- When ‘Contact then Lead’ or ‘Person Account then Lead’ is chosen as the Salesforce Object:
- Choose to push remaining new unique records into Salesforce as ‘Contacts’/’Person Accounts’ or as ‘Leads’.
- Choosing ‘Contacts’/’Person Accounts’ will push all remaining records in as new Contacts/Person Accounts instead of Leads.
- If pushing in as new Contacts, a new Account will be created if a matched Account is not identified.
- To push in Contacts instead of Leads only if a matched Account is identified, use the ‘Rescan’ option to scan one last time against ‘Contacts’. Choose the desired filter & rule and select the ‘Automatically create a new contact (instead of lead) when a matching account is found’ option.
- This setting will only push in new Contacts that have a matched Account identified.
- All remaining records after this final scan can be manually pushed in as Leads.
- Choosing ‘Contacts’/’Person Accounts’ will push all remaining records in as new Contacts/Person Accounts instead of Leads.
- Choose to push remaining new unique records into Salesforce as ‘Contacts’/’Person Accounts’ or as ‘Leads’.
Export
Be sure to use the 'Export' option to save a local copy of the results and how records were managed. Files will be deleted from Cloudingo after 30 days.