Overview
Cloudingo is a powerful tool that helps users merge duplicate records. Filters identify potential matches, and rules determine which record gets chosen as the master and which field values get chosen for merge. Defining the master and field rules is essential before any merging takes place. Cloudingo's rules are customizable based on specific business needs. We will explore how to use rules in Cloudingo to ensure an accurate final record.
Tips for Building Rules
When building rules, it is crucial to think about "why" one record should be chosen over another for the master and "why" one field value should be chosen over another. For instance, is the master chosen based on the created date, a specific field value, or an external system ID? Should a true/false field, regardless of the master, always retain a true over false? Answering “why” these records or field values are chosen will help define how to build out the rule.
Default Automation Rules
Cloudingo comes with default automation rules for each of the supported objects including Leads, Contacts, Accounts, and Person Accounts. These default rules can be edited but not deleted. Additional custom rules can be created and tailored to specific business needs.
Navigation
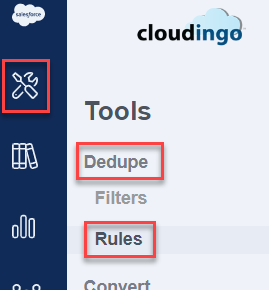
Open the Manage Rules window: Open the Manage Rules window: Choose the ‘Tools’ → ‘Dedupe’ → ‘Rules’ option from the left-hand-side navigation window.
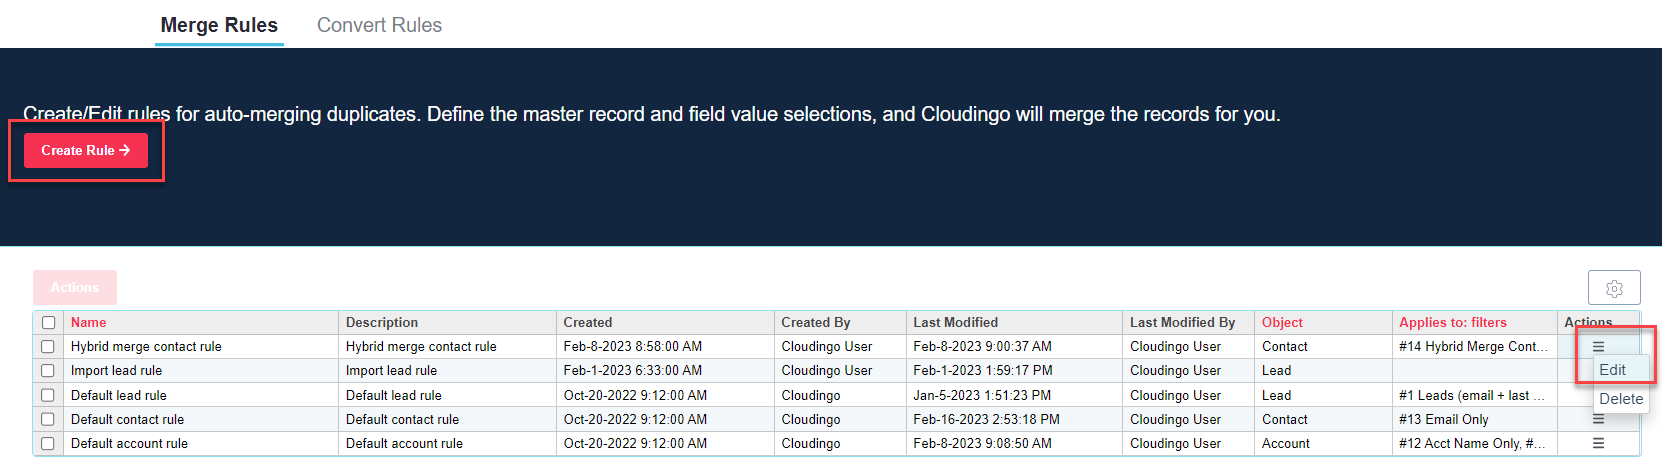
Choose ‘Create Rule’ to build a new custom rule.
Choose ‘Edit’ next to a specific rule to edit an existing rule under the ‘Actions’ column.
Choose 'Delete' next to a specific rule to delete an existing rule under the 'Actions' column'
Choose the checkbox next to the rule(s) to perform a copy or add to the rule library. Then, choose the red 'Actions' button.
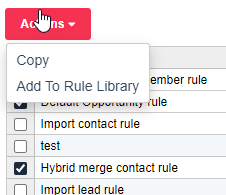
Choose 'Copy' to create a replica of the selected rule(s) to reduce time configuring new rules that may need minor modifications (such as applying a different master rule for a specific subset of records). Be sure to edit and rename the newly copied rule to something specific to the logic that will be applied.
Choose 'Add to Rule Library' to add the selected rule(s) to the rules library to share the rule over to another connected environment.
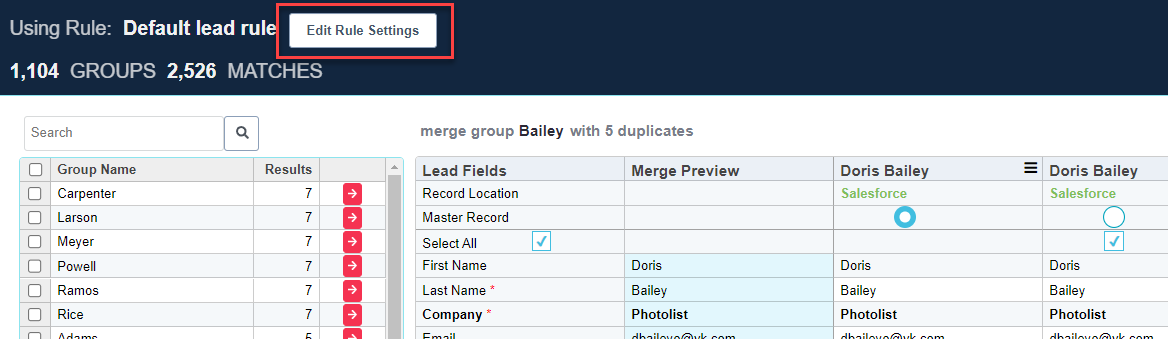
Access a rule setting from within the Merge Preview page for easy and quick editing while viewing results for accuracy.
Choose 'Edit Rule Settings' option from within the Merge Preview page.
Note:
If editing from the preview, saving rule changes will return to the record preview page previously being viewed. New rule changes will be reflected immediately on the records in preview.
Step 1: The Basics
Define the object.

Object: Choose the object for the rule (this is not editable if editing an existing rule).
Rule Name: Give the rule a descriptive name.
Description (optional): Give a brief description of the rule.
Display rule for filters and automation: Choose this option if the rule should be accessible for regular dedupe jobs.
Display rule on import: Choose this option if the rule should be accessible for import jobs.
Apply owner mapping during merge: Choose this option to apply Owner Mapping to reassign record ownership from inactive or queue owners to new owners during merge/convert.
What is Owner Mapping?
See more details in the Owner Mapping help article.
Step 2: Group Fields (optional)
Set up any field groupings to group, or link, field values together. The controlling field chosen for merge will also select the other grouped fields from the same record. Choose the 'Add Field Group' button to add a field grouping.
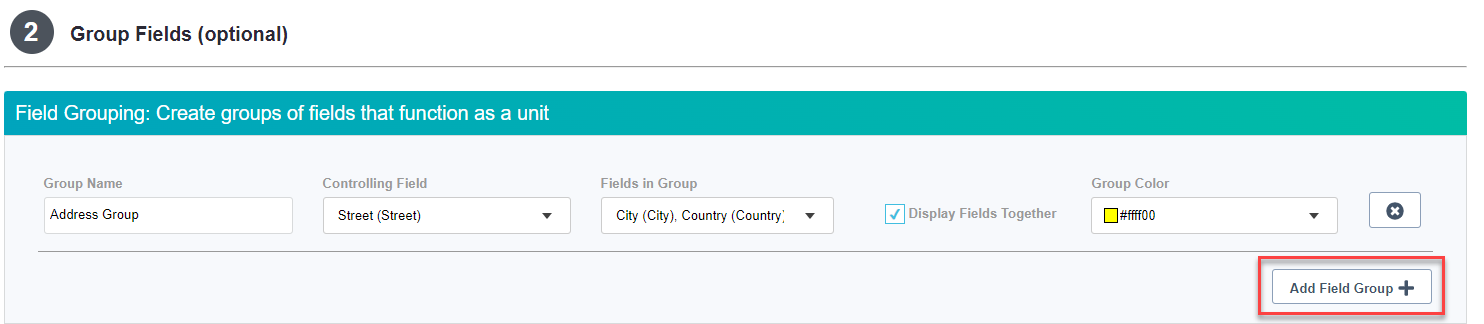
Group Name: Give the field grouping a descriptive name.
Controlling Field: Choose the controlling field that will determine how the block of records in the group get chosen.
Fields In Group: Choose all fields that get blocked together and chosen for merge based on the value chosen with the controlling field’s rule.
Display Fields Together: Choose this option to display the block of fields together on the Merge Preview page.
Group Color: Choose a group color to display for the grouped fields on the Merge Preview page.
Once the field group is set up, the entire group of fields can then be set up using a specific field rule using the controlling field to determine which record the values will pull from.
Looking at an Example:
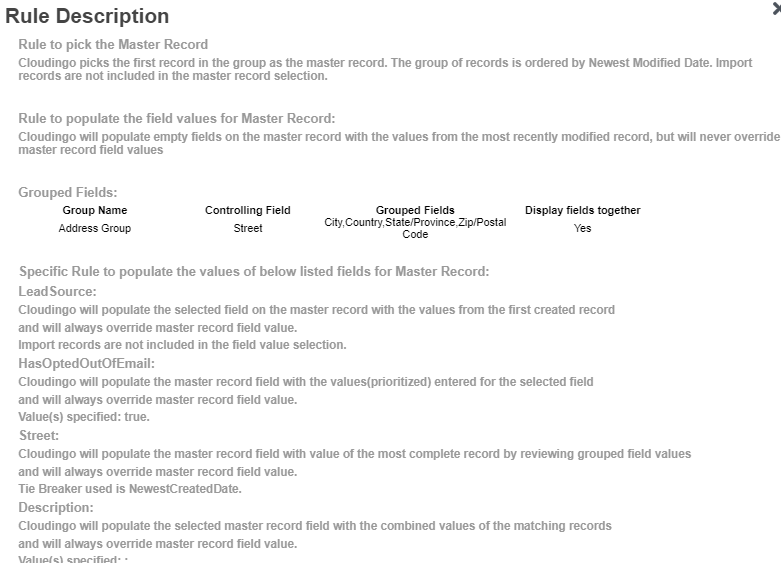
1. The image below shows a rule configured to group Address Fields using Street as a controlling field and City, Country, State, and Zip were added to the fields in the group.
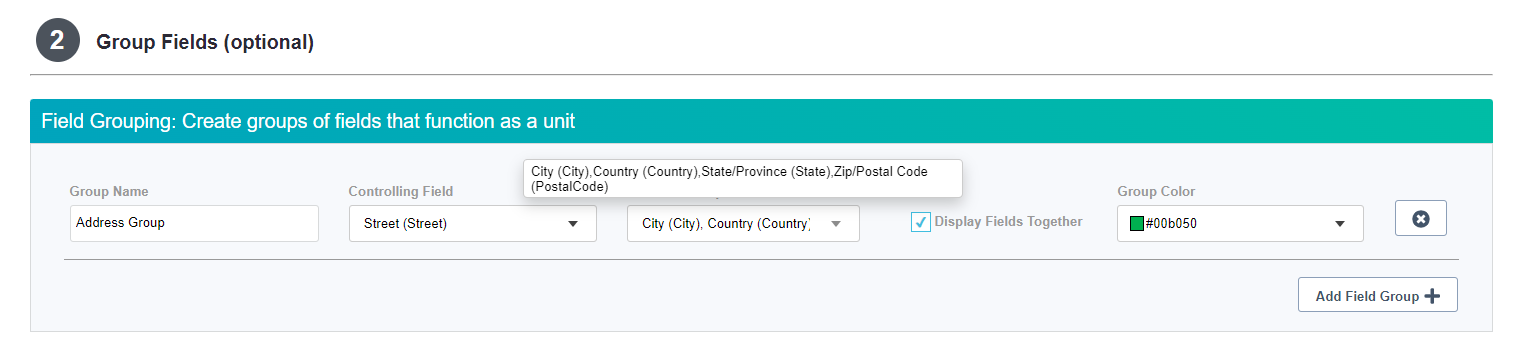
When street gets chosen as the value for merge on the final record, the other grouped fields get chosen from the same record. In this example, a field rule was configured on street to use the record with the 'Most Complete by Grouped Fields':

The end result pulls all street values from the record with the most complete values within the block of records:

Note: If the field street field rule was set to use 'Newest (ordered by CREATE date)' vs. the 'Most Complete by Grouped Fields', Cloudingo would have chosen the address block from the newest created record.
2. Field group rules ensure that Cloudingo does not pull some values from one record while other values pull from another record. For example, without the field group rule, the record may pull values with mixed and matched values from multiple records.

Values will pull from the master record for fields that have a value populated while pulling in values from non-master records when the master record value is blank. An address in Texas would not have a city and zip code in California. This results in a bad final record.
3. Specific field rules cannot be configured to determine a value choice for merging non-controlling fields that are part of a field grouping. Specific field rules can only be configured for non-controlling fields to ‘inherit default’ to perform an action (such as to create a note, audit, or other action without changing the behavior of how the value gets chosen for merge).
4. Grouping fields using a formula-type field as the controlling field is allowed. Even though the values of formula fields are system-determined and rules cannot dictate a value for merge, specific field rules on formula fields can still be configured as the controlling field in a field grouping to control how the grouped fields get chosen.
5. Field group rules can be useful for grouping any set of field values together that should be retained from the same record.
Another example would be if a custom formula field returns "True" or "False" based on the presence of certain values in an email field. If the 'true/false' field should control which email is chosen during merge, a field grouping can be configured using the true/false field as the controlling field and any other email-relevant fields configured as fields in the group. Then, a field-specific rule on the true/false field (even if a formula field) can be configured to determine how the email and other grouped fields get chosen from the group of records during a merge.
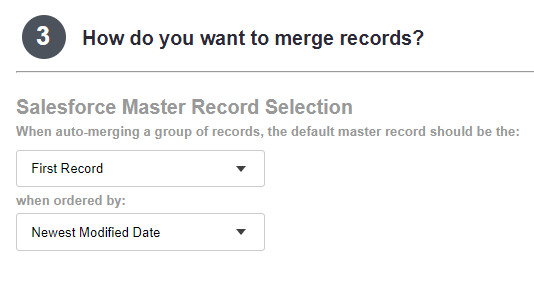
Step 3: How do you want to merge records?
Define the specifics of how Cloudingo should merge duplicate records.
Master Record Selection
Tell Cloudingo how to select the master record when merging a group of duplicates. The master record serves as the starting point, or baseline, for the final result for all field values.
Rule Options
1. Rule: Choose a master rule. Rule options include:
First Record | This option chooses the first record when ordered by an additional option. Choose this option to define the master based on Newest or Oldest Created or Modified Date or choose the 'First Record' that meets the criteria defined in the rest of the rule. |
Most Complete | This option chooses the record with the most populated field values. |
Most notes, attachments, activities, etc. | This option chooses the record with the most related object data. Keep in mind that attached objects are preserved regardless of the master record selection. Cloudingo will evaluate the record with the most Tasks, Notes & Attachments, Open Activities, Activity Histories, Cases, Opportunities, Contacts & Campaign Members. |
Highest value in the give field | This option chooses the record with the highest or lowest value in a user-defined field (common use: numeric field types). |
First record with a value in the given field | This option chooses the first record that has a value populated in a user-defined field (value is not null). |
First record with no value in the given field | This option chooses the first record that has no value populated in a user-defined field (value is null). |
Prioritized on the given field and values | This option prioritizes values in order of importance (EX: True over False; Status hierarchy for chosen value). Priority levels get configured within the 'Options' section. Arrange highest priority (top of the list) to lowest priority (bottom of the list). |
Protected Record | This option chooses any record marked as protected within the Libraries → Excluded Records section accessible from the left-hand navigation window. |
Newest by a given (custom) date field | This option chooses the record based on the oldest or newest value on a custom date field. The rule requires an Options setting to evaluate blanks as a value. If set to 'False', Cloudingo will only look at the records that contain a value to determine the master. If set to 'True', Cloudingo will treat blank values as the oldest date (since a date does not exist, the date will be assigned an arbitrary date of the beginning of time). |
Record with field value not on specified ignore list | This option defines a field and value(s) to be ignored, and any other master will be chosen. The tiebreaker determines the master if more than one or none of the records contain the value to be ignored. |
Record with max characters in the given field | This option chooses the record with the longest (character) length value populated. |
Record with Active Owner | This option will choose the record with an active Owner (as opposed to a record with an Inactive Owner). The tiebreaker determines the master if more than one or none of the records contain an active owner. |
Record with the most Opportunities | This option will choose the record with the most Opportunities associated (available for Account object rules only). |
Record with the most Contacts | This option will choose the record with the most Contacts associated (available for Account object rules only). For customers that allow multiple Accounts to be associated with a Contact, indirect Contact relationships are not included in the Contact count. |
2. Order-by/Tiebreaker: Choose an order-by/tiebreaker options.
A tiebreaker option will only appear when required. If more than one record or none of the records meet the defined criteria, a tiebreaker is necessary for determining which record to pull the value from.
An order-by option will appear for all other rules that do not require a tiebreaker.
Notes Regarding Master Rules:
When creating a rule for Imports, the master selection will always choose a Salesforce record instead of an Import record.
Salesforce always retains the oldest created date & created by user during merge. This is not controlled by Cloudingo.
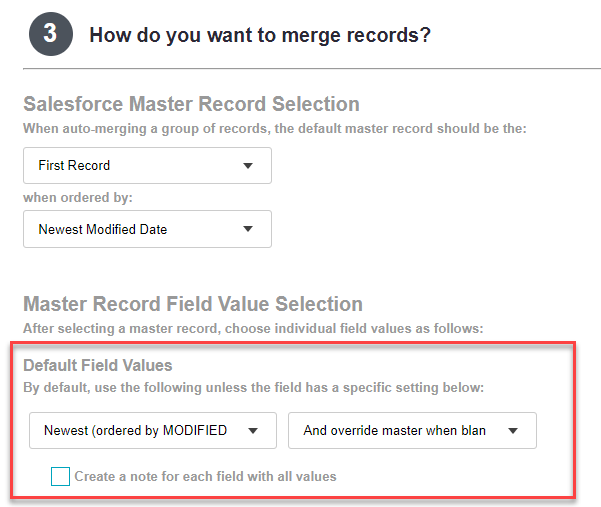
Default Field Rule
Tell Cloudingo how to select most fields from records. Default field values determine the field value selections for the final record if multiple records have the same field but with different values. The master definition will control most field values chosen in most cases. The default field rule is most commonly used to fill in blank values on the master with values from non-master records.
Rule Options
1. Rule: Choose a default rule to choose field values from. In some cases, depending on the override specified, this will take precedence over the master definition. Rule options include:
Most Common | This option chooses the value that appears most frequently across the records in the group for each field. If no value appears more than any other value, Cloudingo will use the specified tiebreaker in the field rule. |
Oldest (ordered by MODIFIED date) | This option chooses the field values from the record that has the most recent or oldest modified date. |
Oldest (ordered by CREATE date) Newest (ordered by CREATE date) | This option chooses the field values from the record that has the oldest or newest created date. |
Incoming record (import or API value) | This option chooses the field values from the import or API record. If an incoming record does not have a value for any given field, Cloudingo will use the specified tiebreaker in the field rule. |
Override Options
2. Set an override option: 'Override master when blank' is the most common default rule. Override options include:
Override master when blank | This option preserves the values of the selected master record. However, if there are empty fields on the master record, Cloudingo will populate those fields based on the record defined in the first drop-down menu resulting in the most complete record possible. |
Never override master | This option preserves the field values for the master record, even if blank (regardless of the rule chosen). This option will not give the most complete record possible for the fields during merge. |
Always override master with a value | This option chooses the field values based on the Rule defined. It always will pull from the record that contains a value. It will not pull from a blank value. If a value is not detected based on the rule defined, the master is always retained. If the master value already fits the rule, the master value is retained. |
Always override master even with a blank | This option chooses the field values based on the Rule defined, even if the value is blank. This could result in overriding the master (that has a value) with a blank value (if the non-master record is blank and fits the rule defined). |
3. Tiebreaker: A third tiebreaker box will only appear when required. If more than one record or none of the records meet the defined criteria, a tiebreaker is necessary for determining which record to pull the value from.
4. Create a note for each field with all values: This option will create a Salesforce note under the ‘Notes’ or ‘Notes & Attachments’ section for all pre-merge field values that get updated during merge.
a. Notes take up space and are not searchable in Salesforce.
Specific Field Rules
Set up specific field rules to control field value choices. These rules take precedence over the master & default field rules in most cases. Defining specific business logic for data retention is handled here.
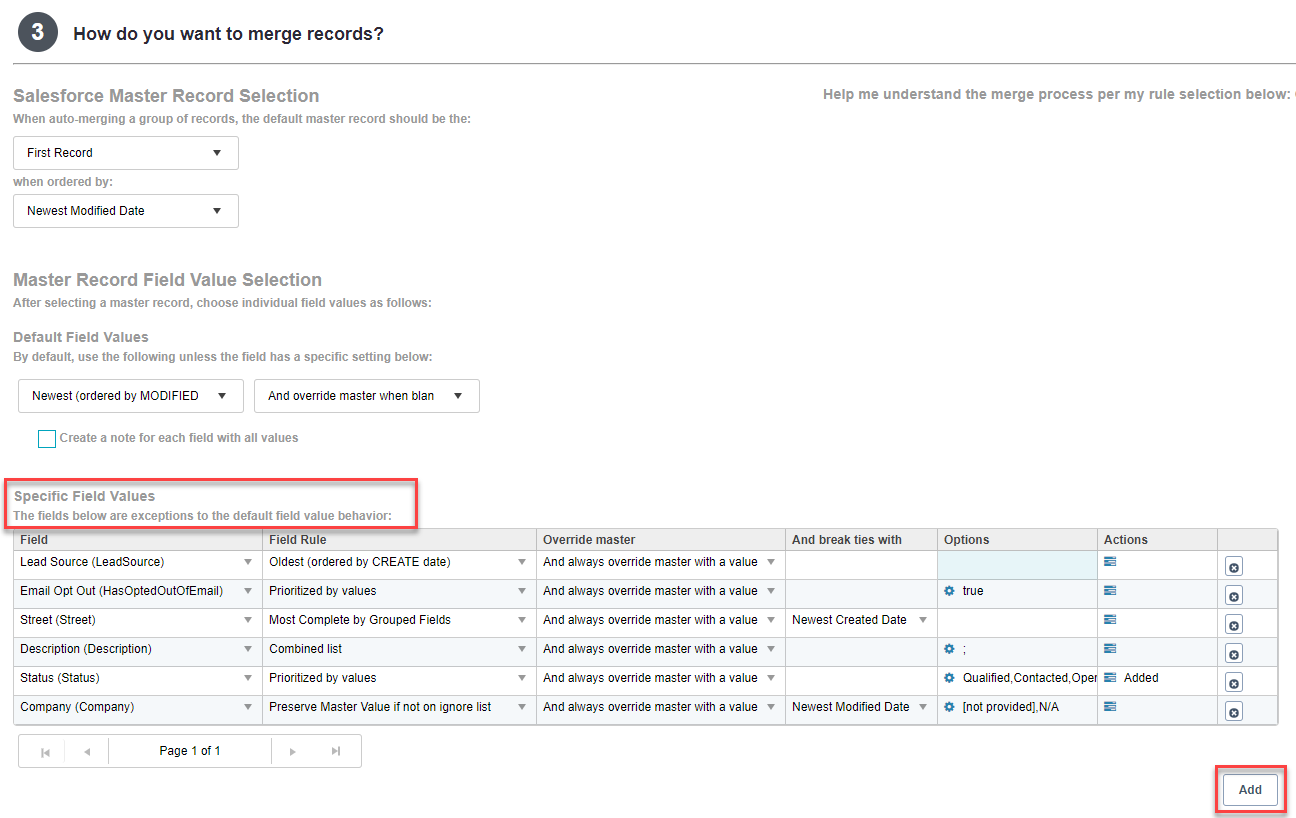
1. Choose the ‘Add’ button.
2. Field: Choose a field in the drop-down (standard or custom field). This drop box is searchable if typing in a full or partial field name.
Rule Options
3. Field Rule: Define which rule to use for the field chosen. Field rule options include:
Inherit Default | This option chooses the value based on the default field rule. It will not change how the field value gets chosen for the field. Non-controlling grouped fields can also use this option. Use this option to perform an 'Actions' setting but avoid changing how the field value would normally get chosen. |
Most Common | This option chooses the value that appears most frequently across the records in the group for each field. If no value appears more than any other value, Cloudingo will use the specified tiebreaker in the field rule. |
Oldest (ordered by MODIFIED date) | This option chooses the field values from the record that has the most recent or oldest modified date. Salesforce stores the modified date at the record level, not at the independent field level. |
Oldest (ordered by CREATE date) Newest (ordered by CREATE date) | This option chooses the field values from the record that has the oldest or newest created date. |
Ignore All Values: update to blank or to given value | This option replaces all field values with a specific value or to blank. The value is set in the Options section. It does not look up the current field values, and all values can be overwritten with the specified value. If a specific value is not provided, all values will be overwritten with a blank value. Use caution with this rule. |
Prioritized By Values | This option allows ranking values of the duplicate records based on their importance. The values get sorted in the order of importance in the Options section. Cloudingo will select the value that appears highest in the list. Use this option to prioritize important values like "true" over "false" for checkboxes or to prioritize certain values, such as ‘status’. If all records have the same value or if no records have a value that matches the priority rule, the tiebreaker will be used. |
Combined List | This option combines multiple values, such as multi-select picklists and short text fields. Values get separated by a semicolon, colon, comma, space, new line, or other. The combined values get set in the master record’s field value during the merge or conversion. For text fields, only use this rule for fields that typically do not contain the same values as their matched records. Consider using the ‘Combine field values into another field’ Action setting as an alternative to this rule to prevent copying the same value more than once into the master record. |
Override Master Value with value not on ignore list | This option will always override the master record value (even if the master value is not on the ignore list). Set the values to be ignored in the Options setting. Cloudingo will select an alternate value if one is available. The tiebreaker determines the value chosen if more than one or none of the records contain the value to be ignored. Consider using the ‘Preserve master value if not on ignore list’ instead to preserve master values that are not on the ignore list. |
Preserve Master Value if not on ignore list | This option preserves the master value if it is not on the ignore list. Set the values to be ignored in the Options setting. If the master value is on the ignore list, Cloudingo will choose another value from a non-master record. The tiebreaker determines the value chosen if more than one or none of the records contain the value to be ignored. |
Oldest (ordered by date field) Newest (ordered by date field) | This option chooses the record value with the oldest or newest value for custom date fields. |
Highest (numeric) Lowest (numeric) | This option chooses the record value with the highest or lowest value for currency & numeric value fields. |
Sum (numeric) | This option sums all record values together to determine what value to set on the master for currency & numeric value fields. |
Field with max characters | This option chooses the record value that has the longest length value. If no value is longer than any other record, Cloudingo will use the specified tiebreaker in the field rule. |
Most Complete by Grouped Fields | This option chooses the values for the group of fields from the record that has the most complete data. Only available if a field grouping has been configured in Step 2 of the rule configuration. |
Incoming record (import or API value) | This option chooses the field value from the import or API record. If an incoming record does not have a value for any given field, Cloudingo will use the specified tiebreaker in the field rule. |
Choose active owner when master has inactive owner | This option is only available for field rules configured on 'Owner ID'. If the master record's owner is inactive, it will choose the owner from the non-master record with an active owner. If there is more than one non-master record with an active owner, or if there are no active owners in the group, the owner will be chosen based on the tiebreaker specified. |
Override Options
4. Override master: Choose an override option. Override options include:
Inherit Default override | This option chooses the override based on the default field rule. Use this option to perform an 'Actions' setting but avoid changing how the field value would normally get chosen for merge. |
Never override master | This option preserves the field value for the master record, even if blank (regardless of the rule chosen). This option will not give the most complete record possible for the field during merge. |
Override master when blank | This option preserves the values of the selected master record. However, if there are empty fields on the master record, Cloudingo will populate those fields based on the record defined in the first drop-down menu resulting in the most complete record possible. If the default rule is already configured to ‘override master when blank’, setting up a field rule is only necessary if needing to use a different rule option for the specific field than what is set at the Default field rule level. |
Always override master with a value | This option chooses the field value based on the Rule defined. It always will pull from the record that contains a value. It will not pull from a blank value. If a value is not detected based on the rule defined, the master is always retained. If the master value already fits the rule, the master value is retained. |
Always override master even with a blank | This option chooses the field value based on the Rule defined, even if the value is blank. This could result in overriding the master (that has a value) with a blank value (if the non-master record is blank and fits the rule defined). |
5. And break ties with: The tiebreaker setting will only be editable when using a rule that requires a tiebreaker. If more than one record or none of the records meet the defined criteria, a tiebreaker is necessary for determining which record to pull the value from.
6. Options: The Options gear icon will appear when a rule is chosen that requires additional settings. Define the settings for the rule requirements.
Actions

7. Actions: Choose the Actions icon to do any of the following actions:
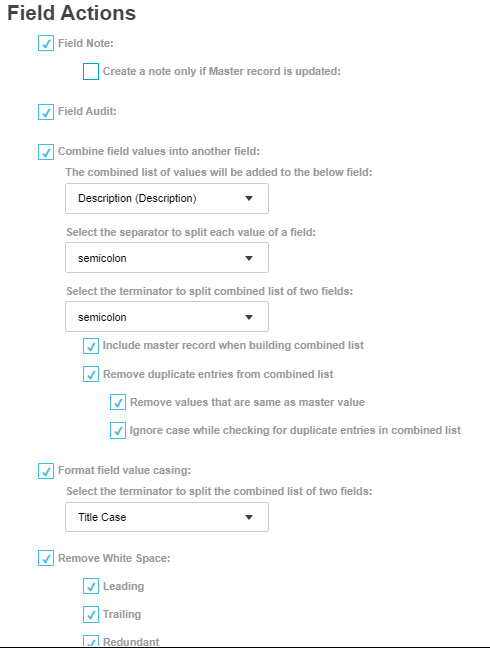
Field Note: This option will create a Salesforce note under the ‘Notes’ or ‘Notes & Attachments’ section for the specified pre-merge field value.
Choose to ‘Create a note only if the Master record values is updated’ option if desired.
This option is not needed if the option to create a note for all fields is enabled in the Default field rule.
Notes take up space and are not searchable in Salesforce.
Field Audit: Choose to add the pre-merged field value to the Cloudingo Audit report.
To set up a field rule for auditing only without changing behavior of how the master or default rule chooses the value, set the rule and override options to ‘inherit default’.
Combine field values into another field: This works similarly to the ‘Combined List’ rule, but Cloudingo will dedupe the values before copying.
Choose this option to:
Combine deduped values from all records from one field to copy into another field.
Combine deduped values from all records from a field back into the same field.
Field: Choose the field that Cloudingo will be copying the combined values into.
If copying combined values into a different field, and do not want to change the behavior of how the original field value gets chosen during merge, choose the 'Inherit Default' rule & override options to retain the master/default field rule behavior. Or define a specific rule to determine the kept value during merge. The combined values get copied to the specified field, while retaining the logic applied to the original field value.
If copying combined values back into the same field, set the main field rule ‘Inherit Default’ and ‘always override the master with a value’.
Do not use the Combined List rule option and the Combined field values into another field Action setting on the same rule. This will result in values combining into the field twice (once with non-deduped values and once with deduped values)
Separator: Choose the separator setting. Separator separates the different values of each record for the same field.
Terminator: Choose the terminator setting. Terminator separates the values of different fields on multiple records.
‘Include master record when building combined list’: Choose this option to ensure that all values get copied (including the master record’s value).
To only include values from the deleted/non-master records only, deselect this option.
‘Remove duplicate entries from the combined values’: Choose this option to check in between the Separator & Terminator for existing or duplicated values within the records. This will prevent Cloudingo from copying the same value into the field more than once.
Do not change the separator & terminator settings after initial settings have been configured and merging has already been performed with the rule. This will cause issues in future merges when checking for existing values.
‘Remove values that are the same as the master value’: Choose this option to check all values already evaluated and eliminate copying a value from any of the non-master records if the value is the same as the master record. If deselected, the non-master value gets included in the combined list even if it exists on the master record.
‘Ignore case while checking for duplicate entries in the combined values’: Choose this option to ignore case sensitivity (upper or lower case) when checking for an existing value between the Separator & Terminator values.
d. Format field value casing: Choose to reset the value for the field to be all upper case, lower case, or title case.
e. Remove white space: Choose to remove white spaces from the record value by choosing from leading, trailing, and/or redundant.
Tips for Field Considerations
For preserving checkbox values, users should use the ‘Prioritized by Values’ rule and ‘Always Override the Master With a Value’ and set the 'Option' setting to prioritize true values over false values.
To preserve values in multi-picklist fields, users should select the ‘Combined List’ rule and ‘Always Override the Master With a Value.'
Fields referencing or linked to external systems need special consideration, and users may need to set up field-level rules to retain the value, set up an audit under ‘Actions’ to capture the deleted record value, or define the master record as the record with the link to the external system.
Export the Audit Report to obtain external record values for deleted records. Use the data to find and remove records from the external system.
Exceptions
Set up exception rules to exclude records from automatic merging while still viewing them in the merge preview. Manually merge the excluded records later or adjust the filter configuration to exclude them entirely.

Exclude: Choose the Exclusion rule. Options include:
Group when no value exists for any record in group for a field
Group when one or more records is protected
Group when same value does not exist in all records (Blank not treated as a value)
Group when Specified Value exists in more than one record
Group when record has less than X% of the fields with values
Group when its size is >=X
Group when its size is <=X
Record when Non Master Record is protected
Record when Non Master Record is not an Import Record
Record when Non Master Record has any value in field
Record when Non Master Record has specified value in field
Record when Value does not match master record for field
Record when Value does not match master record (Blank value is matched)
Field: Choose the field for the exclusion rule.
Run Exception Rule: Choose a rule option when to apply the exception.
'After master record and field rules are evaluated':
Rule determination for the master and field value selections is applied first and the exceptions are applied afterward based on the values populated.
Values from excluded records may still pull into the final record during merge.
'After master record but before evaluating field level rules':
Rule determination for the master is applied first, exception/exclusions are applied second, and field value selections are applied only to the non-excluded records.
Values from excluded records will not pull into the final record during merge.
'Before determining master record and evaluating field rules':
Only available for group exclusion rules that do not evaluate the master to determine the exclusion.
Exception/exclusions are determined first and rule determination for the master and field value selections is applied afterward only to the non-excluded records.
Values from excluded records will not pull into the final record during merge.
The master record selected can vary from the original master rule if the original master is excluded from the merge.
Notes About Exclusions:
Exclusions can leave records in filters after jobs complete processing. Exclusions do not filter records out. Consider using filter logic in addition to exclusion rules to exclude records from pulling into the filter results.
Exclusions can cause merge errors that indicate that groups have been 'skipped' due to exception rules. If all records in the group have been excluded, nothing remains in the group to merge. This is particularly true when using options B or C above.
Group rules will skip auto-merging the entire group of records. Record rules will only skip the records affected by the exclusion rule while proceeding to merge the records in the group that are not excluded.
Options: The Options gear icon will appear when choosing an exclusion rule that requires additional settings. Define the settings for the rule requirements.
Rule Summary

Choose the question mark next to ‘Help me understand the merge process per my rule selection below’ to view a detailed explanation of the rule configuration.
What is Next?
After setting up filters and rules, it is time to preview the results for accuracy!