Purpose
The Cloudingo Integration Web Service API allows Enterprise customers to use the Cloudingo platform from their own Enterprise systems. The power to find duplicates, merge data into records, and manage data does not have to be done from the Cloudingo website alone.
System Design
The Cloudingo platform runs in its own cloud, separate from Salesforce. The setup and configuration involve connecting Cloudingo to your Salesforce cloud and creating endpoints in Cloudingo for your Enterprise system to connect to.
Proprietary Indexing
Cloudingo leverages its own indexes for finding duplicates. These proprietary indexes allow for more complex duplicate scenarios than can be supported in Salesforce Apex and SOQL. The Cloudingo system is also unrestricted by Salesforce governance (CPU limits, query result sizes, looping maximums) because indexes on the Cloudingo cloud servers are used to perform searches.
Newly created or modified records in Salesforce result in index updates in the Cloudingo platform. The speed at which these updates occur is dependent on the system load for both the Salesforce and Cloudingo servers, as well as the Cloudingo synchronization mode being used for your account. An understanding of index updates is fundamental to understanding results. Usually, the timing of index updates is not an issue, but when data is flowing into Salesforce from multiple sources simultaneously, duplicate detection will depend on the indexes being up-to-date.
Web Service Technologies
The Cloudingo Web Service API is provided to customers via standard web services technologies. We support both REST and SOAP technologies.
Dual Support for REST/JSON and SOAP/XML
The dual support for REST and SOAP allows customers to program against our platform in the most comfortable way for that customer. The REST endpoints use JSON as the data format, as is the most common convention in modern web programming. The SOAP endpoints use XML as the data format. SOAP provides WSDL definitions of the web service interface which can be used by tools to generate proxy code. These proxies are convenient for interacting with the web service in a way that is natural to the programming language being used by our customers.
Navigation
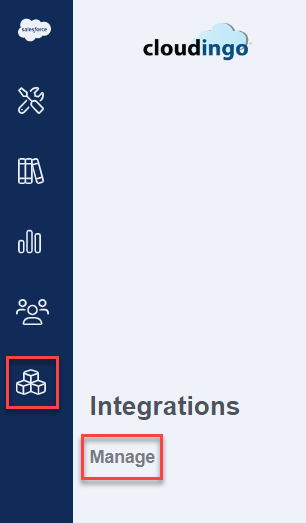
- The Cloudingo Integration dashboard can be accessed by logging into https://app.cloudingo.com. Once logged in, the user is presented with the Dedupe dashboard by default. To access the Cloudingo integration dashboard, choose the 'Integrations' → 'Manage' option from the left-hand-side navigation window.
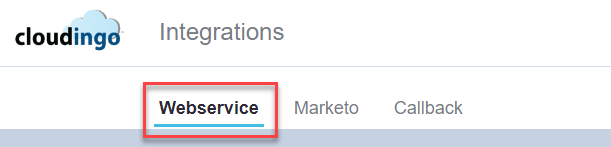
- At the top of the page, choose the 'Webservice' tab.
- If no integrations have previously been created, the screen will automatically display an option to 'Create New'. The option is also available under the 'Actions' menu.
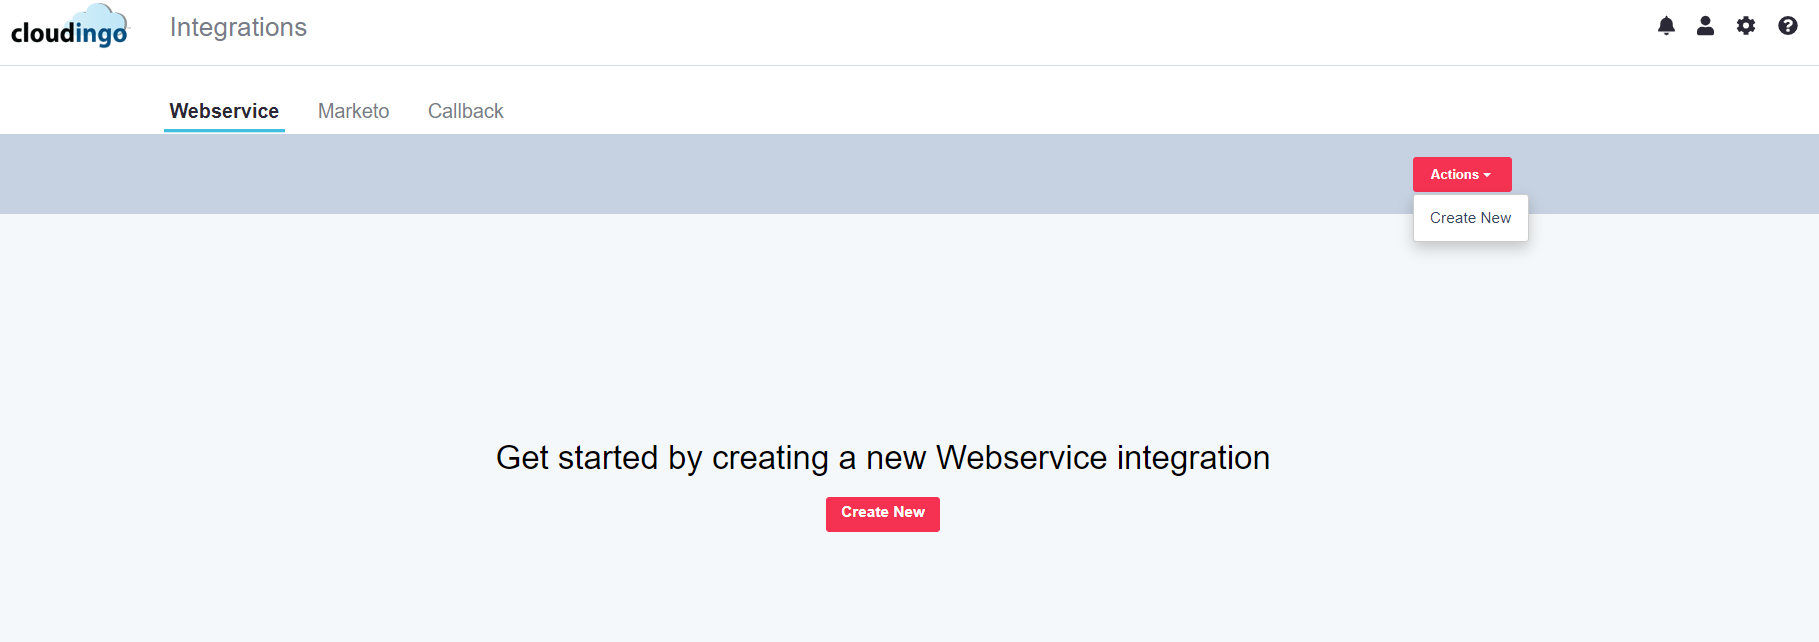
- After choosing the option to create a new Webservice, you will be taken to the Webservice integration Create screen.
Step 1: Cloudingo Settings
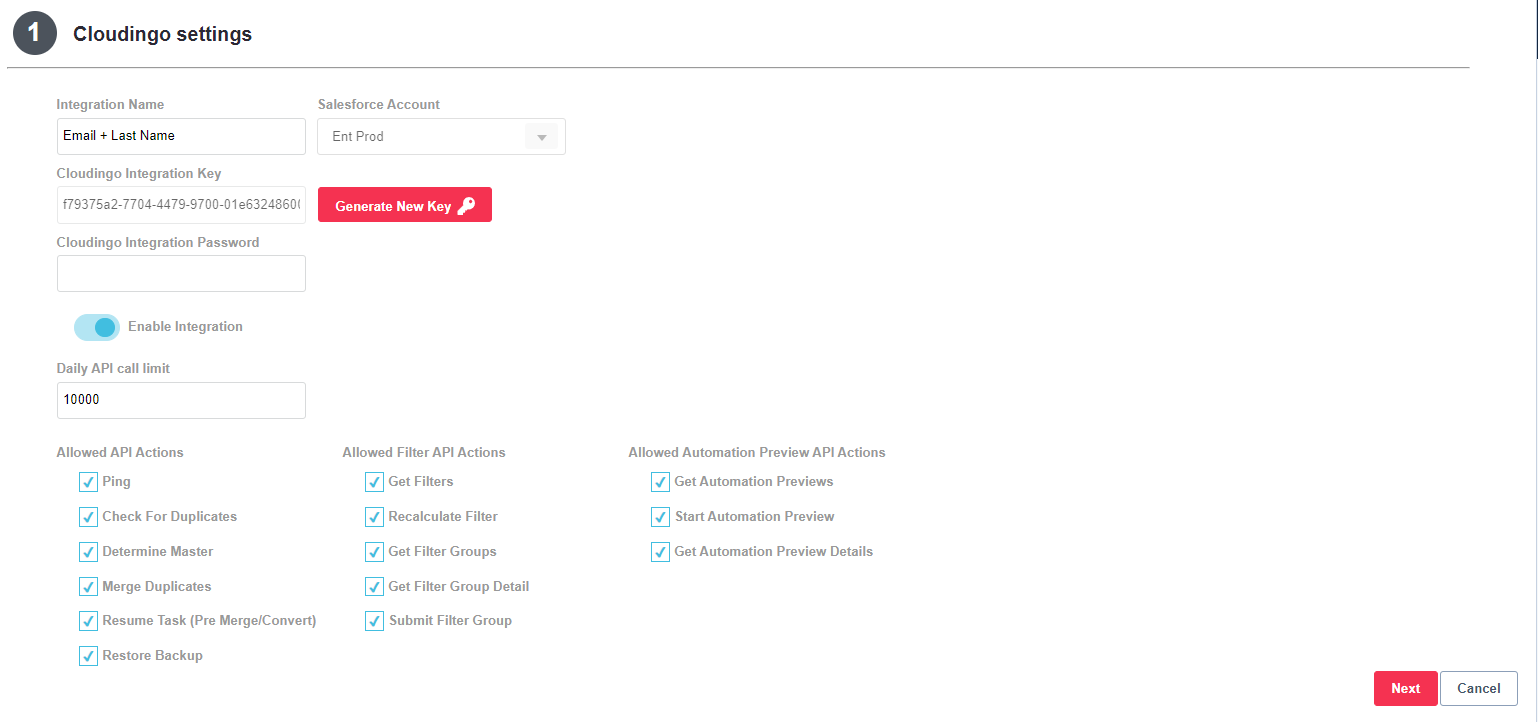
- Integration Name: Give the integration a descriptive name.
- Salesforce Account: Choose the desired Account that the integration will apply.
- If only one org is connected to Cloudingo, it will default automatically.
- Cloudingo Integration Key: This is the unique identifier for the integration.
- A key will be populated by default, but a new key can be regenerated if desired.
- This key will be included in the headers when generating an access token to call the Cloudingo Integration API.
- Cloudingo Integration Password: Enter any password.
- Password entries will be automatically encrypted.
- Plain text version of the password is never exposed but can be viewed from the integration configuration using the 'show password' icon.
- In conjunction with the Cloudingo Integration Key, the (encrypted) Integration Password will be sent in the headers when generating an access token used to authenticate incoming API calls.
- Password entries will be automatically encrypted.
- Enable Integration: Choose this option to enable the integration.
- Deselect to disable the integration.
- Daily API call limit: Value can be adjusted downward to limit the number of API calls that Cloudingo can use within a 24-hour period. The
- The API call limit cannot exceed the default maximum established for the Account.
- Allowed API Actions: Choose which actions should be available in the API.
- By default, all options are enabled.
- Example: Limit the API to not merge records via the API by deselecting that option. Cloudingo will return an Action Not Allowed error if the action is called.
- Visit the Allowed API Actions section below (or click here to open the list in a separate browser tab) for full definitions of API actions available.
- Allowed Filter API Actions: Choose which filter actions should be available in the API.
- By default, all options are disabled.
- Visit the Allowed API Actions section below (or click here to open the list in a separate browser tab) for full definitions of filter API actions available.
- Allowed Automation Preview API Actions: Choose which automation preview actions should be available in the API.
- By default, all options are enabled.
- Visit the Allowed API Actions section below (or click here to open the list in a separate browser tab) for full definitions of automation preview API actions available.
Step 2: Duplicate search settings
Determine which objects should be evaluated when performing the check for duplicates as well as which objects can be sent to determine master and merge duplicates. Pre-existing Dedupe filters can be used, or new filtering logic can be built.
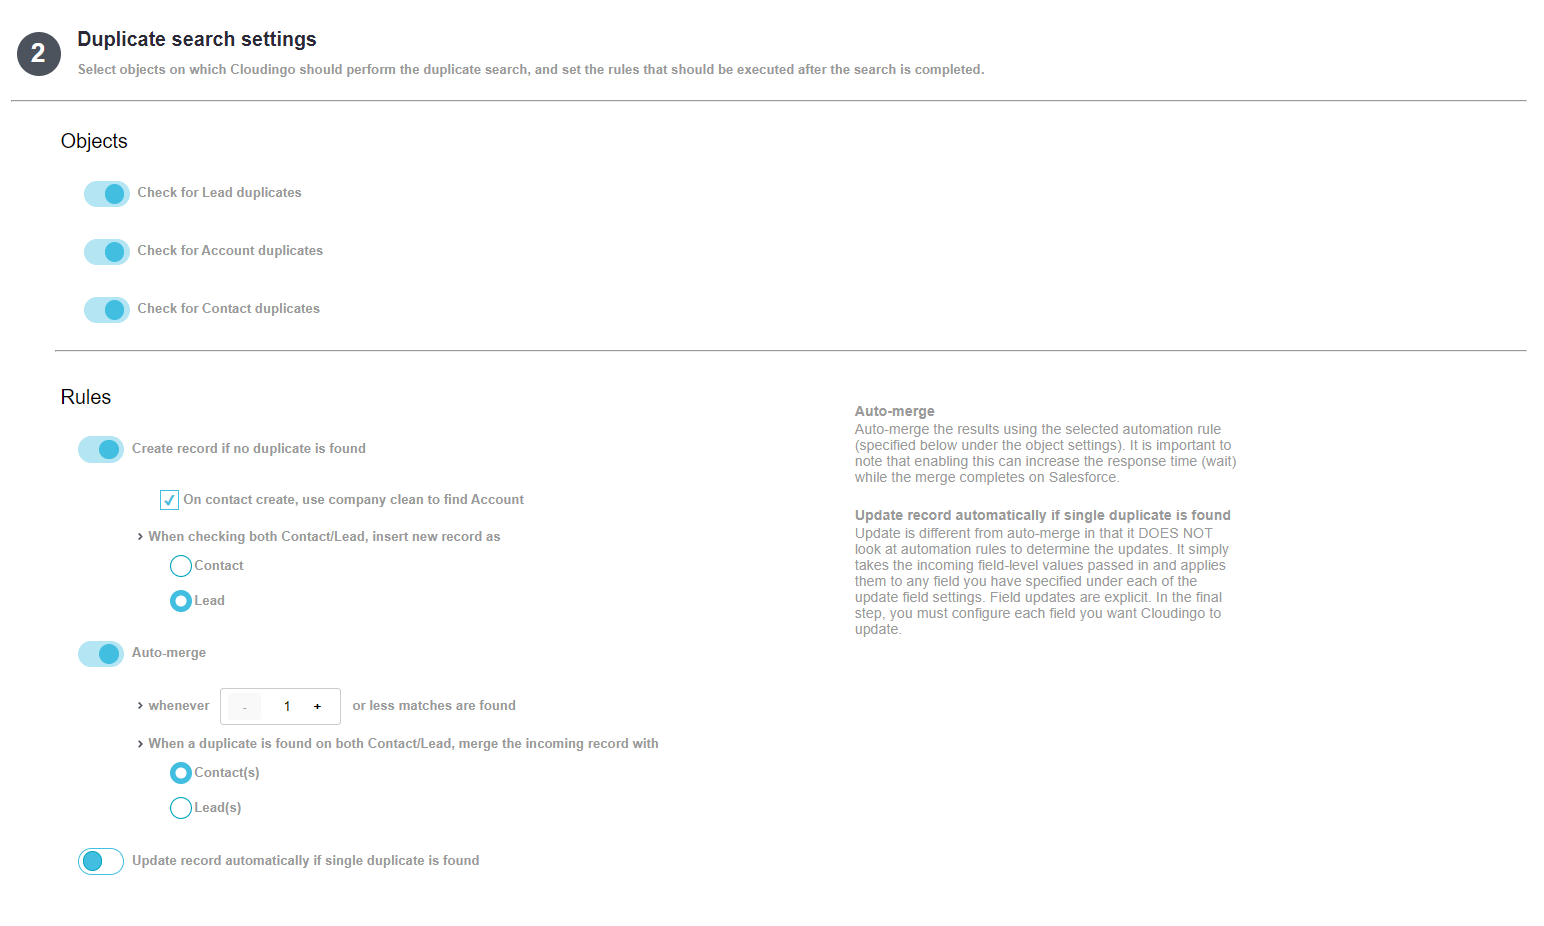
- Check for Lead duplicates: Choose this option to scan incoming records against existing Leads in Salesforce to identify a match.
- Check for Account duplicates: Choose this option to scan incoming records against existing Accounts in Salesforce to identify a match.
- Check for Contact duplicates: Choose this option to scan incoming records against existing Contacts in Salesforce to identify a match.
- Create record if no duplicate is found: Choose this option to allow the incoming record into Salesforce if a duplicate is not detected.
- On contact create, use company clean to find Account: Choose this option to use the 'Company Clean' matching algorithm instead of 'Exact' to search for existing Accounts during the Contact scan.
- If a duplicate Contact is not detected, but a matched Account is detected, the newly created Contact (if choosing to create the record as a Contact) can be created under the matched Account.
- When checking both Contact/Lead, insert new record as:
- Contact: If duplicate scans across both objects do not find a match, newly inserted records will get created as Contacts instead of Leads.
- Lead: If duplicate scans across both objects do not find a match, newly inserted records will get created as Leads.
- On contact create, use company clean to find Account: Choose this option to use the 'Company Clean' matching algorithm instead of 'Exact' to search for existing Accounts during the Contact scan.
- Auto-merge: Choose this option to apply the Check for Duplicates action and merge the duplicates detected.
- Rules assigned in the Object Settings (Step 3) will determine how existing field values are retained or updated/overwritten.
- Whenever 'x' or less matches are found: Set a threshold for how many duplicates can be merged if more than one record is detected as a match.
- Threshold values range from 1 to 10.
- If the scan detects more than the set threshold count in matched records, the merge will not be performed.
- Regular maintenance on dedupe filters should help to keep the duplicate matches detected to a minimum.
- When a duplicate is found on both Contact/Lead, merge the incoming record with:
- Contact(s): If the scan detects at least one duplicate Contact and one duplicate Lead in Salesforce, this option will merge the incoming record with the duplicate Contact record instead of the Lead.
- Lead(s): If the scan detects at least one duplicate Contact and one duplicate Lead in Salesforce, this option will merge the incoming record with the duplicate Lead record instead of the Contact.
- Regular maintenance on the convert dedupe filters should help prevent scans from detecting duplicates in both objects.
- When enabled, the 'Update record automatically if a single duplicate is found' cannot be chosen. The setting allows for either a merge or an update.
- Update record automatically if single duplicate is found: Choose this option to apply the Check for Duplicates action and perform specified updates (overrides) to the existing record values.
- Updates will only apply if a single record match is detected. If more than one match is detected, the update will not be performed.
- Rules for merging data are not applied. The incoming values will always override the existing record values.
- Fields must be configured, indicating which values will be overwritten with the incoming record in the Object Settings (Step 3).
Step 3: Object Settings
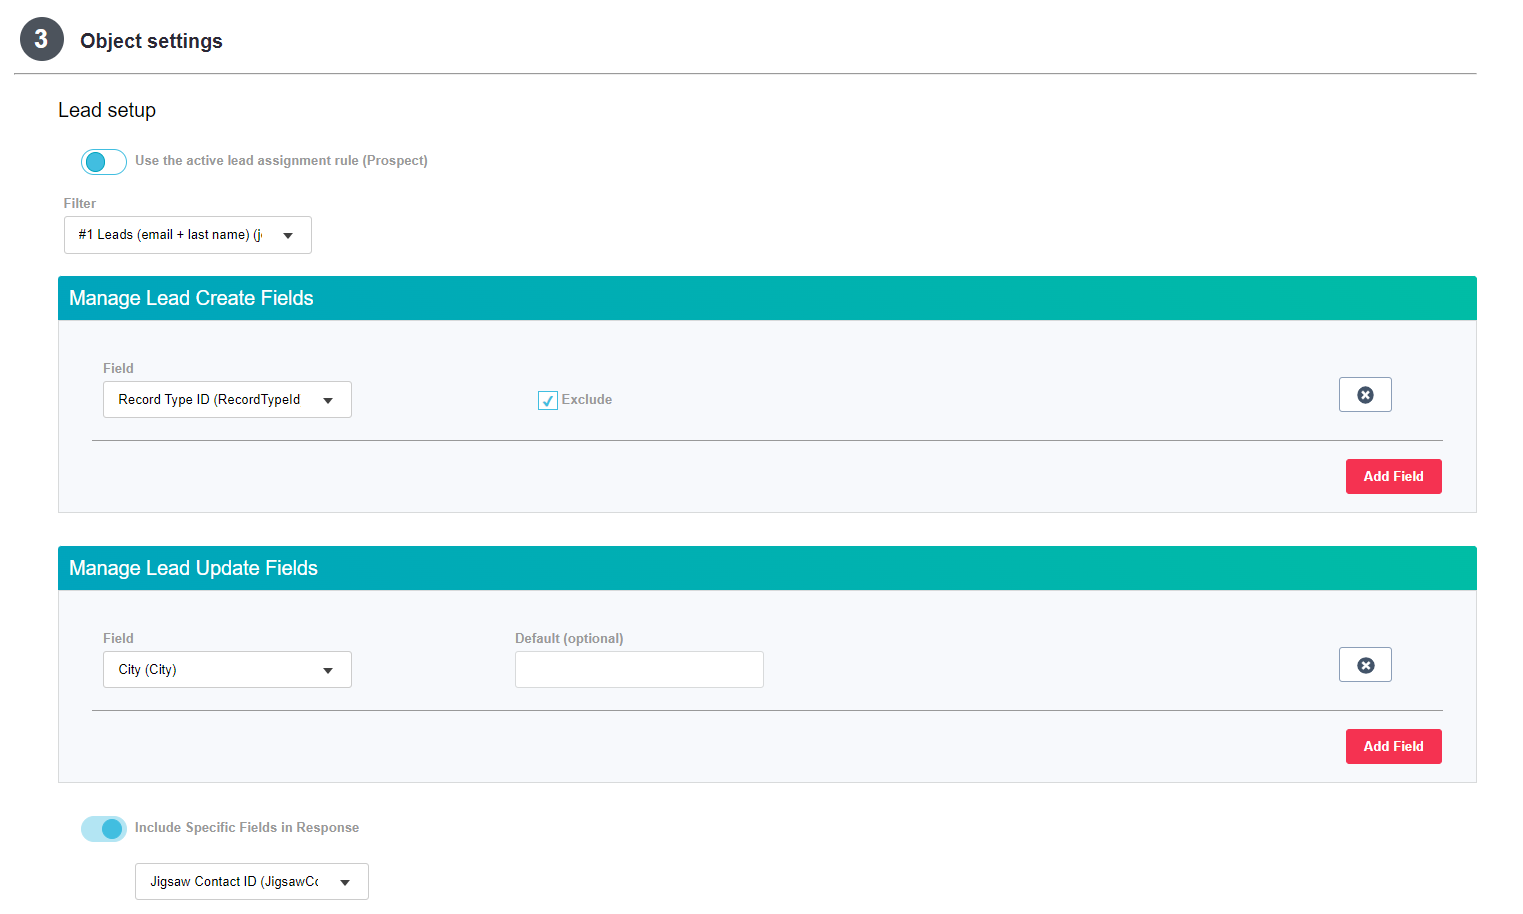
Lead setup
Options only appear if 'Check for Lead Duplicates' is enabled in Step 2.
- Use the active lead assignment rule: The option only appears if lead assignment rules are configured and enabled in Salesforce.
- Choose this option to apply the defaulted lead assignment rule in Salesforce on newly created records.
- Filter: Choose an existing filter or create custom filter logic to use to identify duplicate matches.
- Existing: Choose an existing dedupe filter. The filter name & user dashboard where the filter is located will be displayed for easy selection. The rule already assigned to the pre-configured filter will automatically get applied for merging logic (master and field selections).
- Custom: Choose 'Custom' in the drop box to build new filter logic. Matching criteria and options are limited. If needing to use options other than 'Exact', 'Ignore Case', or 'Enable Synonym Matching', pre-build a dedupe filter and choose the filter from the list.
- Automation Rule: Choose a rule from the drop box to tell Cloudingo how to merge the records (master and field selections).
- Custom Lead Filter - Matching Fields: Choose the 'Add Field' option to add matching criteria.
- Lead Field: Choose a field for matching criteria in the drop-down box.
- Matching Style: Choose a matching style (Exact).
- Other Options: Choose desired options (Ignore Case or Enable Synonym Matching if applicable).
- Repeat steps until all matching criteria are defined.
- Custom Lead Filter - Limit Records (Optional): Choose the 'Add Field' option to add limit criteria.
- Lead Field: Choose a field in the drop box.
- Condition: Choose a condition (Example: Equals, Not Equals, Has a Value, Has no Value).
- Repeat steps until all limits are defined.
- Manage Lead Create Fields: The option only appears if the 'Create record if no duplicate is found' option is enabled in Step 2. If checking both Leads & Contacts, the option will only appear if 'When checking both Contact/Lead, insert new record as'; 'Lead' is chosen in Step 2.
- All incoming record values will get set on the newly created Leads by default.
- Setting up fields in this step is optional. Set up fields to exclude certain fields from the insert or to default a specific value for certain fields to get applied to all records instead of taking the incoming record value.
- Choose 'Add Field'.
- Choose a field in the drop box.
- Choose 'Exclude' to exclude the field's value from getting set on the newly created Leads.
- Or populate a value in the 'Default (optional)' box to apply a specific value for all Lead records created instead of taking the incoming record's value.
- Repeat steps for any additional fields that need to be excluded or defaulted.
- Manage Lead Update Fields: The option only appears if the 'Update record automatically if single duplicate is found' option is enabled in Step 2.
- Choose 'Add Field'.
- Choose a field in the drop box.
- Fields configured will override the existing record's value with the incoming record's value.
- Populate a value in the 'Default (optional)' box to apply a specific value to all Lead records instead of taking the incoming record's value.
- Repeat steps until all fields for override are configured.
- Include Specific Fields in Response (optional): Choose this option to apply the Check for Duplicates action and have a specific field returned from the API call. For example, a system field might exist on every record, and the values need to be returned with any duplicates found (perhaps to update another external system).
- Enable the setting by toggling the option on.
- Choose a field in the drop box.
- Repeat steps for any additional fields that need to be returned from the API call.
Account setup
Options only appear if 'Check for Account Duplicates' is enabled in Step 2.
- Filter: Choose an existing filter or create custom filter logic to use to identify duplicate matches.
- Existing: Choose an existing dedupe filter. The filter name & user dashboard where the filter is located will be displayed for easy selection. The rule already assigned to the pre-configured filter will automatically get applied for merging logic (master and field selections).
- Custom: Choose 'Custom' in the drop box to build new filter logic. Matching criteria and options are limited. If needing to use options other than 'Exact', 'Ignore Case', or 'Enable Synonym Matching, pre-build a dedupe filter and choose the filter from the list.
- Automation Rule: Choose a rule from the drop box to tell Cloudingo how to merge the records (master and field selections).
- Custom Lead Filter - Matching Fields: Choose the 'Add Field' option to add matching criteria.
- Account Field: Choose a field for matching criteria in the drop-down box.
- Matching Style: Choose a matching style (Exact).
- Other Options: Choose desired options (Ignore Case or Enable Synonym Matching if applicable).
- Repeat steps until all matching criteria are defined.
- Custom Account Filter - Limit Records (Optional): Choose the 'Add Field' option to add limit criteria.
- Account Field: Choose a field in the drop box.
- Condition: Choose a condition (Example: Equals, Not Equals, Has a Value, Has no Value).
- Repeat steps until all limits are defined.
- Manage Account Create Fields: The option only appears if the 'Create record if no duplicate is found' option is enabled in Step 2.
- All incoming record values will get set on the newly created Accounts by default.
- Setting up fields in this step is optional. Set up fields to exclude certain fields from the insert or to default a specific value for certain fields to get applied to all records instead of taking the incoming record value.
- Choose 'Add Field'.
- Choose a field in the drop box.
- Choose 'Exclude' to exclude the field's value from getting set on the newly created Accounts.
- Or populate a value in the 'Default (optional)' box to apply a specific value for all Account records created instead of taking the incoming record's value.
- Repeat steps for any additional fields that need to be excluded or defaulted.
- Manage Account Update Fields: The option only appears if the 'Update record automatically if single duplicate is found' option is enabled in Step 2.
- Choose 'Add Field'.
- Choose a field in the drop box.
- Fields configured will override the existing record's value with the incoming record's value.
- Populate a value in the 'Default (optional)' box to apply a specific value to all Account records instead of taking the incoming record's value.
- Repeat steps until all fields for override are configured.
- Include Specific Fields in Response (optional): Choose this option to apply the Check for Duplicates action and have a specific field returned from the API call. For example, a system field might exist on every record, and the values need to be returned with any duplicates found (perhaps to update another external system).
- Enable the setting by toggling the option on.
- Choose a field in the drop box.
- Repeat steps for any additional fields that need to be returned from the API call.
Contact setup
Options only appear if 'Check for Contact Duplicates' is enabled in Step 2.
- Filter: Choose an existing filter or create custom filter logic to use to identify duplicate matches.
- Existing: Choose an existing dedupe filter. The filter name & user dashboard where the filter is located will be displayed for easy selection. The rule already assigned to the pre-configured filter will automatically get applied for merging logic (master and field selections).
- Custom: Choose 'Custom' in the drop box to build new filter logic. Matching criteria and options are limited. If needing to use options other than 'Exact', 'Ignore Case', or 'Enable Synonym Matching', pre-build a dedupe filter and choose the filter from the list.
- Automation Rule: Choose a rule from the drop box to tell Cloudingo how to merge the records (master and field selections).
- Custom Contact Filter - Matching Fields: Choose the 'Add Field' option to add matching criteria.
- Contact Field: Choose a field for matching criteria in the drop-down box.
- Matching Style: Choose a matching style (Exact).
- Other Options: Choose desired options (Ignore Case or Enable Synonym Matching if applicable).
- Repeat steps until all matching criteria are defined.
- Custom Contact Filter - Limit Records (Optional): Choose the 'Add Field' option to add limit criteria.
- Choose 'Add Field'.
- Field: Choose a field in the drop box.
- Condition: Choose a condition (Example: Equals, Not Equals, Has a Value, Has no Value).
- Repeat steps until all limits are defined.
- Manage Contact Create Fields: The option only appears if the 'Create record if no duplicate is found' option is enabled in Step 2. If checking both Leads & Contacts, the option will only appear if 'When checking both Contact/Lead, insert new record as' 'Contact' is chosen in Step 2.
- All incoming record values will get set on the newly created Contacts by default.
- Setting up fields in this step is optional. Set up fields to exclude certain fields from the insert or to default a specific value for certain fields to get applied to all records instead of taking the incoming record value.
- Choose 'Add Field'.
- Choose a field in the drop box.
- Choose 'Exclude' to exclude the field's value from getting set on the newly created Contacts.
- Or populate a value in the 'Default (optional)' box to apply a specific value for all Contact records created instead of taking the incoming record's value.
- Repeat steps for any additional fields that need to be excluded or defaulted.
- Manage Contact Update Fields: The option only appears if the 'Update record automatically if single duplicate is found' option is enabled in Step 2.
- Choose 'Add Field'.
- Choose a field in the drop box.
- Fields configured will override the existing record's value with the incoming record's value.
- Populate a value in the 'Default (optional)' box to apply a specific value to all Contact records instead of taking the incoming record's value.
- Repeat steps until all fields for override are configured.
- Include Specific Fields in Response (optional): Choose this option to apply the Check for Duplicates action and have a specific field returned from the API call. For example, a system field might exist on every record, and the values need to be returned with any duplicates found (perhaps to update another external system).
- Enable the setting by toggling the option on.
- Choose a field in the drop box.
- Repeat steps for any additional fields that need to be returned from the API call.
JSON Sample
At the bottom of Step 3, an option to 'Show Sample JSON Requests' is available, which will display examples of how input and output should look.
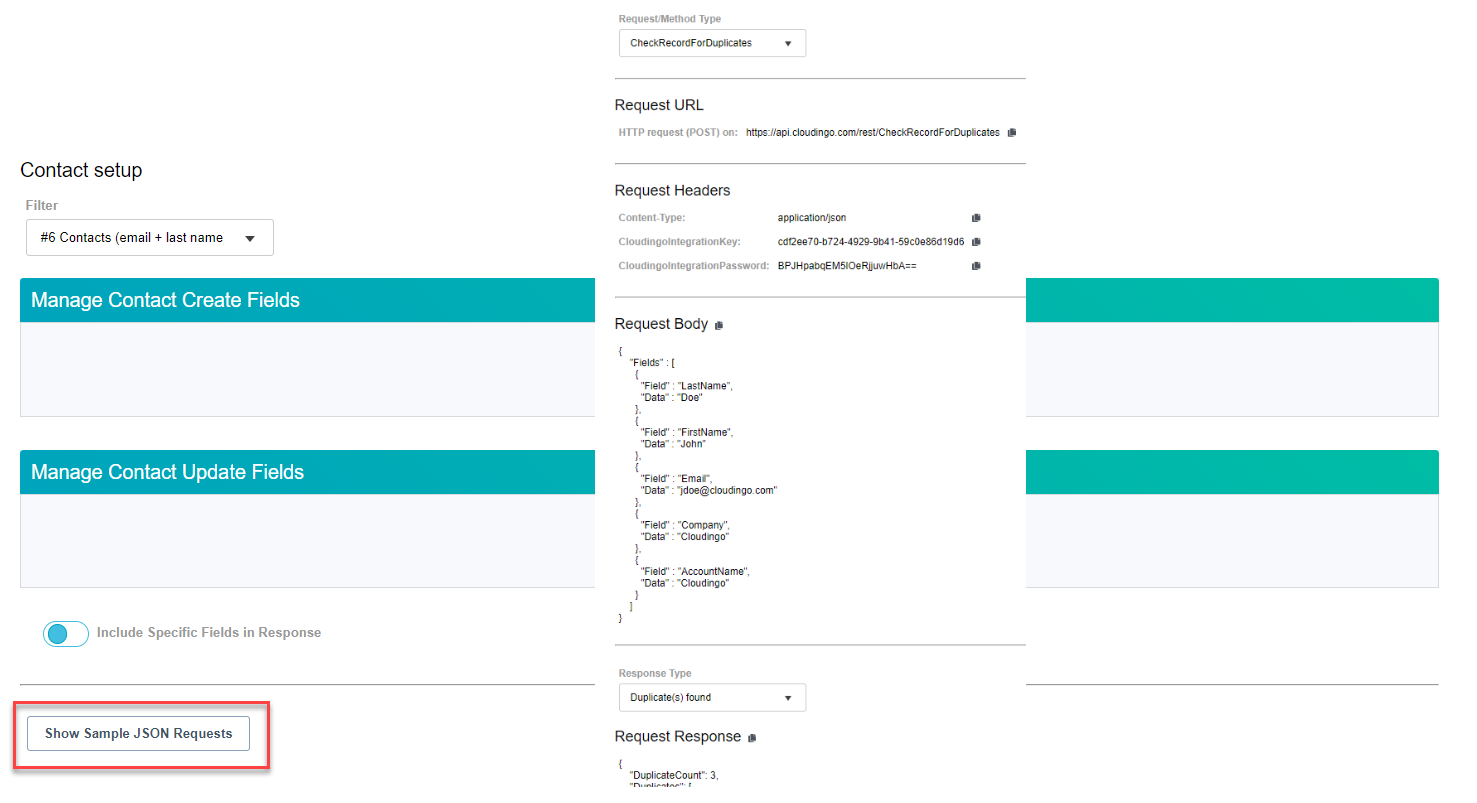
Choose a Request/Method Type. Options include:
- CheckRecordForDuplicates
- CheckForDuplicates
- CheckIdsForDuplicates
Webservice Integration Activity Report
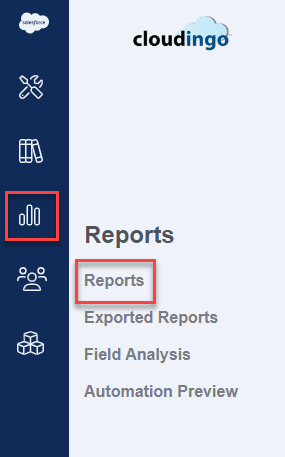
- To see the details of the calls that have been made, navigate to the Reports Dashboard by choosing the 'Reports' → 'Reports' option from the left-hand-side navigation window.
- Search for the Webservice Integration Activity report on the reports dashboard.
- If the report is not enabled, you can enable it under 'Actions' → 'View Reports' (top right in the reports dashboard).
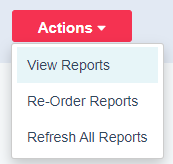
- Check the box next to the report name and 'Save'.

- If the report is not enabled, you can enable it under 'Actions' → 'View Reports' (top right in the reports dashboard).
- The report output will provide the ServiceName, Method, Status, StatusMessage, Date.

Allowed API Actions
In this section, choose which actions should be available in the API. By default, all options are enabled, but the options can be restricted if desired. For example, to limit the API so that merge records cannot be performed via the API, deselect that option, and Cloudingo API will return an Action Not Allowed error if the action is called.
Available Actions
| Action | Input | Output | Version |
|---|---|---|---|
| CheckRecordForDuplicates | Set of fields and values for the record to evaluate. The duplicate criteria can be set up on the Cloudingo Integration Dashboard. | Integration Action Status Code, along with a list of potential duplicates per object based on the configuration. If a new record is created, it will provide the new record ID. | 1.0 |
| CheckForDuplicates | Same as CheckRecordForDuplicates, but will take up to 200 records as an array in a single API call. | Same as CheckRecordForDuplicates, but will return an array of results corresponding to the records provided. | 1.0 |
| CheckIdsForDuplicates | Up to 200 Salesforce IDs | Same as CheckForDuplicates | 1.1 |
| DetermineMaster | Duplicate Records as returned from the check for duplicates method | Integration Action Status, Master record along with any fields that would be changed based on merge rules, and all other duplicate record IDs. | 1.0 |
| MergeDuplicates | Duplicate Records as returned from the check for duplicates method | Integration Action Status, Backup ID, Master record ID, Master record fields details | 1.0 |
| MergeRecords | Salesforce IDs of records to be merged | Integration Action Status, Backup ID, Master record ID | 1.2 |
| ResumeTask | TaskId as returned by any applicable callback | Integration Action Status | 1.0 |
| RestoreBackup | BackupId as returned by any method performing a merge, passed either through the body or as a query parameter | Integration Action Status | 1.0 |
| Ping | None | Time in total minutes from the current time until the next expected outage. If there is no scheduled maintenance window upcoming, this will return a negative number referring to the last maintenance window in the past. | 1.0 |
| GetFilters | Optional FilterRequest object to determine if Dedupe or Data Maintenance Filters are requested | List of Filters currently available on the Cloudingo Dashboard along with details of the current Match and Group count in addition to the filter status | 1.0 |
| GetFilterGroups | Filter info as returned from the get filters method | List of the filter groups for the filter provided | 1.0 |
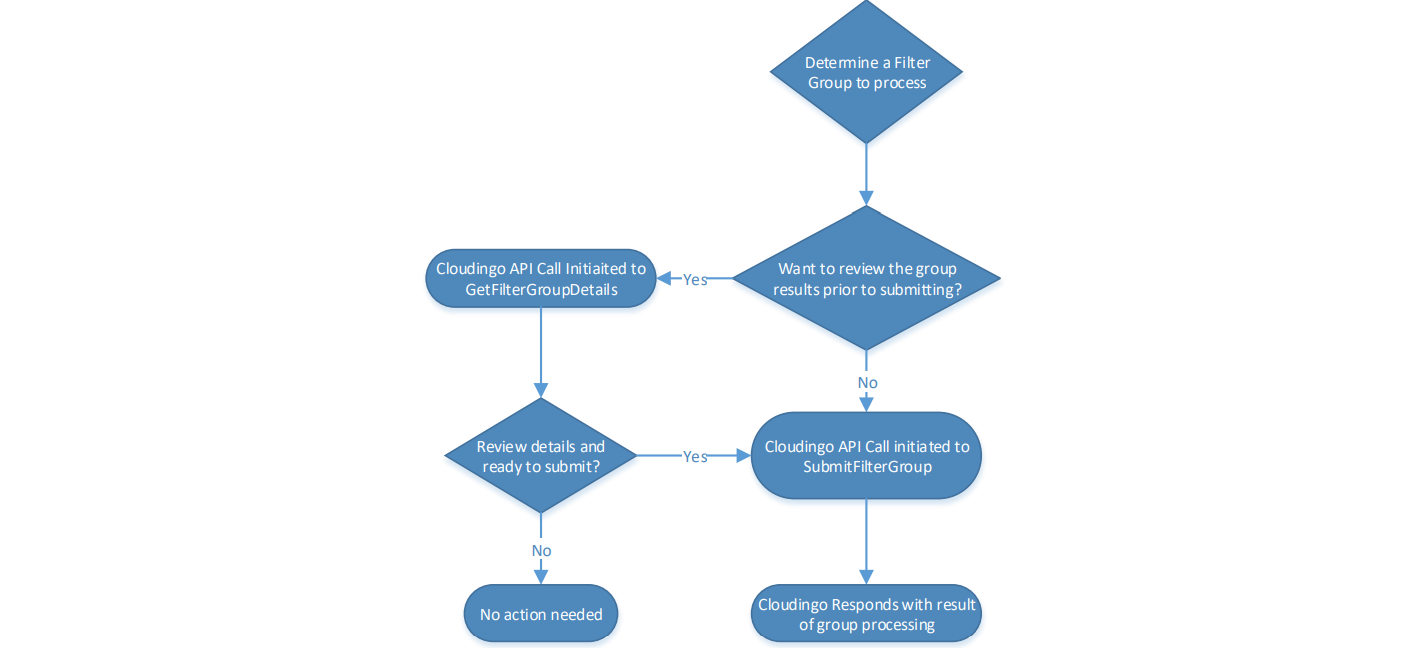
| GetFilterGroupDetail | Filter group info as returned from the get filter group method | The details for the group. If a dedupe filter, the master and child records will be provided. If a data maintenance filter, the record and update values (if appropriate) will be provided. | 1.0 |
| RecalculateFilter | Filter info as returned from the get filters method | Whether or not the recalculate request was submitted successfully. The status for the filter can be evaluated through the get filters method. | 1.0 |
| SubmitFilterGroup | Filter group info as returned from the get filter group method | Submits the filter group for processing based on the type of filter. For a dedupe filter, the group will either be merged or converted. For a data maintenance filter, the group will either be updated or deleted. | 1.0 |
| GetAutomationPreviews | None | If the Cloudingo account is set up for automation preview, will return any of the automation previews currently available along with details and status. | 1.0 |
| GetAutomationPreviewDetails | Automation preview info as provided by the get automation previews method | Will provide details on the automation preview as well as the corresponding csv content for the automation preview report | 1.0 |
| StartAutomationPreview | Filter info as provided by the get filters method | Whether or not the start automation preview request was submitted successfully. The status for the automation preview can be evaluated through the get automation previews method. | 1.0 |
See detailed Inputs, Outputs, and Method Specific Response Codes for each Action described further in this article below.
Web Service Integration Dashboard Display
After a Web Service Integration has been created, it will display on the Integration dashboard similarly to the following:
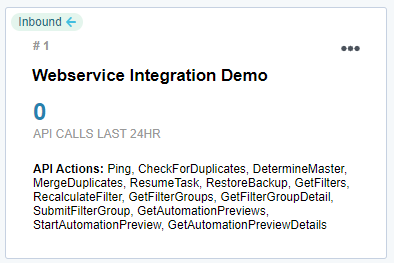
This will provide a brief summary of the configured integration, including the following:
- The name of the integration.
- The number of calls made for the integration in the past 24 hours.
- The actions that have been selected.
Endpoints
The Cloudingo Integration API is currently available via SOAP (XML-based) or REST (JSON-based) service endpoints. The functionality and methods available for both are identical. However, the endpoint, as well as the manner for initiating the call and handling return values, will vary based on the type of service. All endpoints are handled over SSL.
REST Endpoints
Production Environment: https://api.cloudingo.com/rest/{ActionName}
SOAP Endpoints
Production Environment: https://api.cloudingo.com/soap/
Production Environment WSDL: https://api.cloudingo.com/wsdl
Security
As mentioned, only SSL (https) communication is available for the Cloudingo Integration API. Security for the Cloudingo Integration API is handled by authenticating each incoming API call via an access token, which must be included in order for a call to be successful. An access token should be passed as part of the Authorization header of any REST or SOAP service call, and each token is associated with a single webservice/calling IP combination. The tokens can be generated via the GenerateAuthorizationToken endpoint by passing the correct combination of the Cloudingo Integration Key and the Cloudingo Integration Password, both of which should be passed as HTTP headers.
GenerateAuthorizationToken (Creating an Access Token)
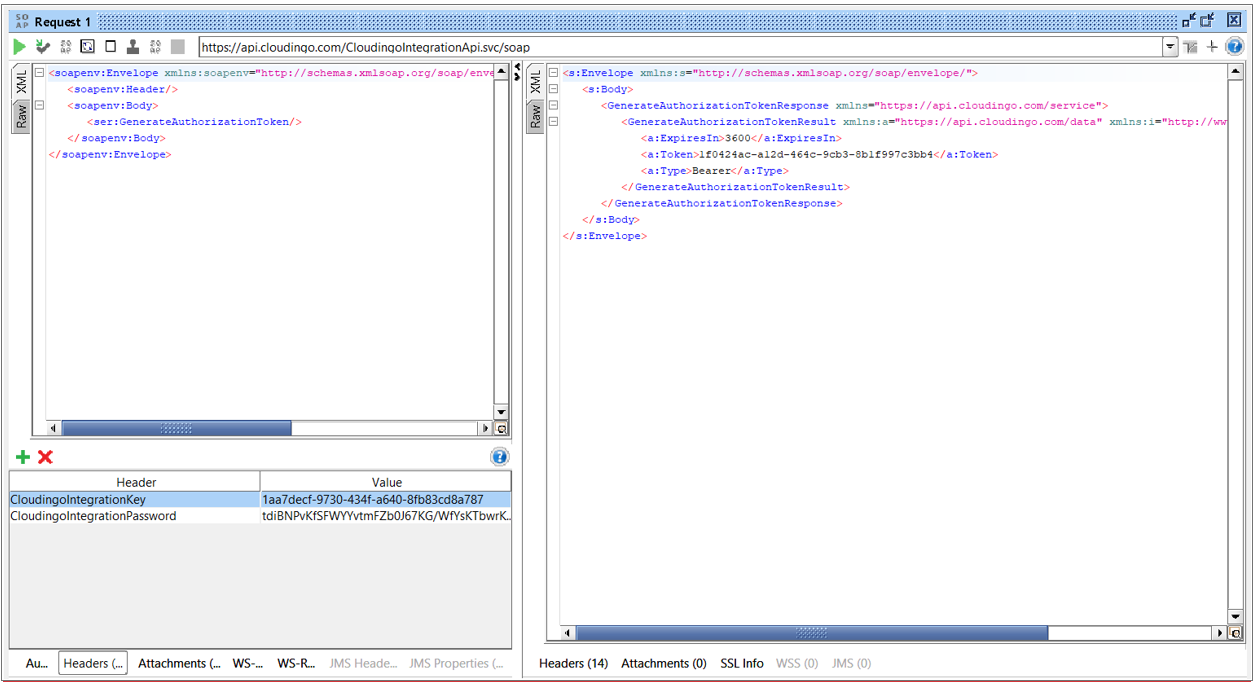
Create an access token using an HTTP GET request to call the GenerateAuthorizationToken endpoint while passing the following HTTP headers:
- CloudingoIntegrationKey: The auto-generated GUID provided by the Cloudingo Integration Wizard within the Cloudingo web portal.
- CloudingoIntegrationPassword: The supplied password to be used to authenticate the caller in combination with the integration key.
- The password can be entered on the Cloudingo Integration Wizard, and the value will be encrypted.
- The encrypted value should be passed in the header.
- Response: If the request was valid and successful, the response will look similar to the following:
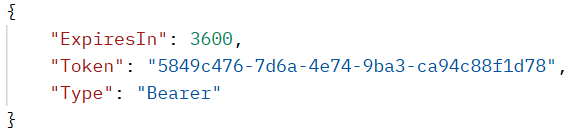
- Outputs:
- The remaining lifespan of the current token in seconds.
- Whenever an access token is initially created, its lifespan is set to be one hour or 3600 seconds by default.
- The access token that can be passed with subsequent calls to authenticate with the target webservice.
- The authentication method used.
- This should also be passed with subsequent calls alongside the access token as part of the Authorization header in order to properly authenticate.
- The remaining lifespan of the current token in seconds.
GetAuthorizationToken
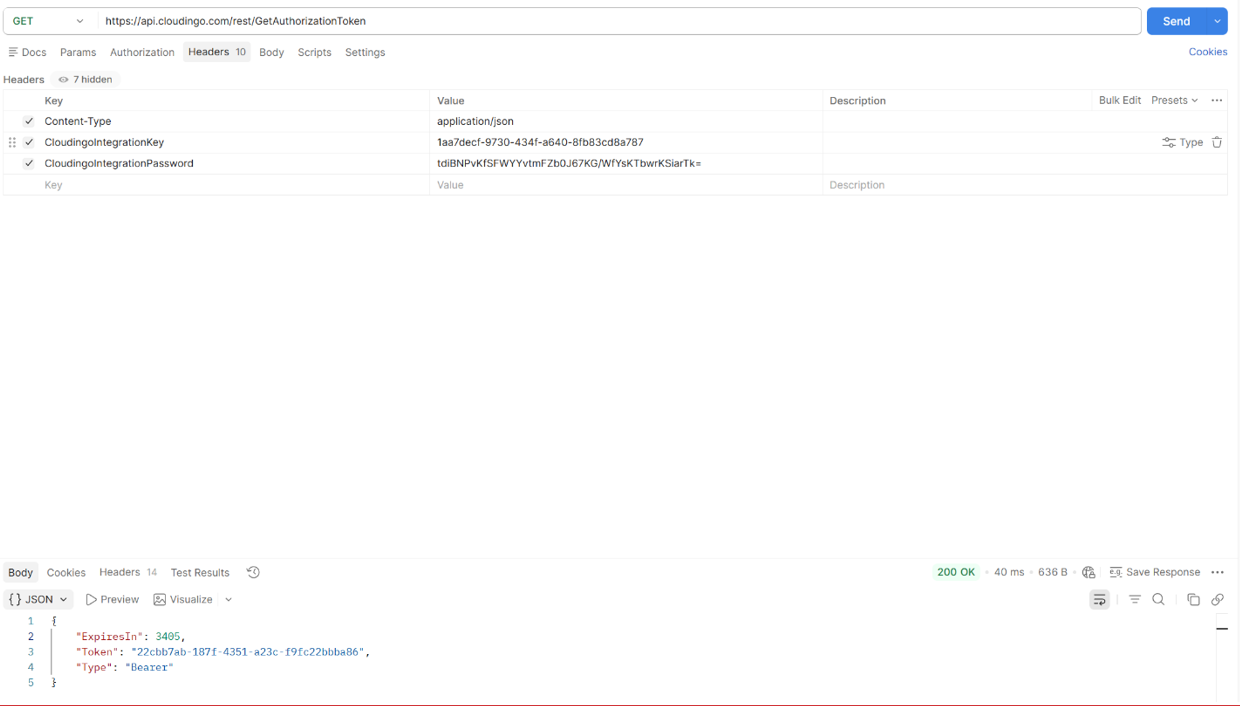
Optionally make HTTP GET requests to the GetAuthorizationToken endpoint to obtain a currently active access token for the calling IP (if one exists).
- This endpoint requires the same correct combination of HTTP headers as the GenerateAuthorizationToken endpoint (CloudingoIntegrationKey and CloudingoIntegrationPassword).
- Response: If the request was valid and successful, and an active access token exists for the calling IP, the response will look similar to the following:
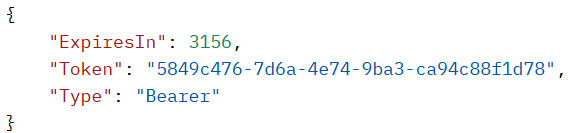
- Outputs:
- The remaining lifespan of the current token in seconds.
- The access token that can be passed with subsequent calls to authenticate with the target webservice.
- The authentication method used.
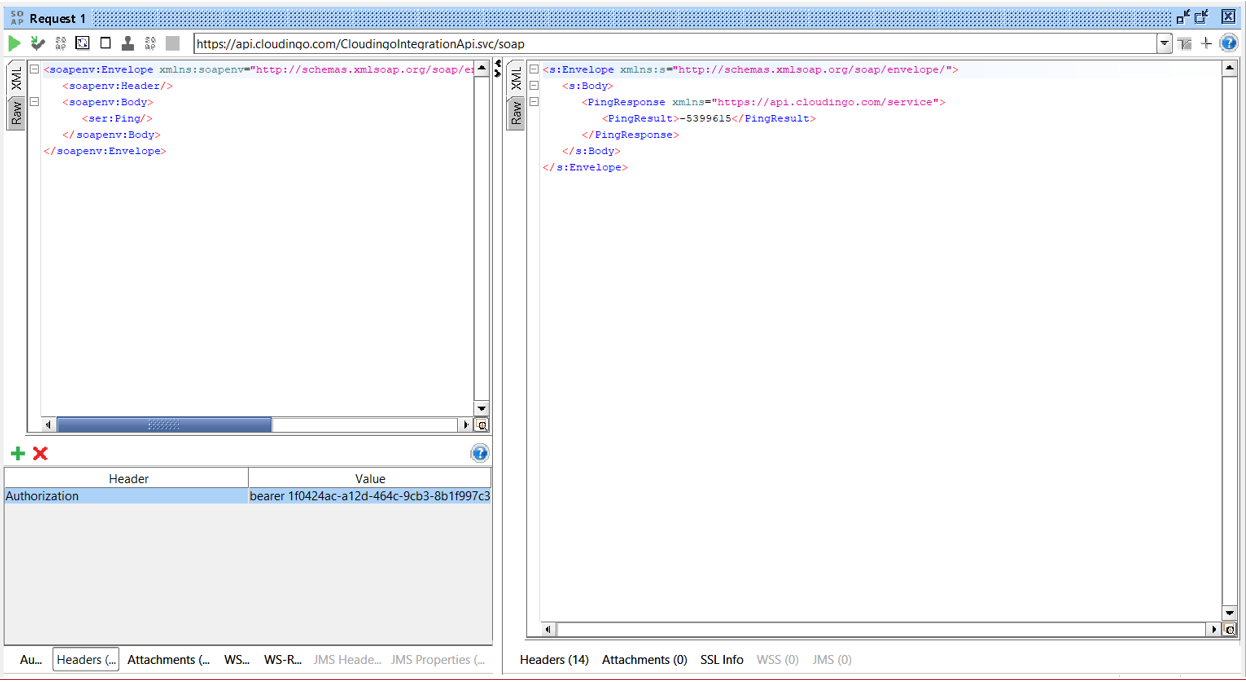
Using an Access Token
- When making calls to any of the available endpoints/actions, an access token must be included in every call to be successful.
- That access token must be passed via the Authorization header, by also indicating the authentication method used.
- Using Postman, below is an example of the exact format of the Authorization header that should be used to properly attach an access token to a request:

Available Actions (Detailed Inputs, Outputs, Response Codes)
We previously described the available actions in this article. This section will detail the inputs, outputs, & method-specific response codes for each action.
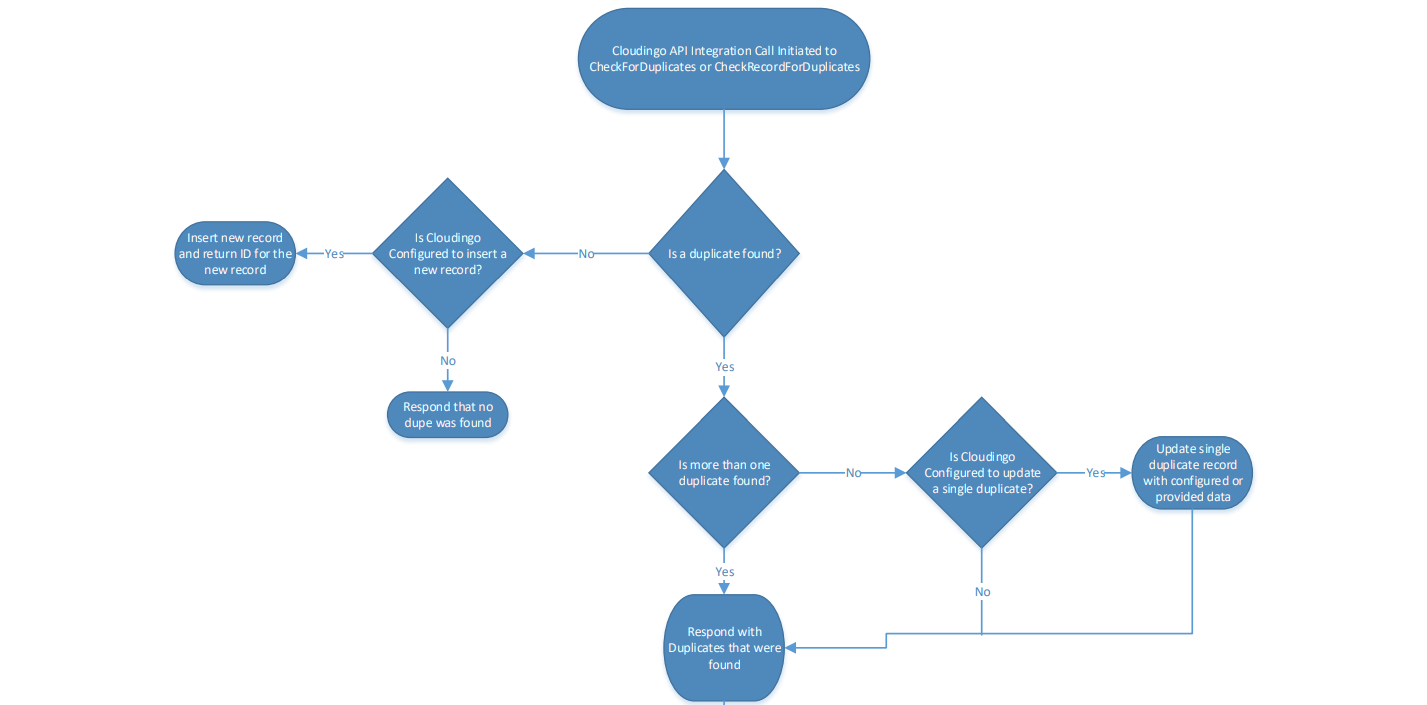
CheckRecordForDuplicates
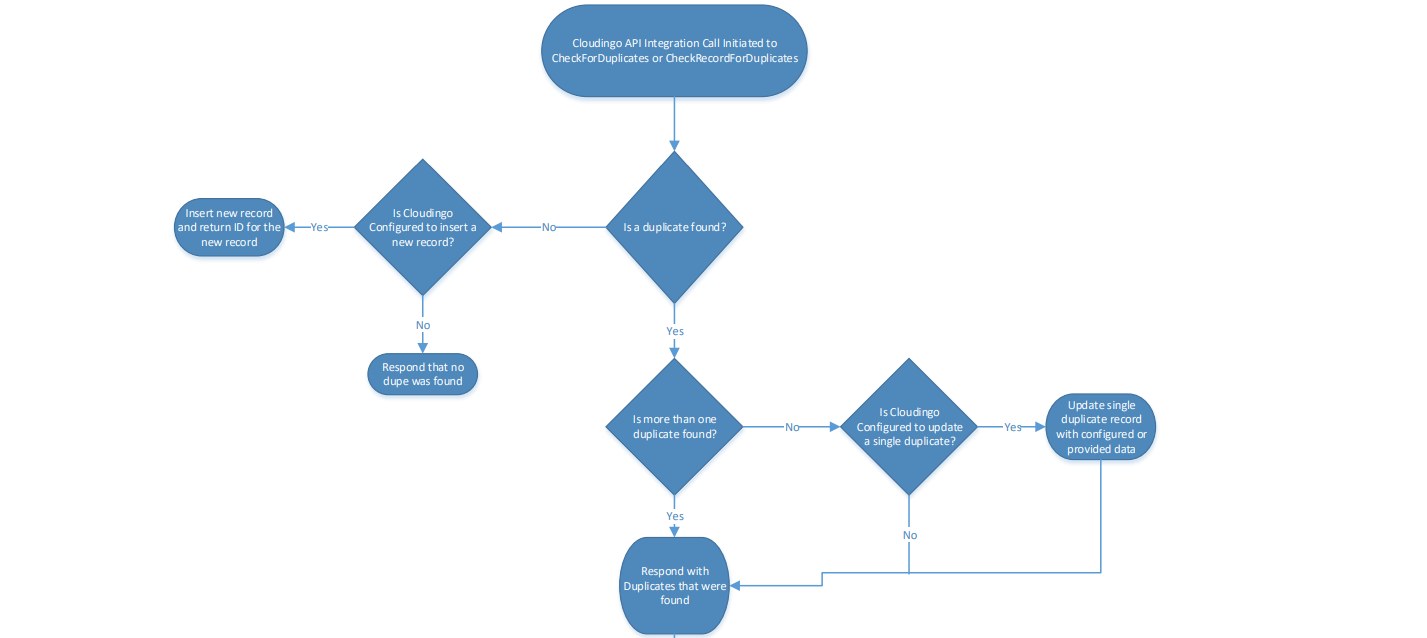
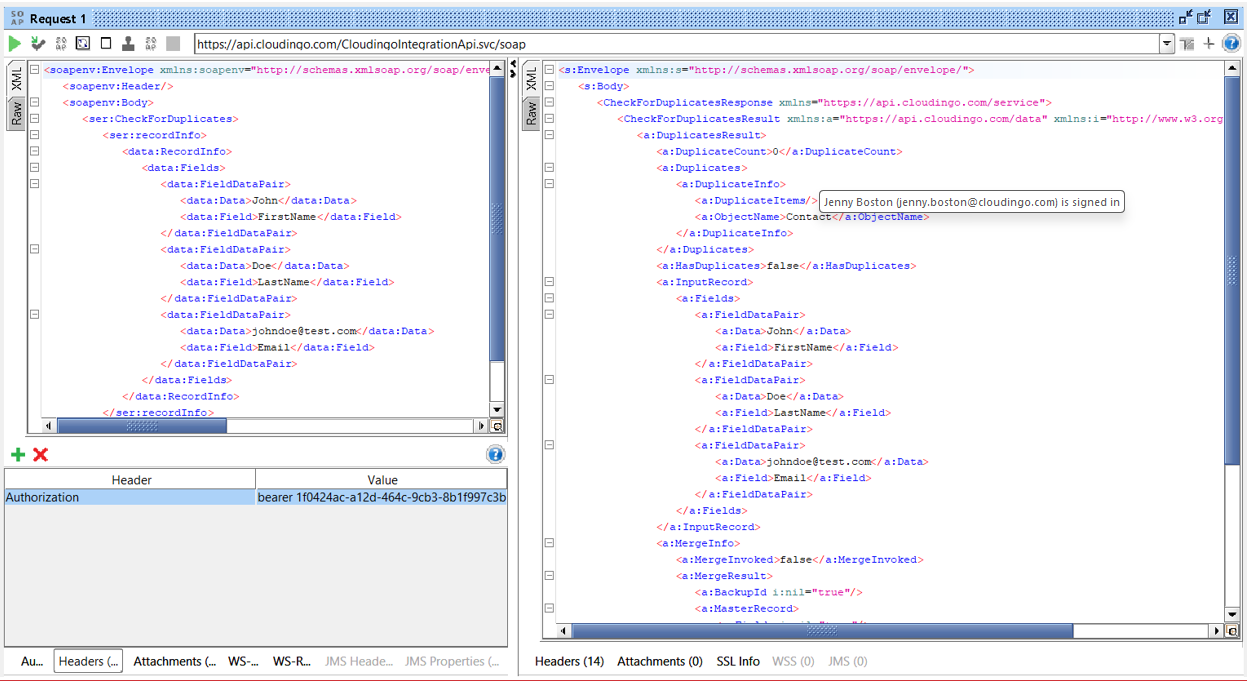
Will evaluate the current data in your organization based on the inputs to determine any possible duplicates using the configured duplicate definition. If configured, it will insert a new record if no duplicate is found, and either update an existing record if only one duplicate is found, or perform an auto-merge of the new record with one or more duplicates that are found (the maximum number of matches available to be set for this operation is 10). Otherwise, it will return a list of potential duplicates. If a new record is created, the new record ID will be returned. If an auto-merge is performed, the result of the merge will be returned (similarly to the MergeDuplicates method's response). May also be configured to provide custom fields as part of the duplicate response. A maximum of 200 duplicates may be returned for any given record.
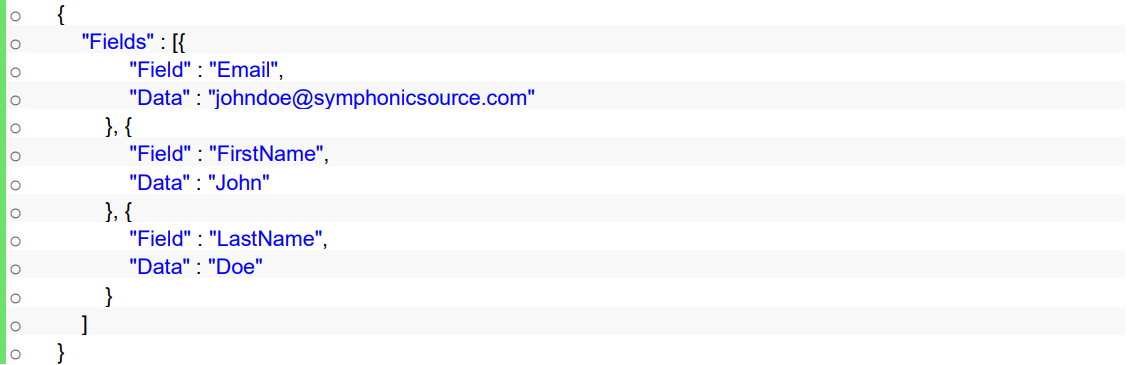
- Inputs:
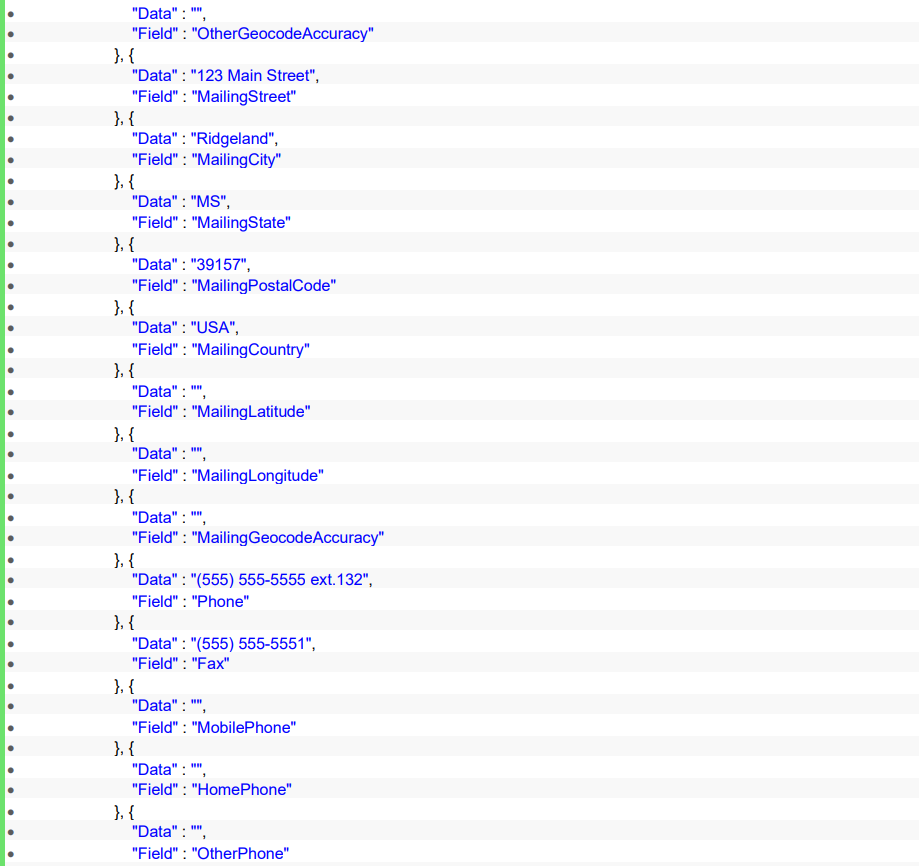
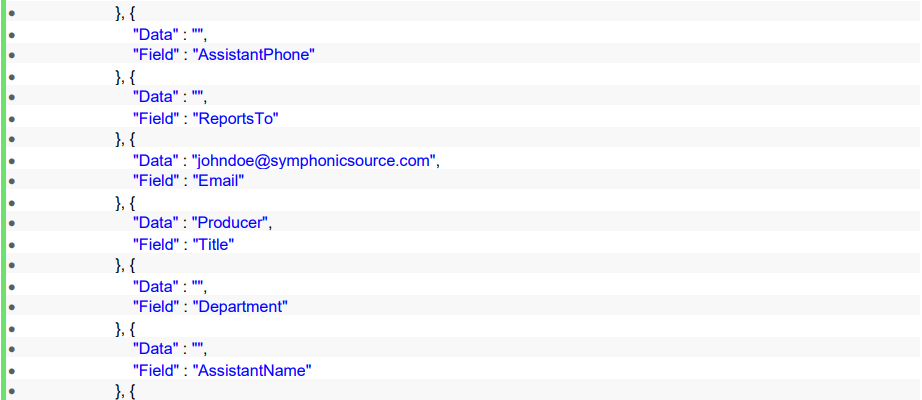
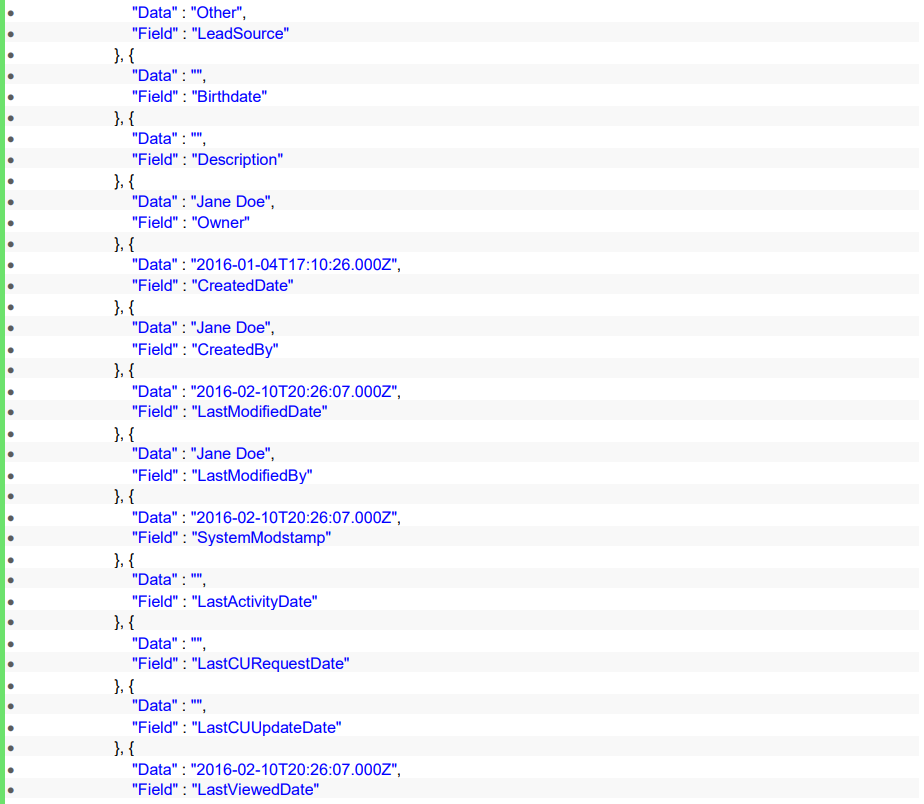
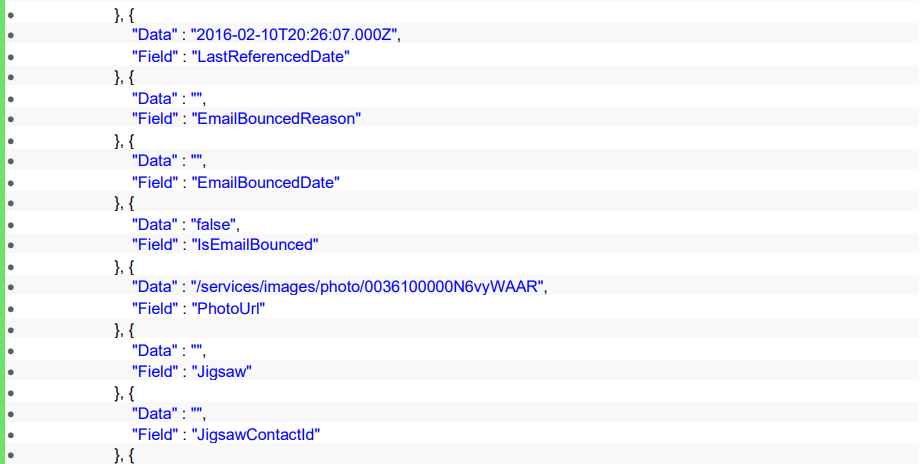
- RecordInfo: Name value pairs of fields and their corresponding values for the new record.
- JSON Example:
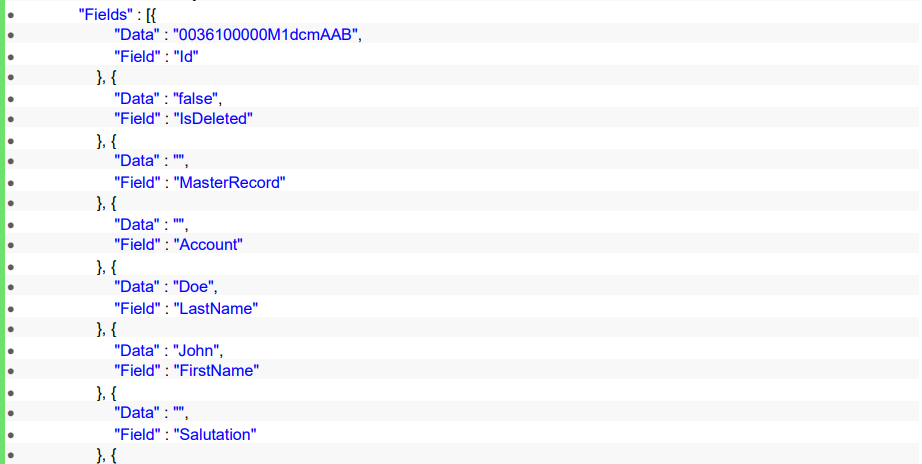
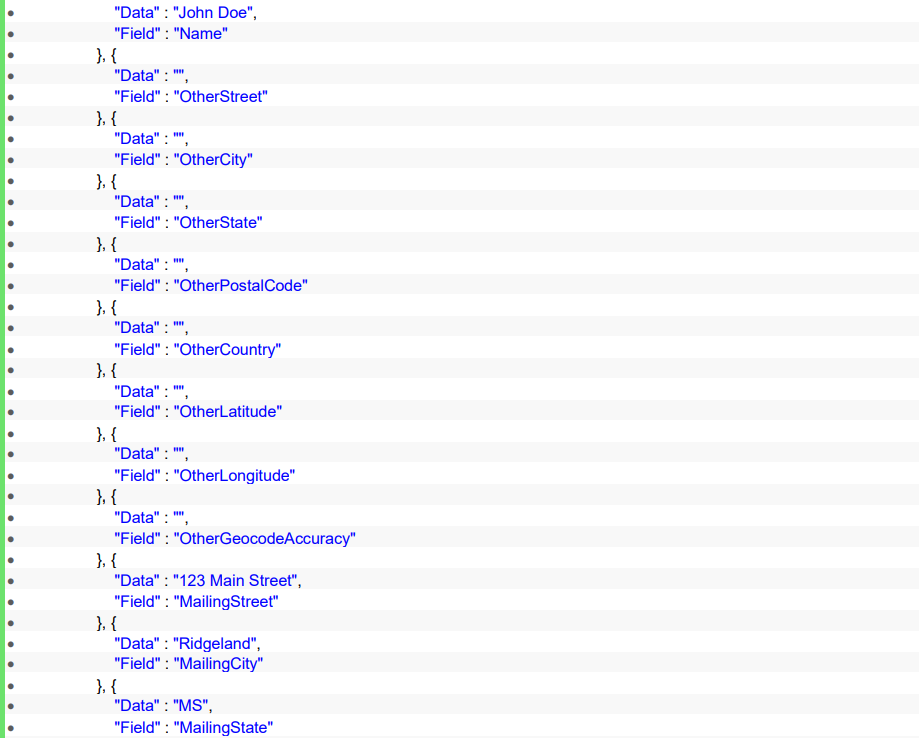
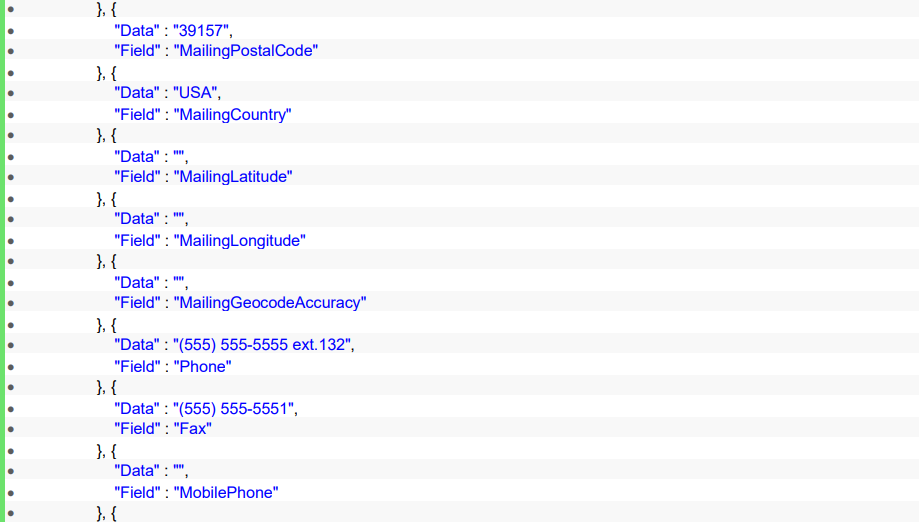
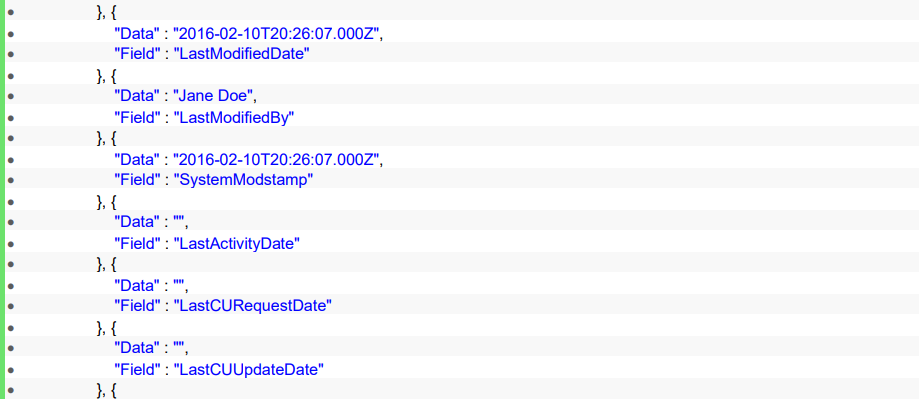
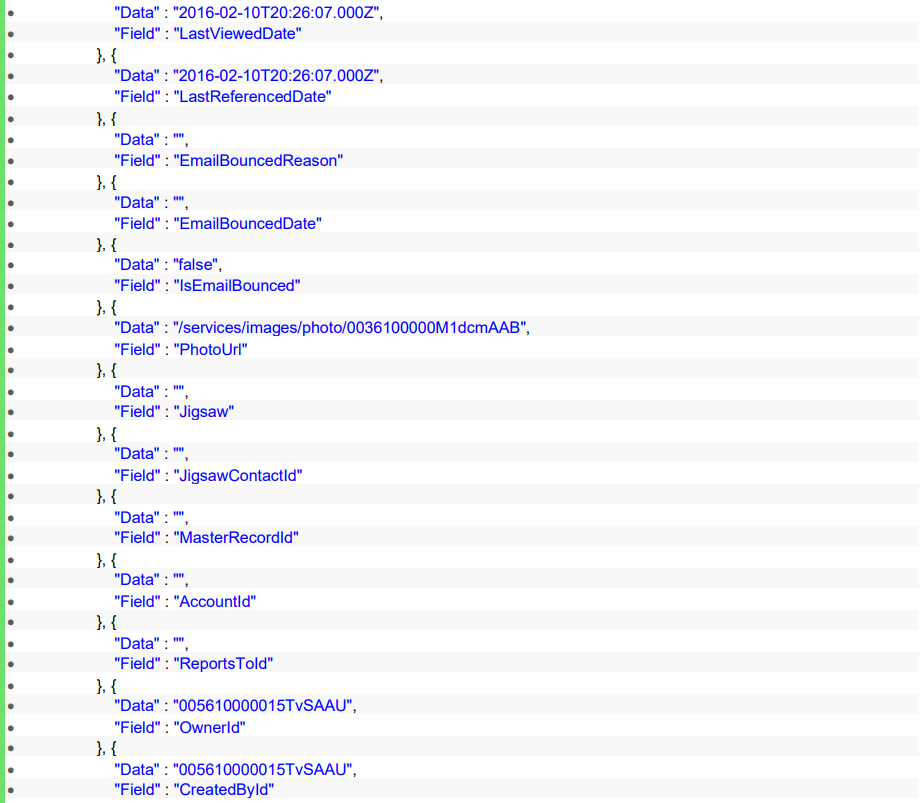
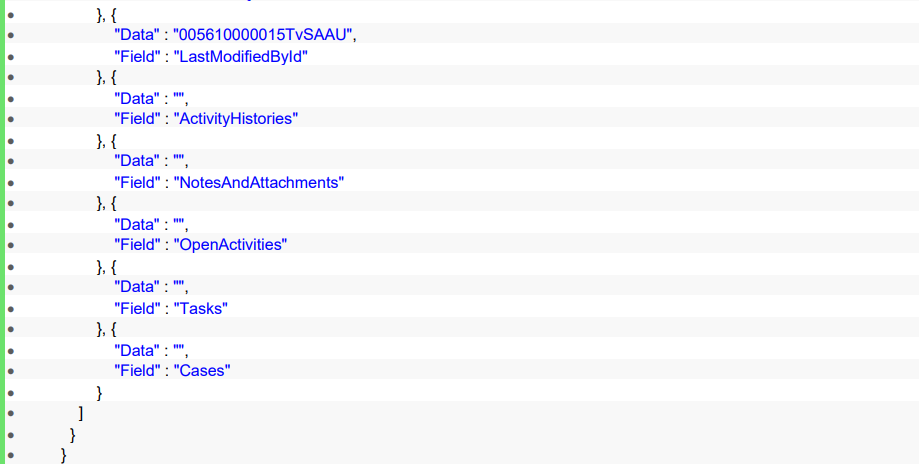
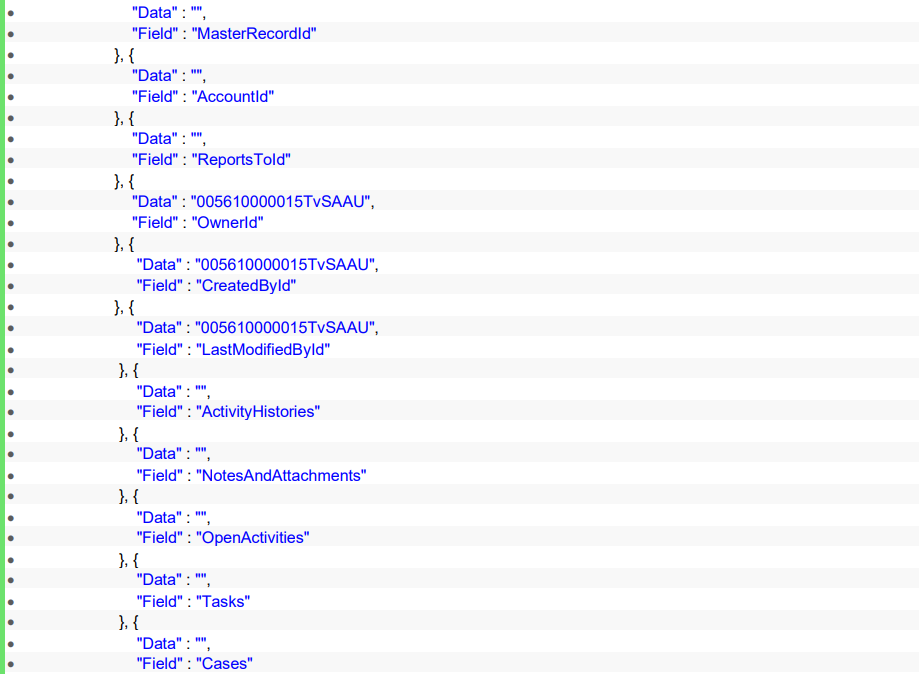
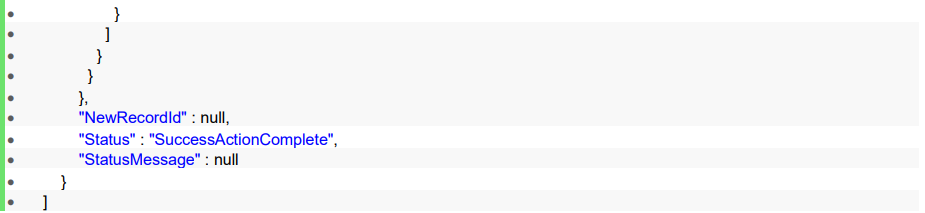
- Outputs:
- An Integration status code for the overall operation.
- The inputs provided for the duplicate check.
- A new record ID if one was created.
- A merge result if an auto-merge was performed.
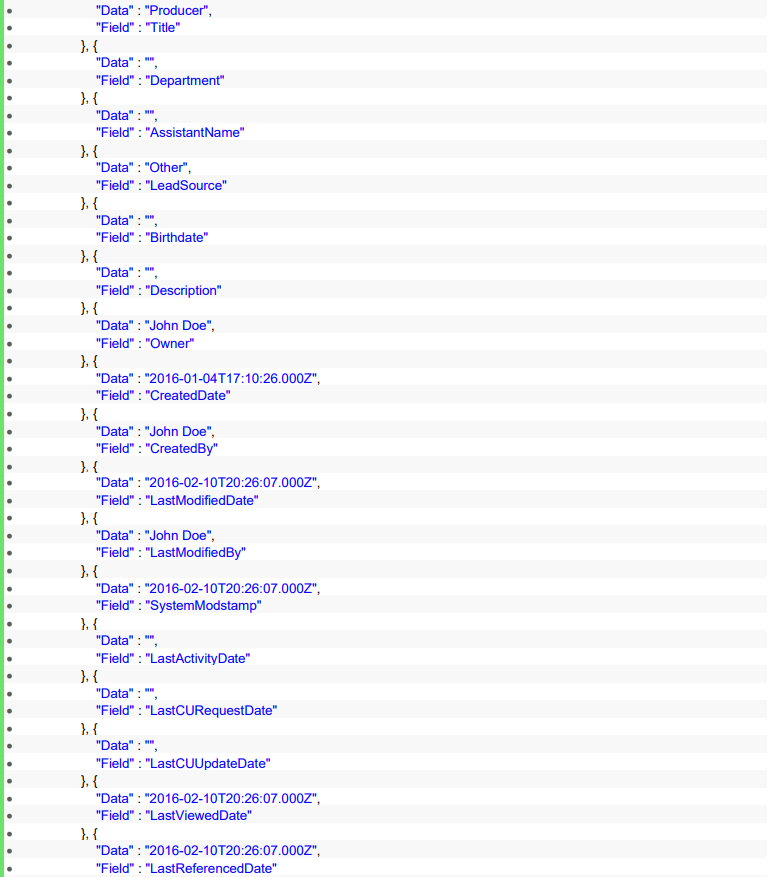
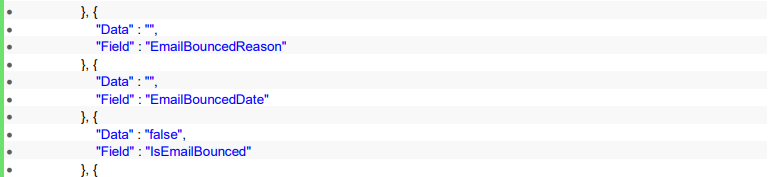
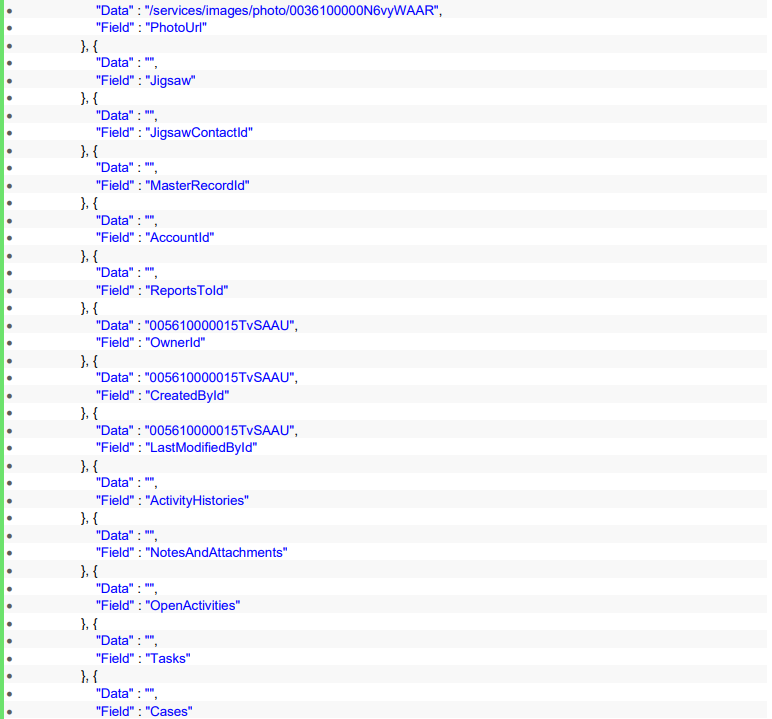
- A list of potential duplicates, along with any specific custom fields configured to be a part of the response.
- JSON Example:


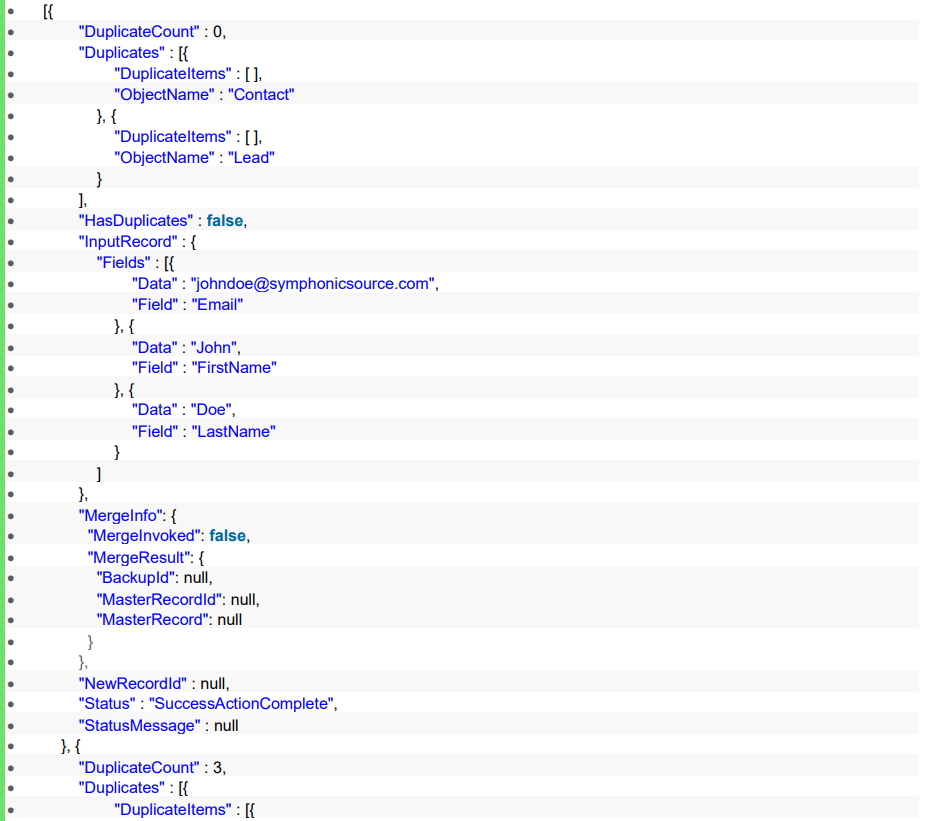
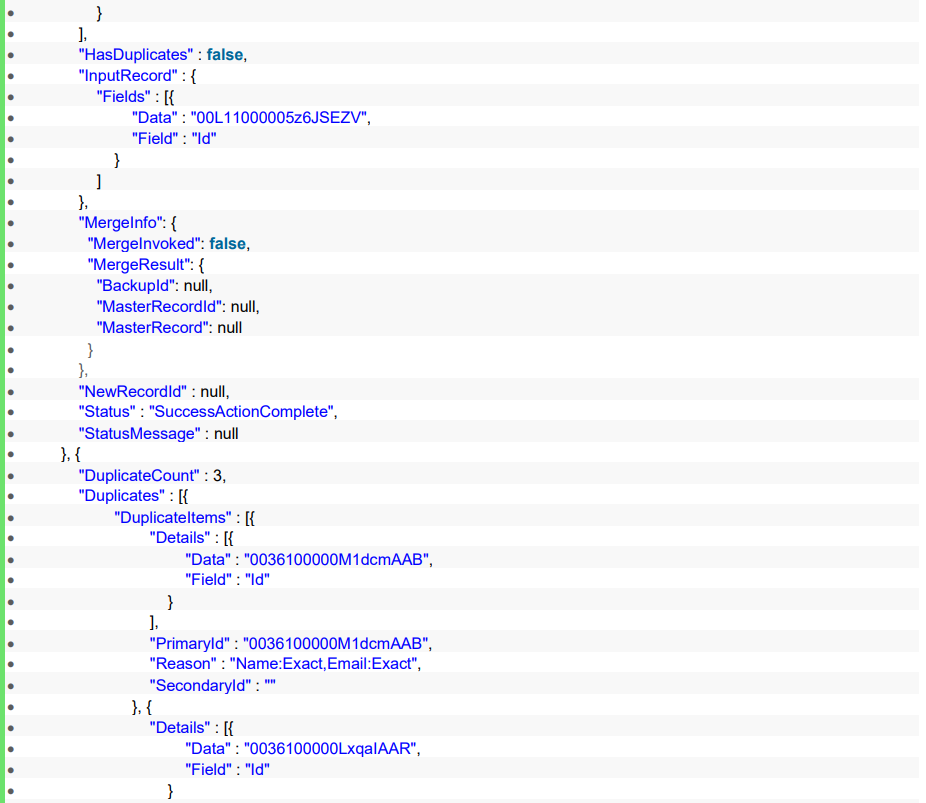
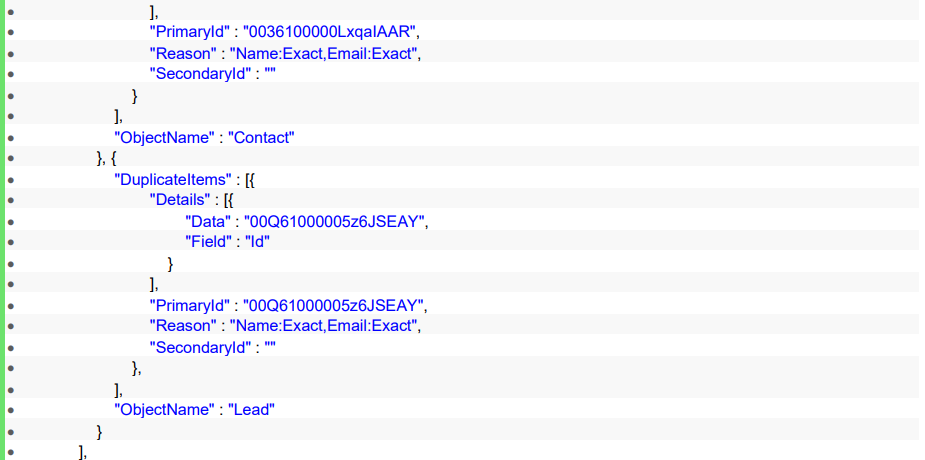
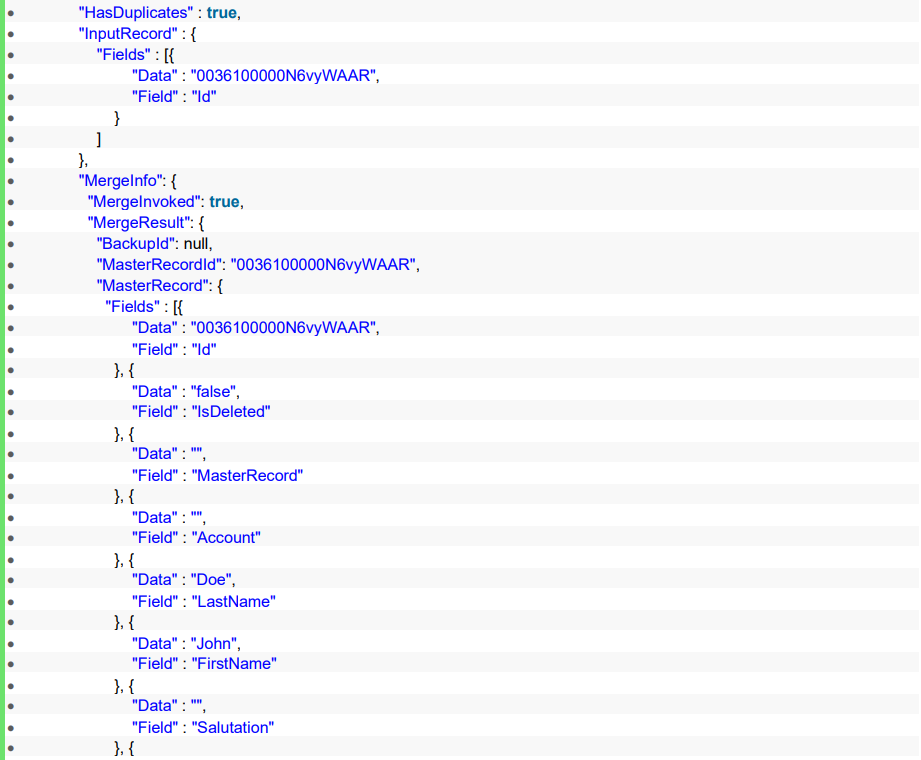
CheckForDuplicates
Behavior is identical to the CheckRecordForDuplicates, but will take an array of potential records and respond with an array of results corresponding to the records provided. This method is limited to a maximum of 200 records.
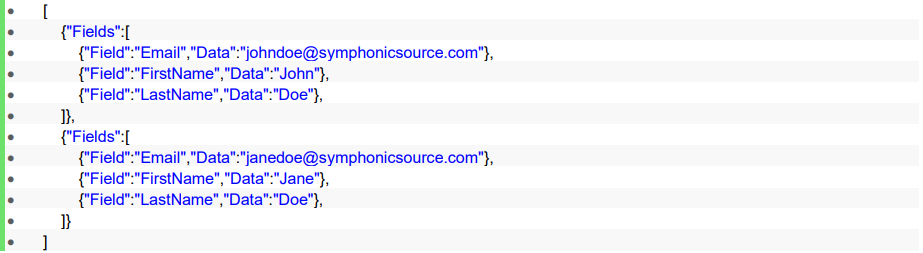
- Inputs:
- RecordInfo: An array of name-value pairs of fields and their corresponding values for the new record.
- JSON Example:
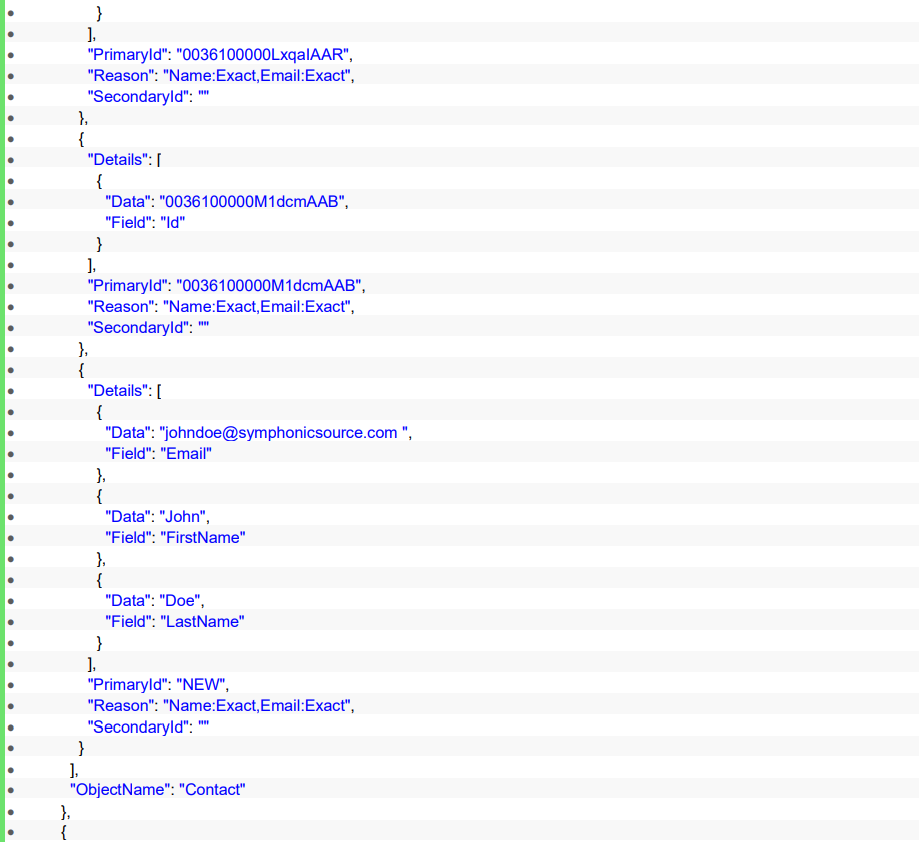
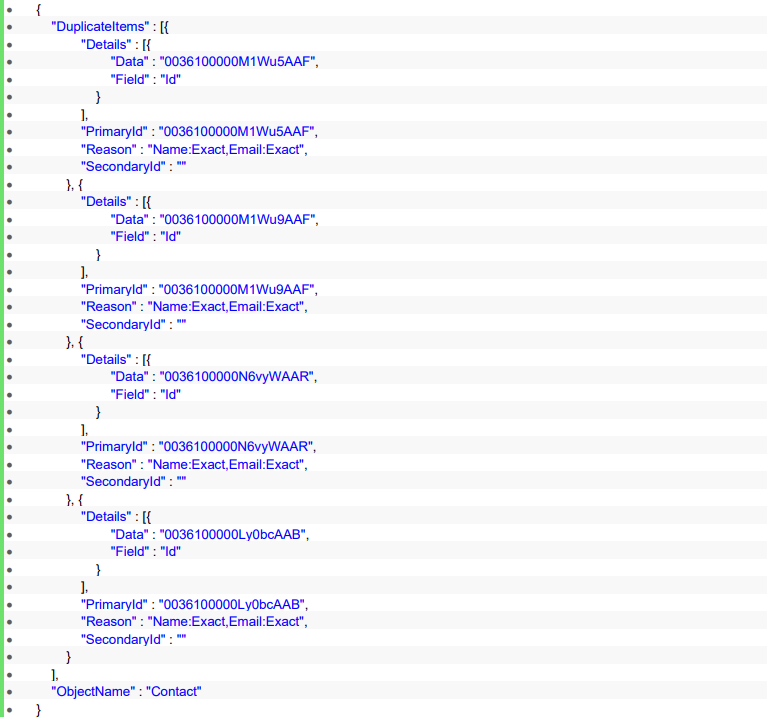
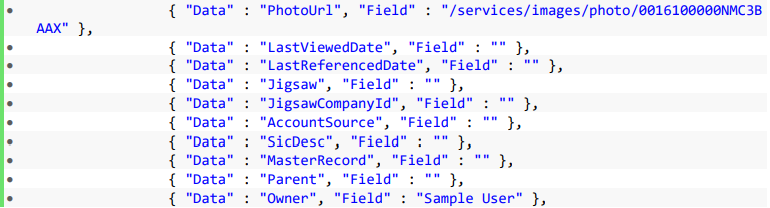
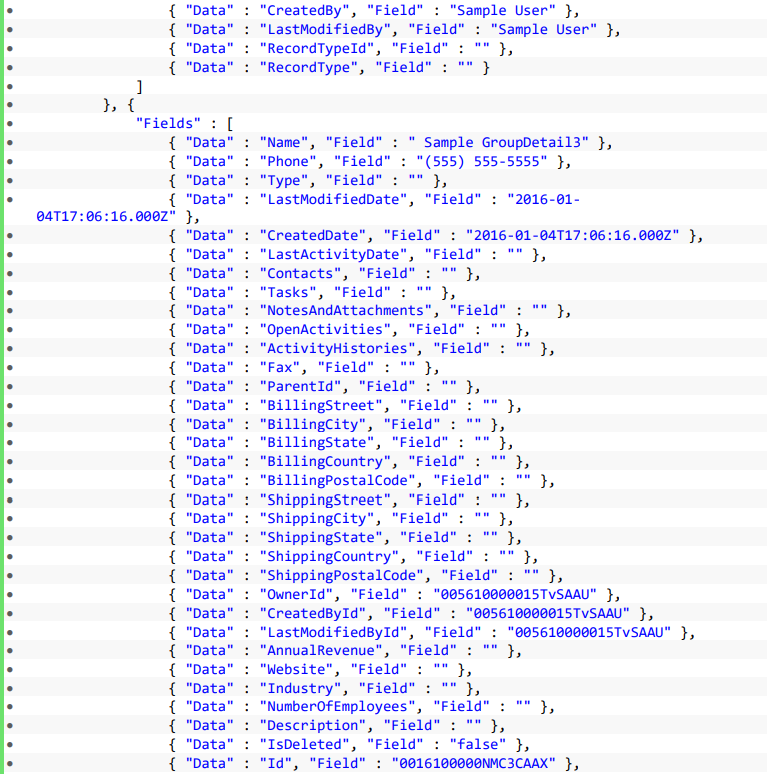
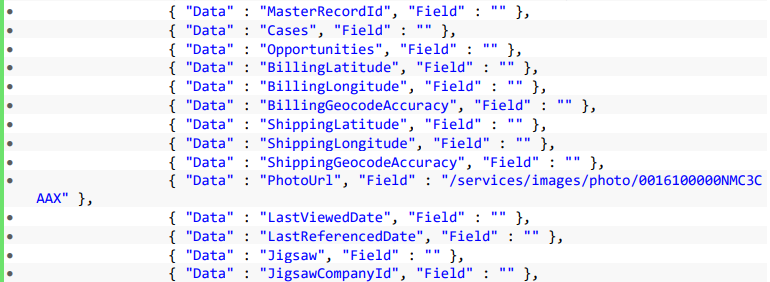
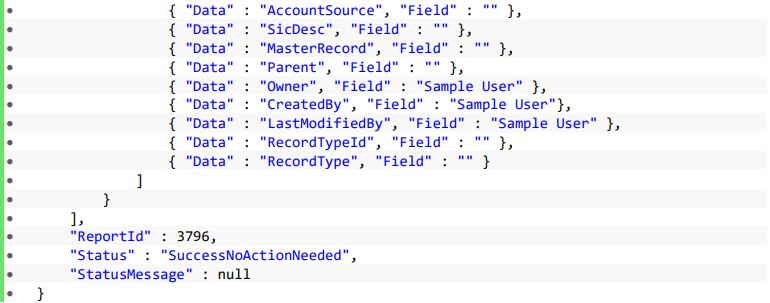
- Outputs:
- An array of Duplicate results.
- JSON Example:
CheckIdsForDuplicates
Behavior is similar to the CheckForDuplicates, but will take a list of IDs that should match Salesforce IDs of the records for which the check should be performed, and respond with an array of results corresponding to those records. This method is limited to a maximum of 200 IDs, which can be passed either through an array of IDs or as the "IDs" query string parameter.
- Inputs:
- IDs: An array of Salesforce IDs, which should match Salesforce records.
- JSON Example:

- Outputs:
- An array of Duplicate results.
- JSON Example:


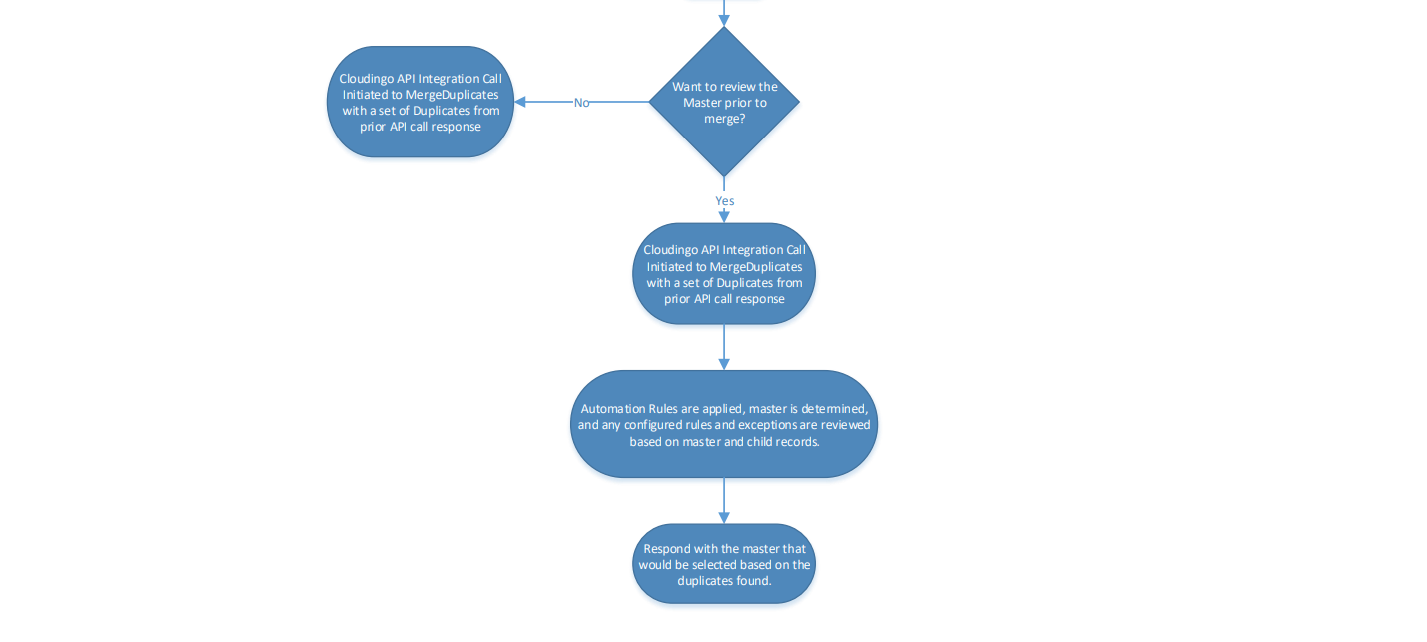
DetermineMaster
This method will take results from the duplicate check method and will provide a preview of what will occur if the merge is submitted. Will review the potential duplicates and determine the master record, as well as evaluate the field values to determine if any values will be changed on the master record as a part of the merge process. This essentially provides a merge preview without performing the actual merge operation. The rules for master selection as well as the determination of field values can be configured within Cloudingo.
- Inputs:
- List of potential duplicates as provided by the duplicate check methods.
- JSON Example:
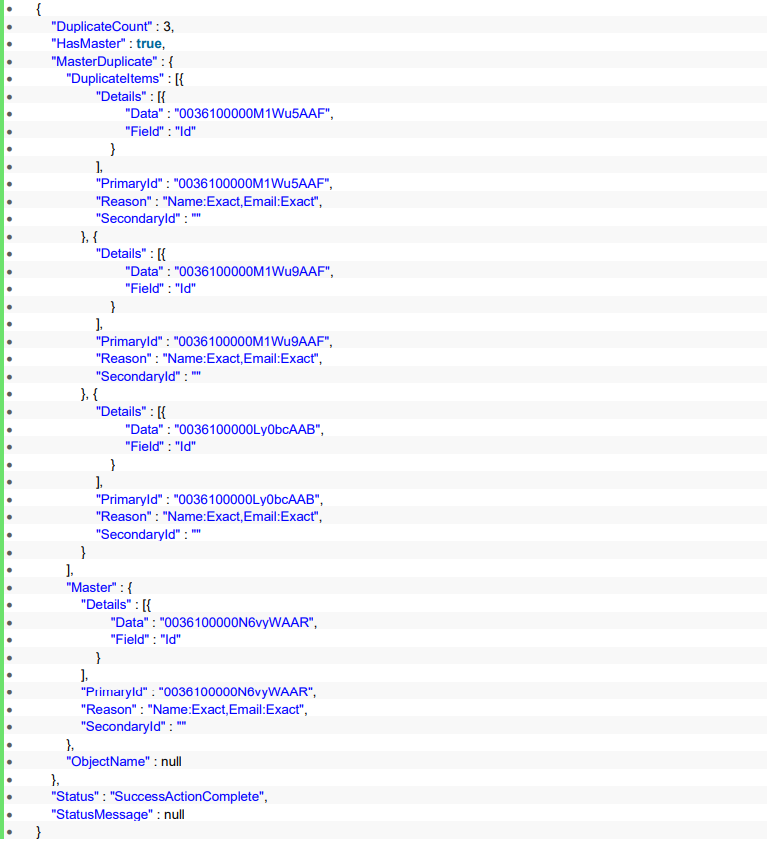
- Outputs:
- List of the duplicates eliminated and the record determined to be the master. If the master record was updated based on the data from the duplicates (depending on configuration), the updated fields will be returned.
- JSON Example:
MergeDuplicates
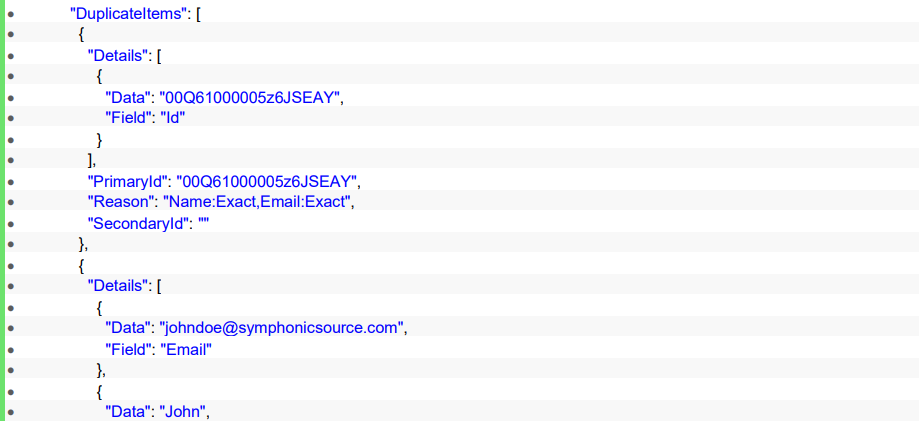
This method will take results from the duplicate check method and will perform a merge operation for the list of duplicates and respond with the result of the merge. Will review the potential duplicates and determine the master record, as well as evaluate the field values to determine if any values will be changed on the master record as a part of the merge process. The rules for master selection as well as the determination of field values can be configured within Cloudingo. By default, the incoming record cannot be selected as the master regardless of the master selection criteria defined in Cloudingo. However, when field-level values are evaluated between records, the incoming record is always considered the newest. If additional details are desired to be provided for the evaluation during the merge process, additional field values can be provided in the Details section of the DuplicateItems list for each duplicate.
- Inputs:
- List of potential duplicates as provided from the duplicate check methods.
- JSON Example:

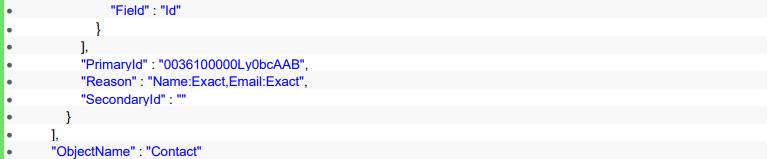
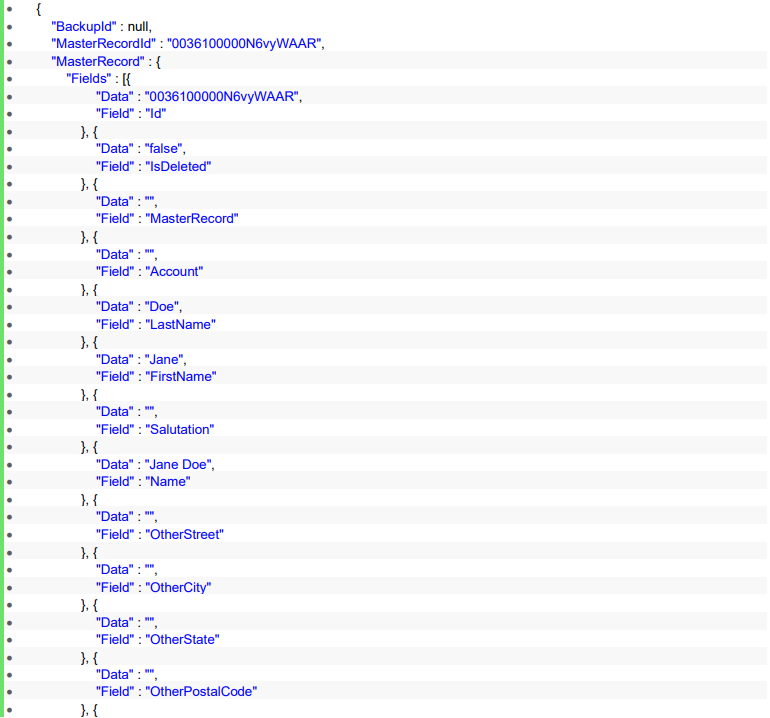
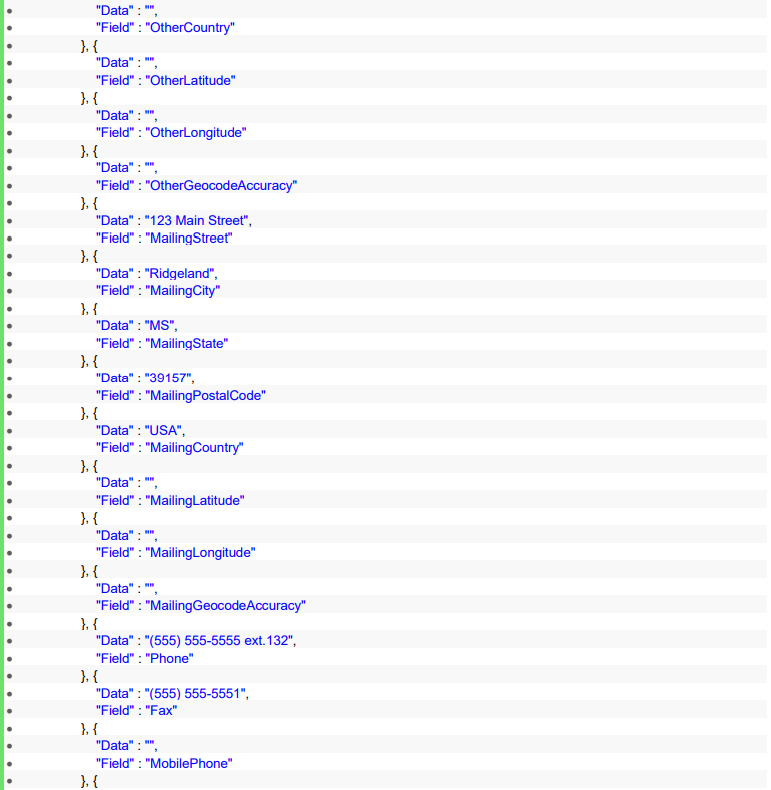
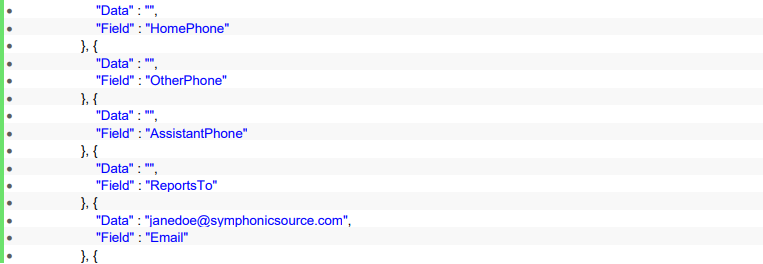
- Outputs:
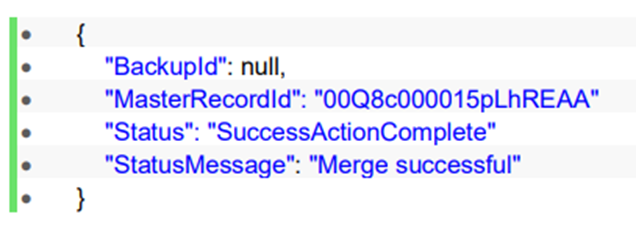
- An Integration status code for the overall operation, along with the corresponding message.
- Backup ID of the merge, if applicable.
- Master record's Salesforce ID.
- Updated master record details.
- JSON Example:

MergeRecords
This method will take Salesforce IDs of the records desired to be merged, arranged as follows:
- MasterRecordId (optional): the main record's Salesforce ID into which all the records will be merged
- ChildIds: array of 1 or more Salesforce IDs of records that are to be merged
The method will then proceed to perform a merge operation on the desired records and respond with the result of the merge. It will evaluate the fields' values to determine if any values will be changed on the master record as a part of the merge process. In case no ID is provided as Master, at least 2 IDs shall be passed as Children, and the corresponding master selection rule will determine the master record among them. The rules for master selection as well as the determination of field values can be configured within Cloudingo. This method is limited to a maximum of 200 IDs in total (i.e., ChildIds array has a limit of 199 IDs in case a Master is provided, and 200 otherwise), and the method’s inputs can be passed either through a well-formed JSON/XML body or as query string parameters.
- Inputs:
- MasterRecordId (optional) - Salesforce ID of the desired master record
- ChildIds - array of Salesforce IDs of records to be merged
- JSON Example:

- Outputs:
- An integration status code for the overall operation along with the corresponding message
- Backup ID of the merge, if applicable
- Master record's Salesforce ID
- JSON Example:
ResumeTask
Will resume the task based on a Task ID provided, which can be passed either through the body or as the "TaskId" query string parameter.
- Inputs:
- TaskId as provided by any applicable callback
- JSON Example:

- Outputs:
- An integration status code for the overall operation
- Status message, if applicable
- JSON Example:
RestoreBackup
Will restore the records that were merged together based on a merge Backup ID provided, which can be passed either through the body or as the "BackupId" query string parameter.
- Inputs:
- BackupId as provided by any of the methods performing a merge.
- JSON Example:

- Outputs:
- An Integration status code for the overall operation.
- Status message indicating how many records were restored/failed.
- JSON Example:

Ping
General method for not only determining the status of the Cloudingo Integration API, but will also provide guidance of possible upcoming maintenance windows. For this method, an HTTP GET should be performed. All others should use HTTP POST.
- Inputs:
- None
- Outputs:
- Time in total minutes from the current time until the next expected outage. If there is no scheduled maintenance window upcoming, this will return a negative number referring to the last maintenance window in the past.
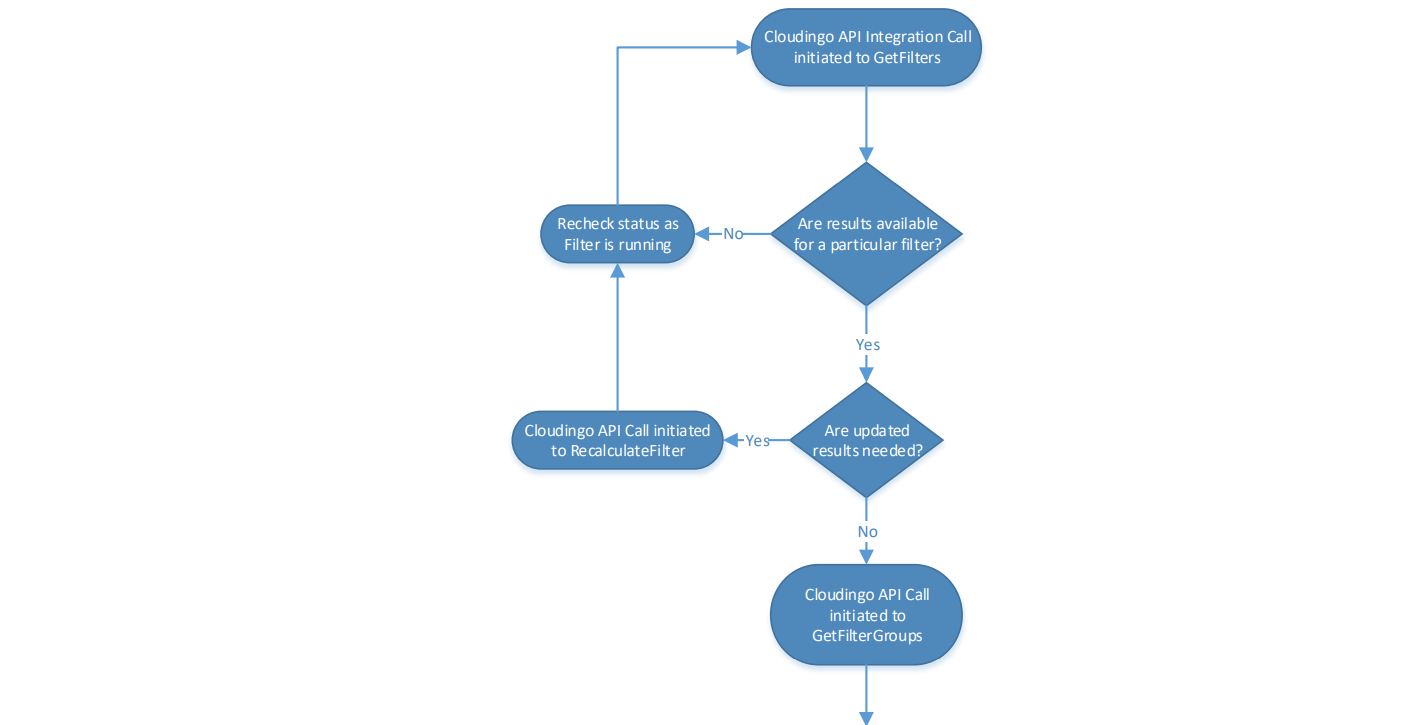
GetFilters
This method will provide the current details and status of filters that are present on the Cloudingo Dedupe and Data Maintenance dashboards.
- Inputs:
- FilterRequest: Optional object used to filter the type of filter returned.
- JSON Example:

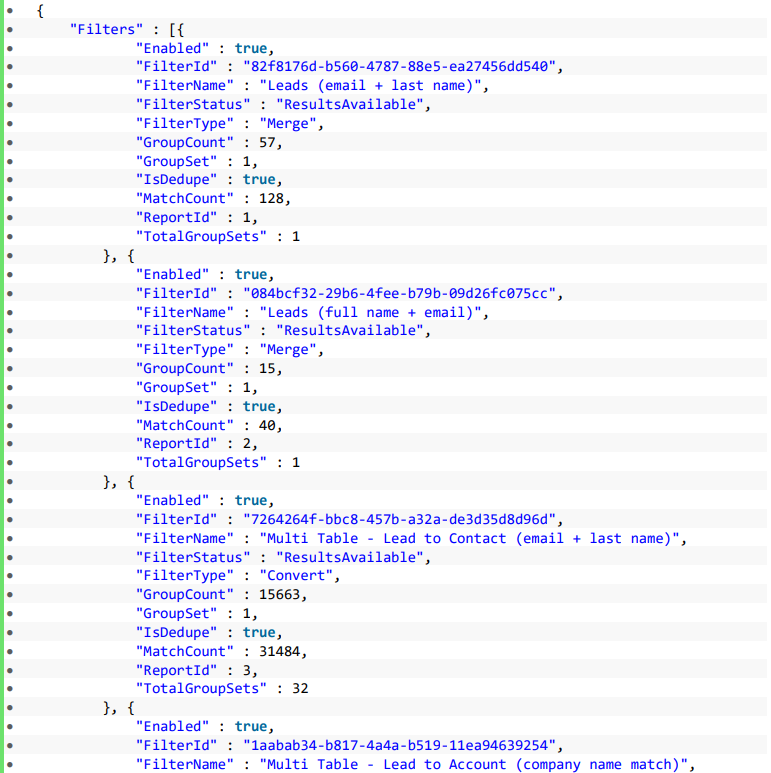
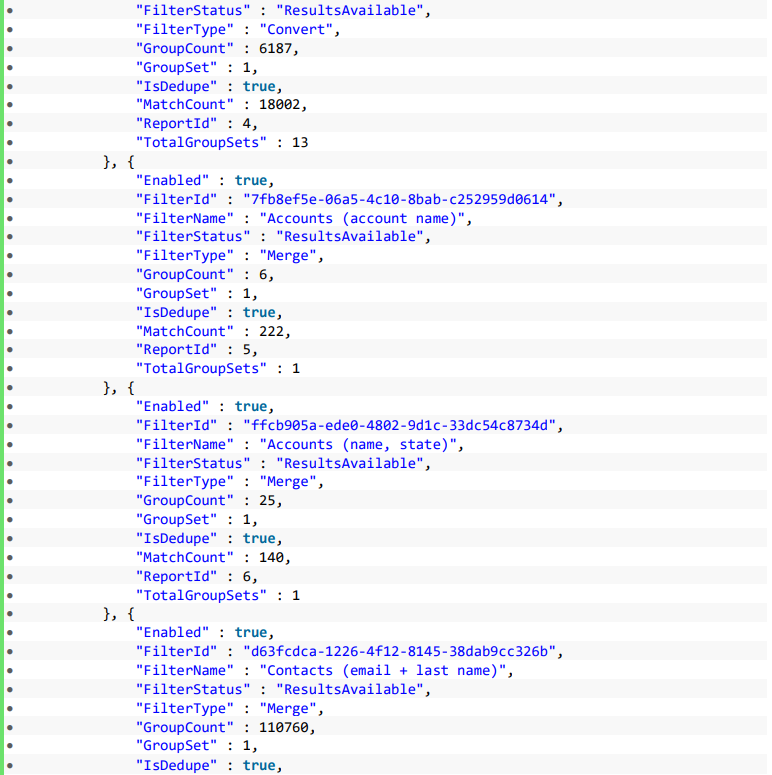
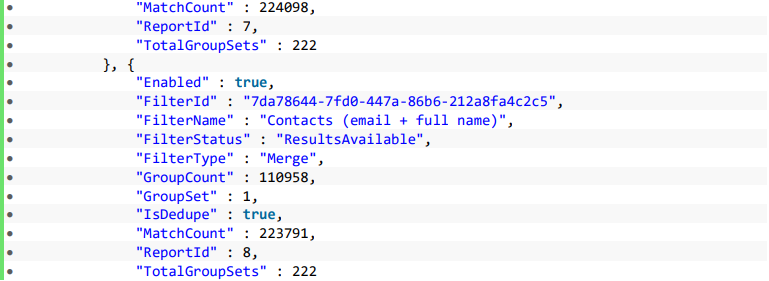
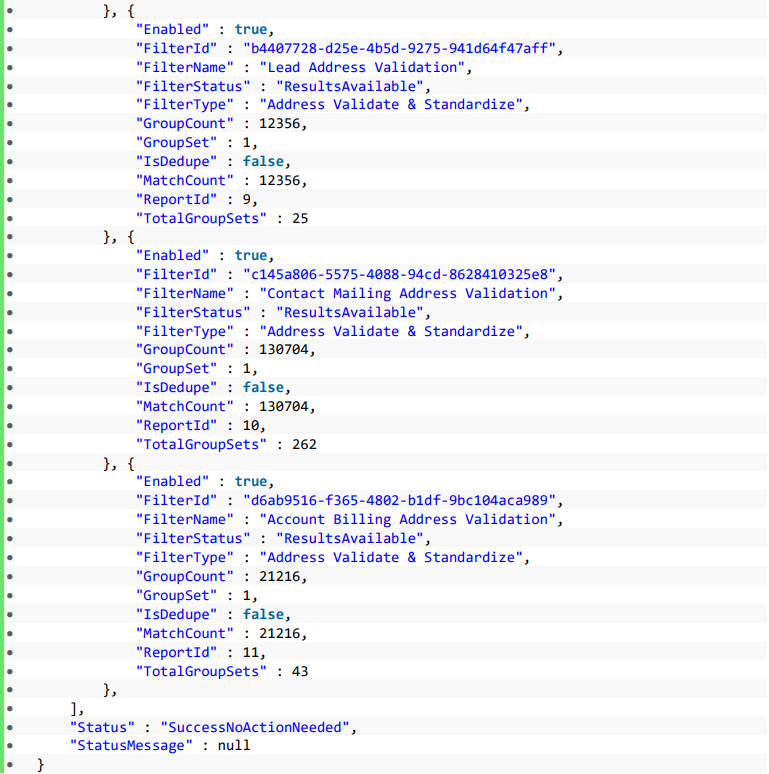
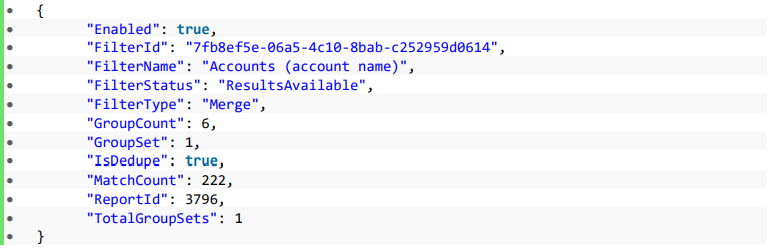
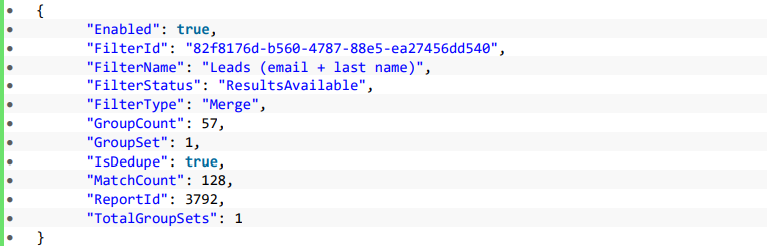
- Outputs:
- An Integration status code for the overall operation.
- A list of filters based on the type requested, along with record count details and the current filter status.
- Possible Filter Statuses: Running, ResultsAvailable, ResultsNotAvailable, ExecutionError
- JSON Example:
GetFilterGroups
This method will provide group details for the filter. Details will be provided for a maximum of 500 groups at a time. In order to get additional groups for a particular filter, the GroupSet requested can be adjusted.
- Inputs:
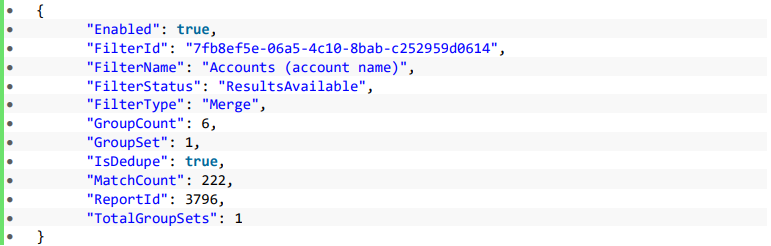
- FilterInfo: Object represented by one of the filters returned from the GetFilters method.
- JSON Example:
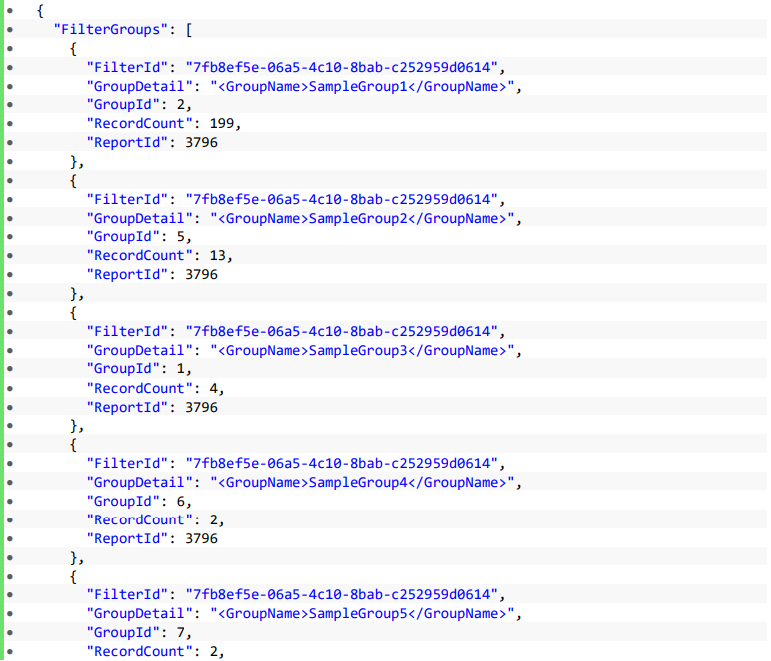
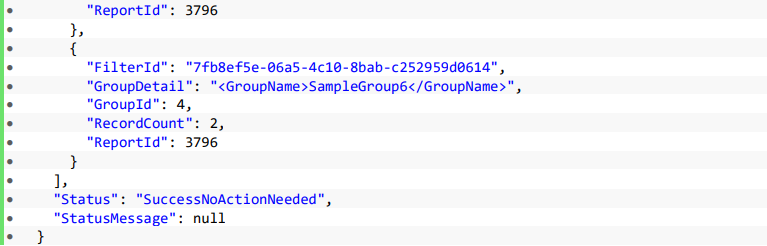
- Outputs:
- An Integration status code for the overall operation.
- List of filter groups with the group name and record counts provided
- JSON Example:
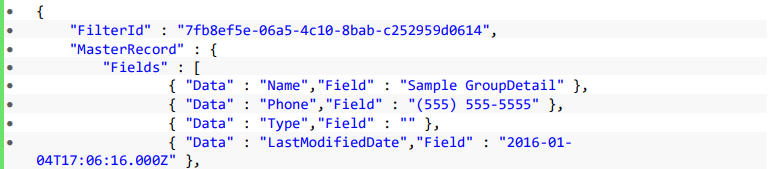
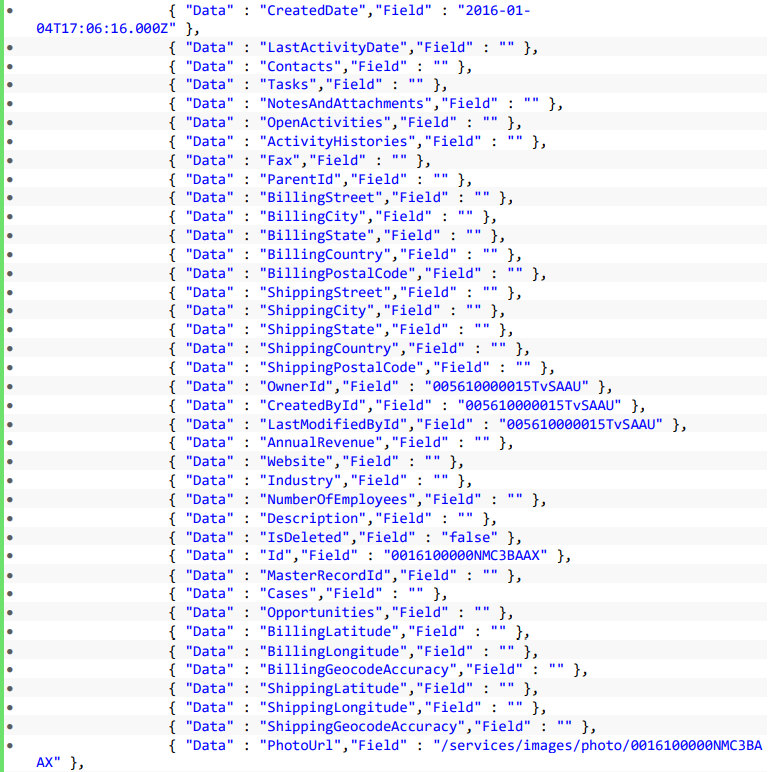
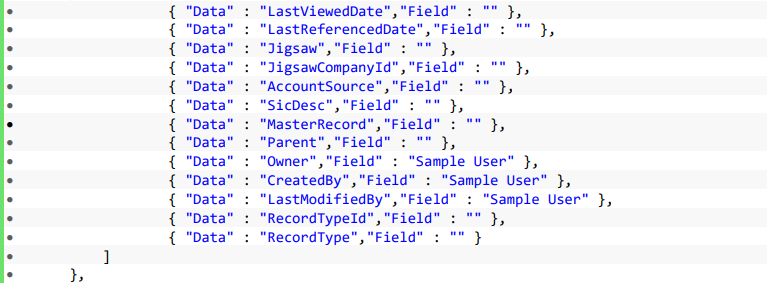
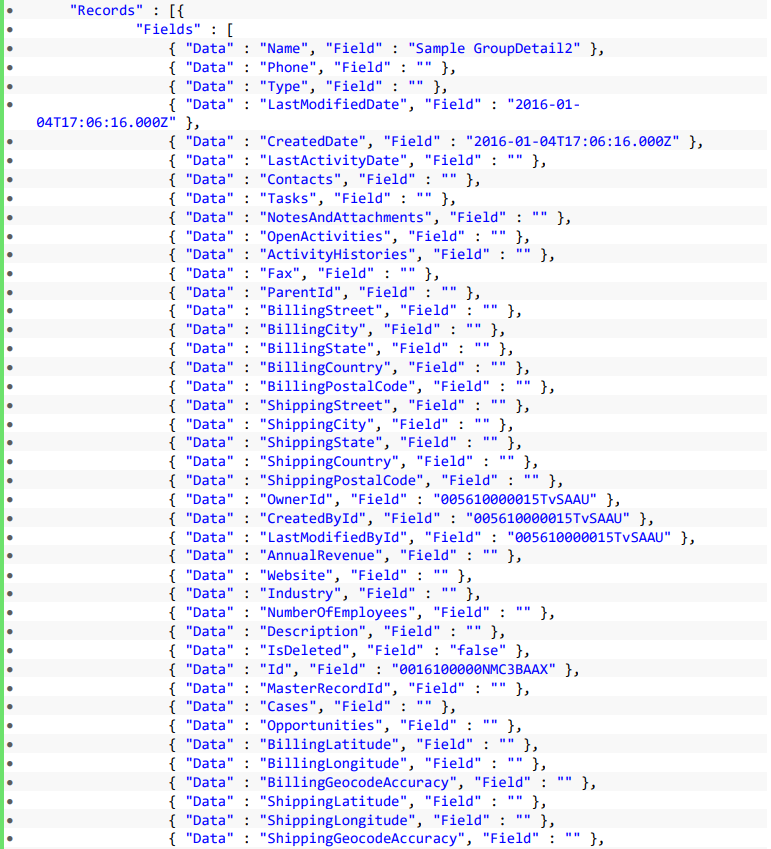
GetFilterGroupDetail
This method will provide details for a particular filter group based on the result returned from the get filter groups method. If a dedupe filter is used, the master and duplicate records will be provided. If a data maintenance filter is used, the record and corresponding update values will be provided (if applicable). This provides a preview of the action result without performing the action itself. Therefore, you can review the merge results prior to submitting the merge itself.
- Inputs:
- Group info as provided by the GetFilterGroups method.
- JSON Example:

- Outputs:
- An Integration status code for the overall oepration.
- Master Record
- Duplicate Records (if a dedupe filter) or Update fields as a record (if an appropriate Data Maintenance filter)
- JSON Example:
RecalculateFilter
This method will start the process of recalculating a provided filter in order to provide updated results. While the filter is recalculating, the status can be evaluated from the GetFilters method.
- Inputs:
- FilterInfo: Object represented by one of the filters returned from the GetFilters method.
- JSON Example:
- Outputs:
- An Integration status code for the overall operation.
- JSON Example:

SubmitFilterGroup
This method will submit a filter group for processing based on the type of filter for the filter group provided. If a merge filter is used, then a merge will be initiated. If a convert filter, then a convert will be submitted, etc. Regardless of the type of filter, the input and outputs are the same and will respond with the same format.
- Inputs:
- Filter group object as provided by the GetFilterGroups method.
- JSON Example:

- Outputs:
- An Integration status code for the overall operation.
- JSON Example:

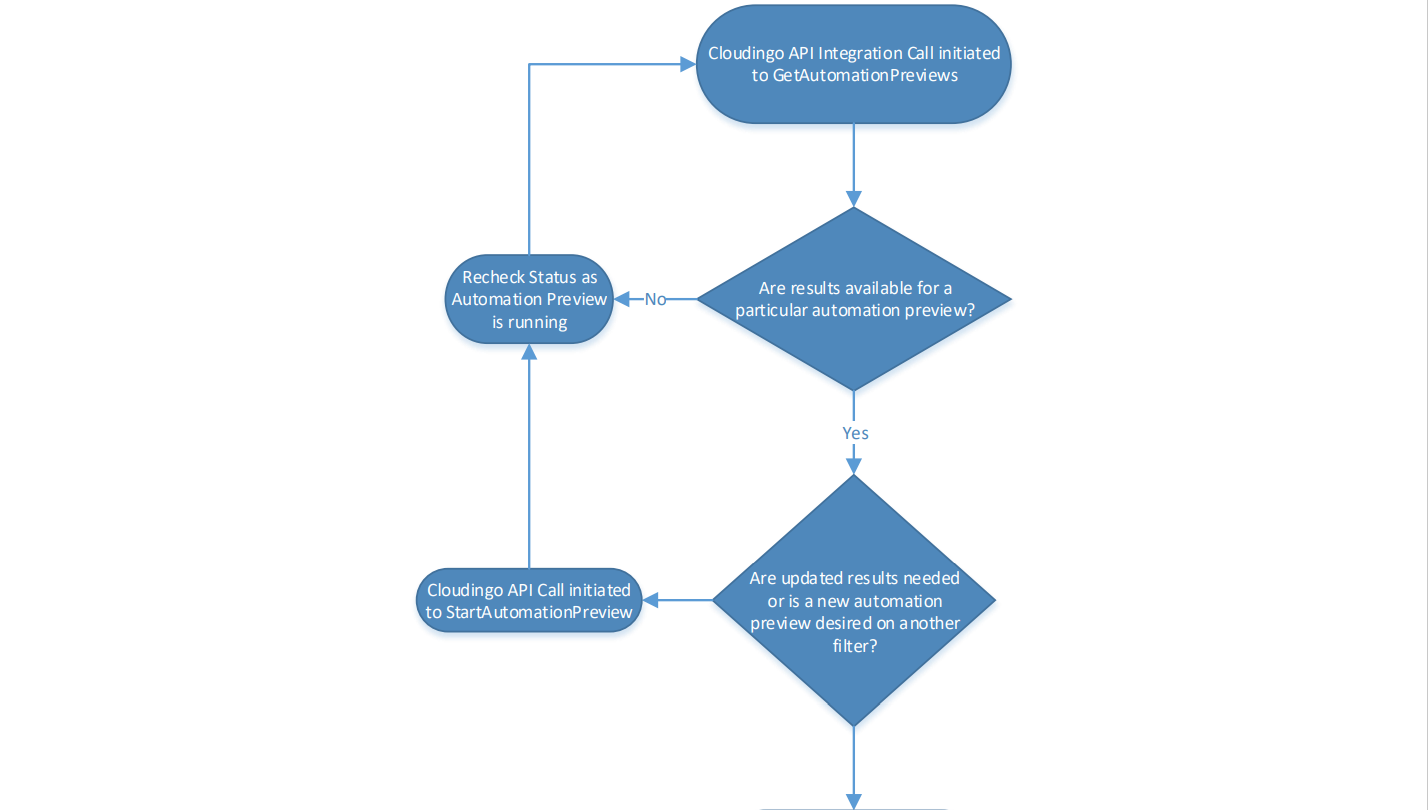
GetAutomationPreviews
This method will return a list of all of the current automation previews available for a Cloudingo account. Automation preview is an advanced feature available, which will provide a report of master and duplicate details for a filter result that can be reviewed prior to running automation on a filter result. This required specific configuration and is not enabled by default on a Cloudingo account. However, if enabled and configured, this method will return any reports available along with their current status and some details on the results.
- Inputs:
- None
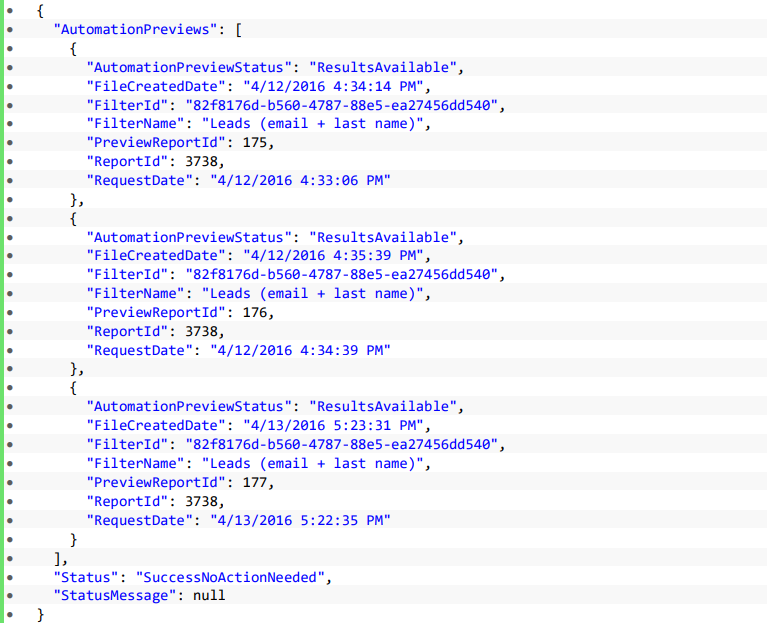
- Outputs:
- An Integration status code for the overall operation.
- List of automation previews currently available, along with the filter for the preview and the status for the preview itself.
- Possible Automation Preview statuses: Running, ResultsAvailable, ResultsNotAvailable, ExecutionError
- JSON Example:
GetAutomationPreviewDetails
This method will return the details for the requested automation preview. This will primarily consist of the CSV content for the automation preview report. The CSV is exported using UTF-8 encoding.
- Inputs:
- Automation preview object as provided by the GetAutomationPreviews method.
- JSON Example:


- Outputs:
- An Integration status code for the overall operation.
- CSV content for the automation preview report.
- JSON Example:

StartAutomationPreview
This method will initiate the creation of an automation preview report for a particular filter provided. Not all filters are eligible for automation preview even if automation preview is available in a Cloudingo account, as they may not all be appropriate, as automation preview is configured per object, and other filters do not have an automation preview (Data Maintenance, etc). If the filter provided is not eligible, a status message will be sent in the response to notify the caller. The overall status of the preview itself can be reviewed using the GetAutomationPreviews method.
- Inputs:
- Filter info object as provided from the GetFilters object.
- JSON Example:
- Outputs:
- An Integration status code for the overall operation. The status message on a successful response will provide the automation preview report ID that was initiated.
- JSON Example:

Action Workflows
The following section provides details on the overall workflows for particular Cloudingo API actions. While separate actions are provided, in some scenarios the actions work together in order to provide overall functionality depending on each client’s usage pattern.
Duplicate Check and Merge Workflow
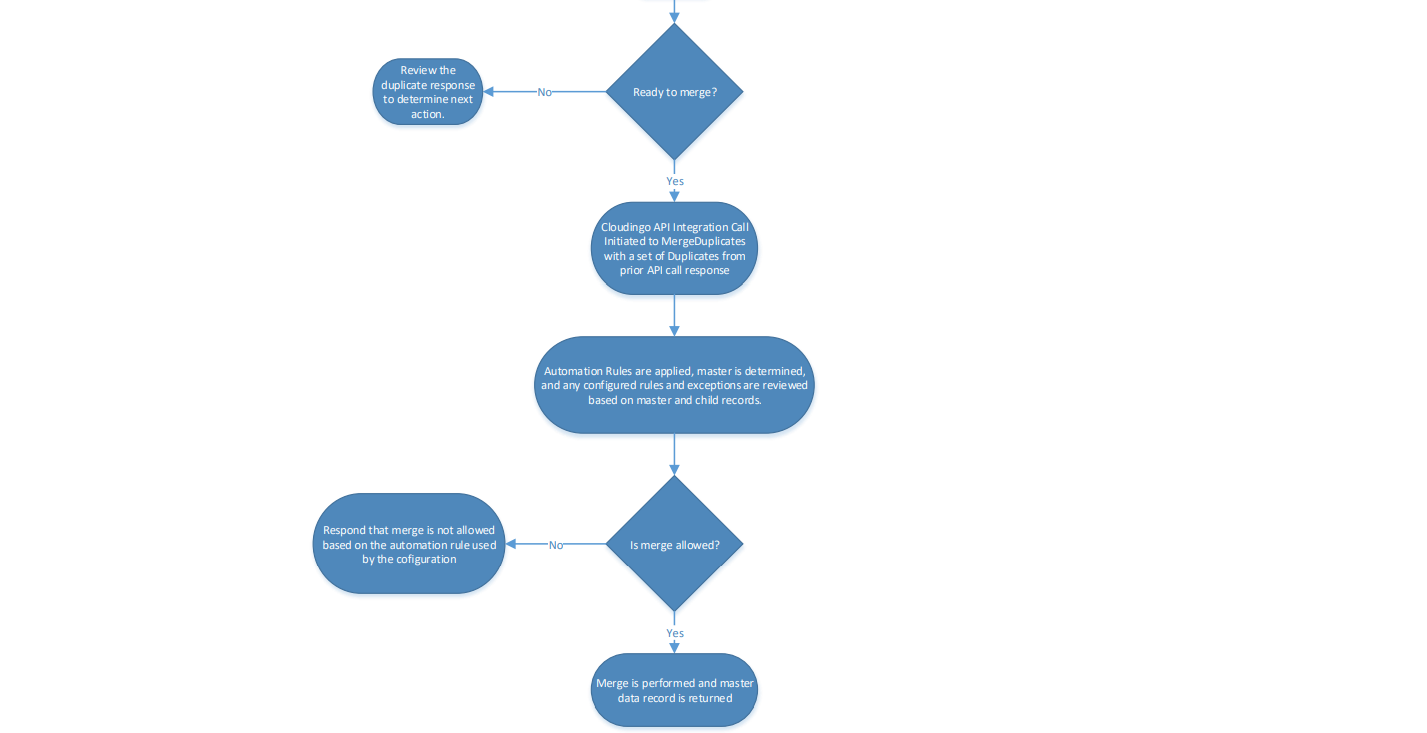
Merging with Automation Rules
There are a few things to consider when using automation rules in conjunction with the API, as follows.
1. The record being passed to the API cannot be the master record when performing a merge. When performing a duplicate check, we do not require a full record in order to perform the duplicate check, but a full record would be necessary if the API were expected to insert records that would satisfy all of the Salesforce validation rules. In addition, if the incoming record could be chosen as the master, there is a greater likelihood that incoming records would fail on create and leave duplicate records within the system. As a result, we do not expect complete records to be passed to the API when performing the duplicate check and merge.
2. While we cannot select the record passed to the Cloudingo Integration API as the master when determining a master record, all field values will be included in the merge process when determining which field-level values should be selected for the master record. In this situation, the incoming API record would be considered the newest record. So, if the desired result would be to have values from the incoming record maintained post-merge, your rule would be to preserve the newest value.
Duplicate Check and Determine Master Workflow
Filter Processing Workflow
Automation Preview Workflow

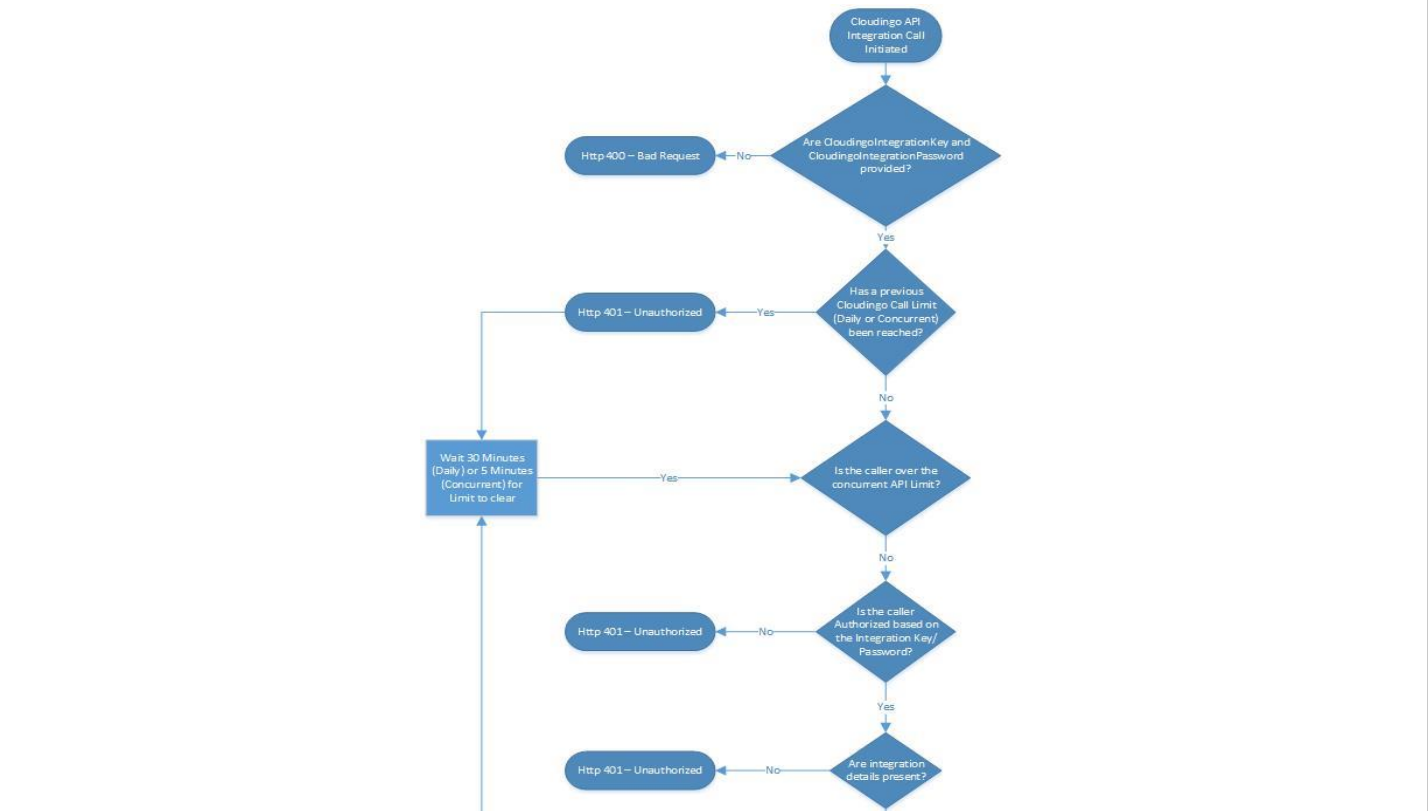
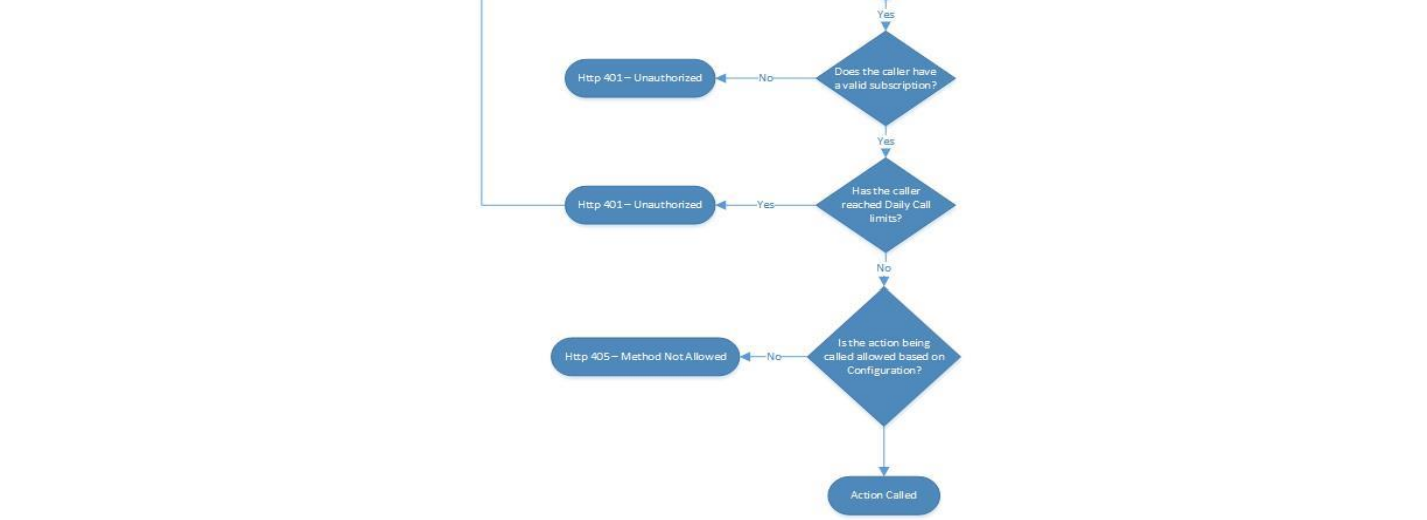
Limits and Conditions
There are a number of checks that occur with each API call, as well as Cloudingo API limits and Salesforce API limits. As a result, there is an overall process flow involved with performing actions through the Cloudingo Integration API when these checks come into play, and a number of potential return messages if limits or conditions are met. The following is a list of the primary call limits:
- Daily API Call Limit - based on a 24-hour rolling period. The exact value will depend on the level purchased.
- 5-minute period – limited to 1000 API calls in any 5-minute period.
- Concurrent API Calls – limited to 100 API calls processing at any given time.
Limits and Conditions Workflow
Return Statuses
The return details will be provided with each return method. Those listed below without a corresponding action apply to any action.
Any method-level error response will have the same structure as shown below. Non-method-level errors will be listed in the corresponding status and status message as a part of the response object for the specific method.
General Error Response JSON: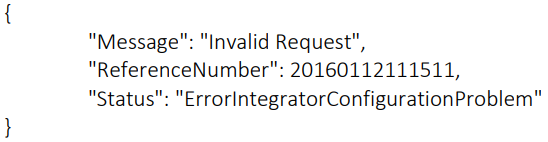 For SOAP, exceptions will all be WebFaultExceptions of type CloudingoApiError which will include a Message, ReferenceNumber, and Status.
| Action | Reason | Http Status | Status | Message |
|---|---|---|---|---|
| Any | Missing Integration Key | 400 | ErrorIntegratorConfigurationProblem | Invalid Request |
| Any | Missing Integration Password | 400 | ErrorIntegratorConfigurationProblem | Invalid Request |
| Any accepting user input | Missing/Invalid input | 400 | ErrorInvalidInput | Corresponding error message |
| MergeDuplicates, Merge Records | Records/IDs provided to merge not found | 400 | ActionCannotBeCompleted | Merge would not be allowed on the duplicate list provided: No records to merge, provided records not found |
| Any | Concurrent API Limit Exceeded | 401 | ErrorCloudingoConcurrentApiLimitReached | Interval Request Limit Exceeded |
| Any | Cloudingo Daily API Limit Exceeded | 401 | ErrorCloudingoApiLimitReached | Cloudingo API Call Limit |
| Any | Cloudingo Subscription Expired | 401 | ErrorContactCloudingoSupport | Cloudingo Subscription Expired |
| Any | Unable to Authenticate | 401 | ErrorIntegratorConfigurationProblem | Unauthorized Request |
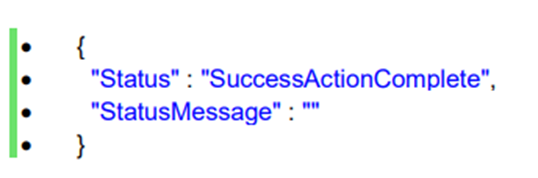
| Any | Success - The requested action was not needed | 200 | SuccessNoActionNeeded | |
| Any | Success - Action Complete | 200 | SuccessActionComplete | |
| CheckRecordForDuplicates, CheckForDuplicates | Success - Record Inserted | 200 | SuccessRecordAdded | |
| CheckRecordForDuplicates, CheckForDuplicates | Success - Existing record updated | 200 | SuccessRecordUpdated | |
| Any | Error during the requested process. Contact Cloudingo for assistance | 400 | ErrorContactCloudingoSupport | Corresponding error message |
| CheckForDuplicates | More records passed to the requested action than are allowed | 400 | ErrorInputLimitReached | Max Inputs (#) Reached |
| Any | Requested action is not configured as accessible | 400 | ErrorActionDisabled | Action Not Allowed |
| Any | Cloudingo profiling/indexing data | 503 | ErrorIntegratorTemporarilyUnavailable | Integration temporarily unavailable. Cloudingo is currently reprofiling your data |
| Any | Error during requested method | 500 | ErrorCloudingoSystemProblem | Corresponding error message |
| CheckRecordForDuplicates | Missing Data prevented record from being created | 200 | ErrorRecordCreateFailedMissingData | Required fields causing the issue |
| CheckRecordForDuplicates, CheckForDuplicates | Invalid field prevented record from being created | 200 | ErrorRecordCreateFailedInvalidField | Invalid fields causing the issue |
| CheckRecordForDuplicates, CheckForDuplicates | Permission denied for creating or updating record | 200 | ErrorRecordCreateFailedPermissionDenied | Failure message |
| CheckRecordForDuplicates, CheckForDuplicates | Record create failed for general reason | 200 | ErrorRecordCreateFailed | Failure message |
| Any | Configured filter information could not be found | 200 | ErrorProvidedFilterNotFound | |
| CheckRecordForDuplicates, CheckForDuplicates, CheckIdsForDuplicates, DetermineMaster, MergeDuplicates, MergeRecords | Unable to determine a master for provided duplicates | 200 | ErrorUnableToDetermineMaster | |
| CheckRecordForDuplicates, CheckForDuplicates | Invalid field prevented record from being updated | 200 | ErrorRecordUpdateFailedInvalidField | Invalid fields causing the issue |
| CheckRecordForDuplicates, CheckForDuplicates | Record update failed for general reason | 200 | ErrorRecordUpdateFailed | Failure message |
| CheckRecordForDuplicates, CheckForDuplicates, CheckIdsForDuplicates, MergeDuplicates, MergeRecords | Merge not allowed based on automation rules or exceptions | 200 | ErrorMergeNotAllowedBasedOnRules | |
| CheckRecordForDuplicates, CheckForDuplicates, CheckIdsForDuplicates, MergeDuplicates, MergeRecords | Merge failed for general reason | 200 | ErrorMergeFailed | Failure message |
Customizations
Customizations to the base Cloudingo Integration API are available on a case by case basis. If you have specific requirements or system integrations that are not covered by the existing API, please contact Cloudingo to discuss your needs.
SOAP Examples
The following examples show SOAP sample calls to the GenerateAuthorizationToken, GetAuthorizationToken, Ping, and CheckForDuplicates methods. These examples use SOAP UI, which can be downloaded from https://www.soapui.org/
GenerateAuthorizationToken
GetAuthorizationToken

Ping
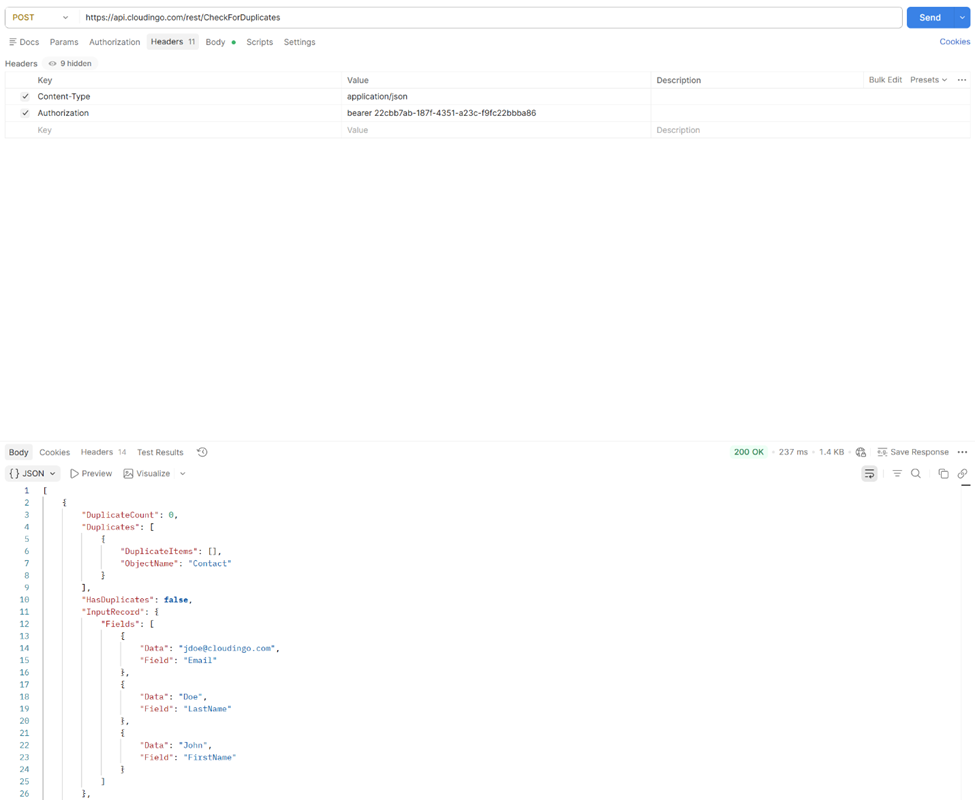
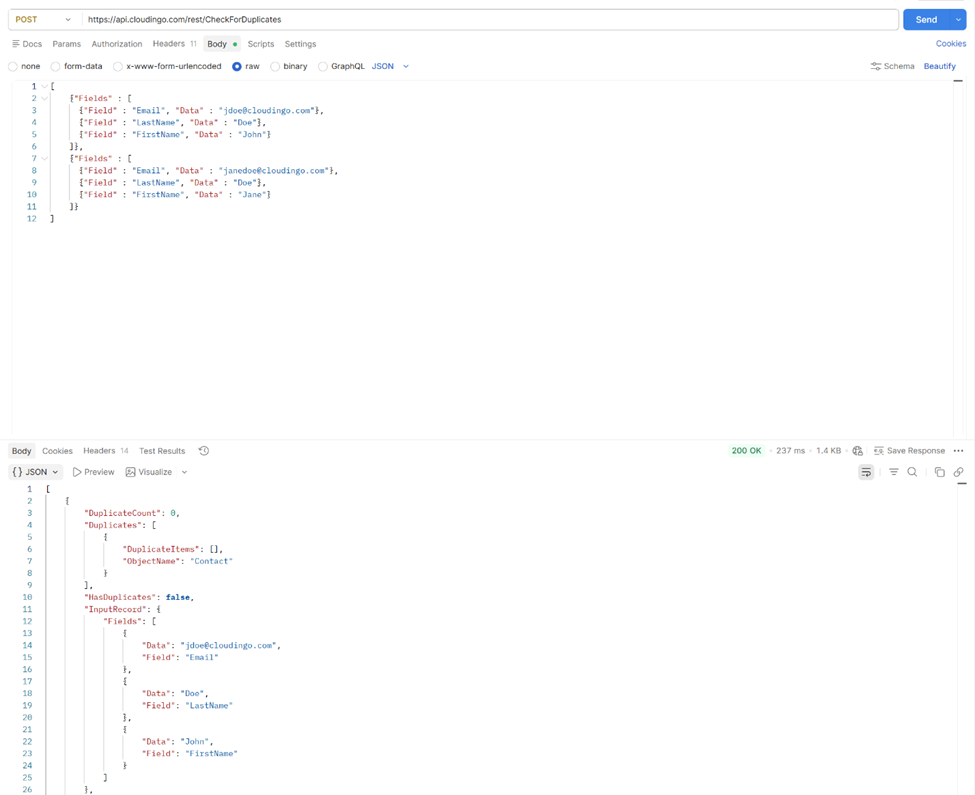
CheckForDuplicates
REST Examples
The following examples show sample REST calls to the GenerateAuthorizationToken, GetAuthorizationToken, Ping, and CheckForDuplicates methods. These examples use Postman, which is a Chrome add-on that can be downloaded from https://www.getpostman.com/
GenerateAuthorizationToken

GetAuthorizationToken
Ping

CheckForDuplicates