Getting started with Cloudingo:
- Install the Cloudingo Agent from the Salesforce AppExchange.
- Create an account at cloudingo.com.
- Connect Salesforce to the Cloudingo account.
- The Salesforce profile must have admin-level access with full read/write/update/delete permissions for the objects (standard, related, and custom) and all fields within those objects that the Cloudingo user will be working with.
- ‘View All’ and ‘Modify All’ access is also required. If these permission requirements aren't met, Cloudingo will not be able to select field values for merging, which can result in potential data loss.
Step 1: Install the Cloudingo Agent
- Find the Cloudingo Agent at the Salesforce AppExchange here and follow the installation instructions.
- Make note of which users will be connecting using their own credentials. Also, make note of their respective Salesforce profiles assigned.
- During the installation process, choose the appropriate profiles when prompted. Choose all profiles for all users that will be connecting using their own credentials. Shared connections or single-user connections need to choose the profile for the Admin user connecting. Trial users will only have single-user login during the trial.
Step 2: Create a Cloudingo Account
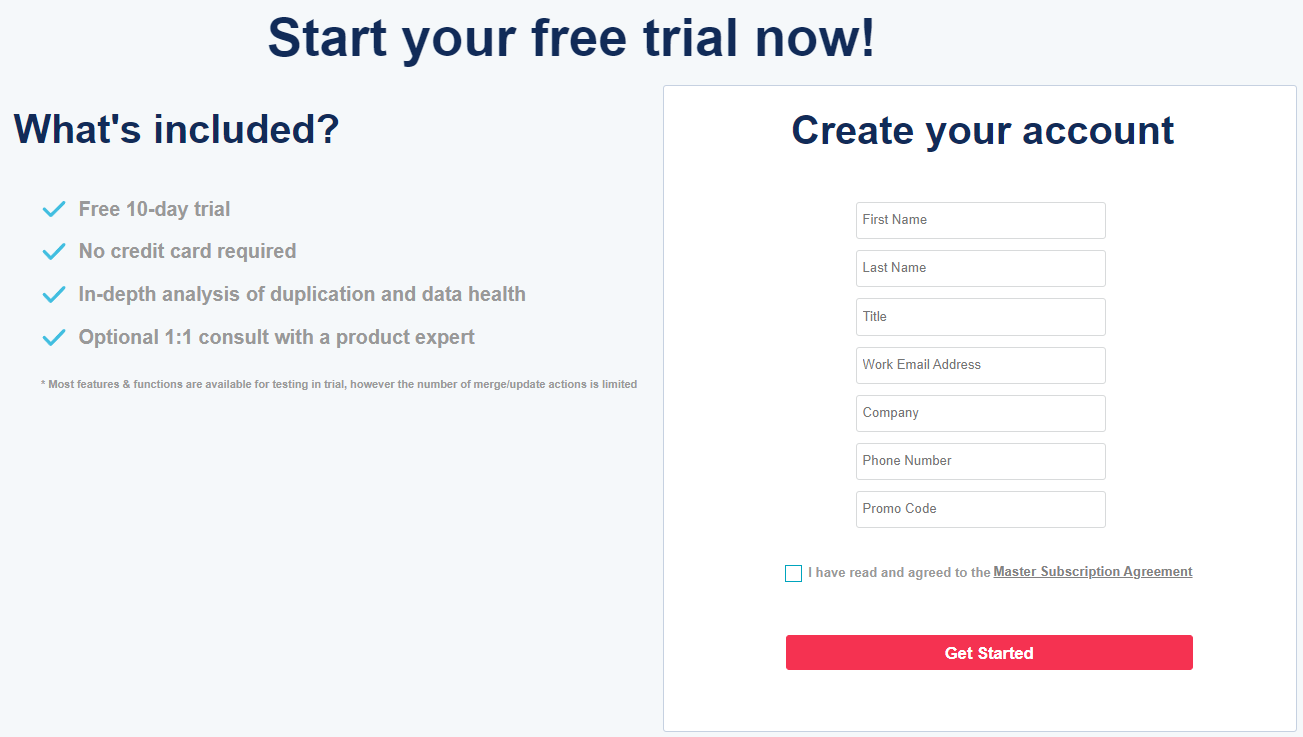
- Go to the Cloudingo registration form here.
- Fill out the form to create an account.
Step 3: Login and Connect Cloudingo to Salesforce
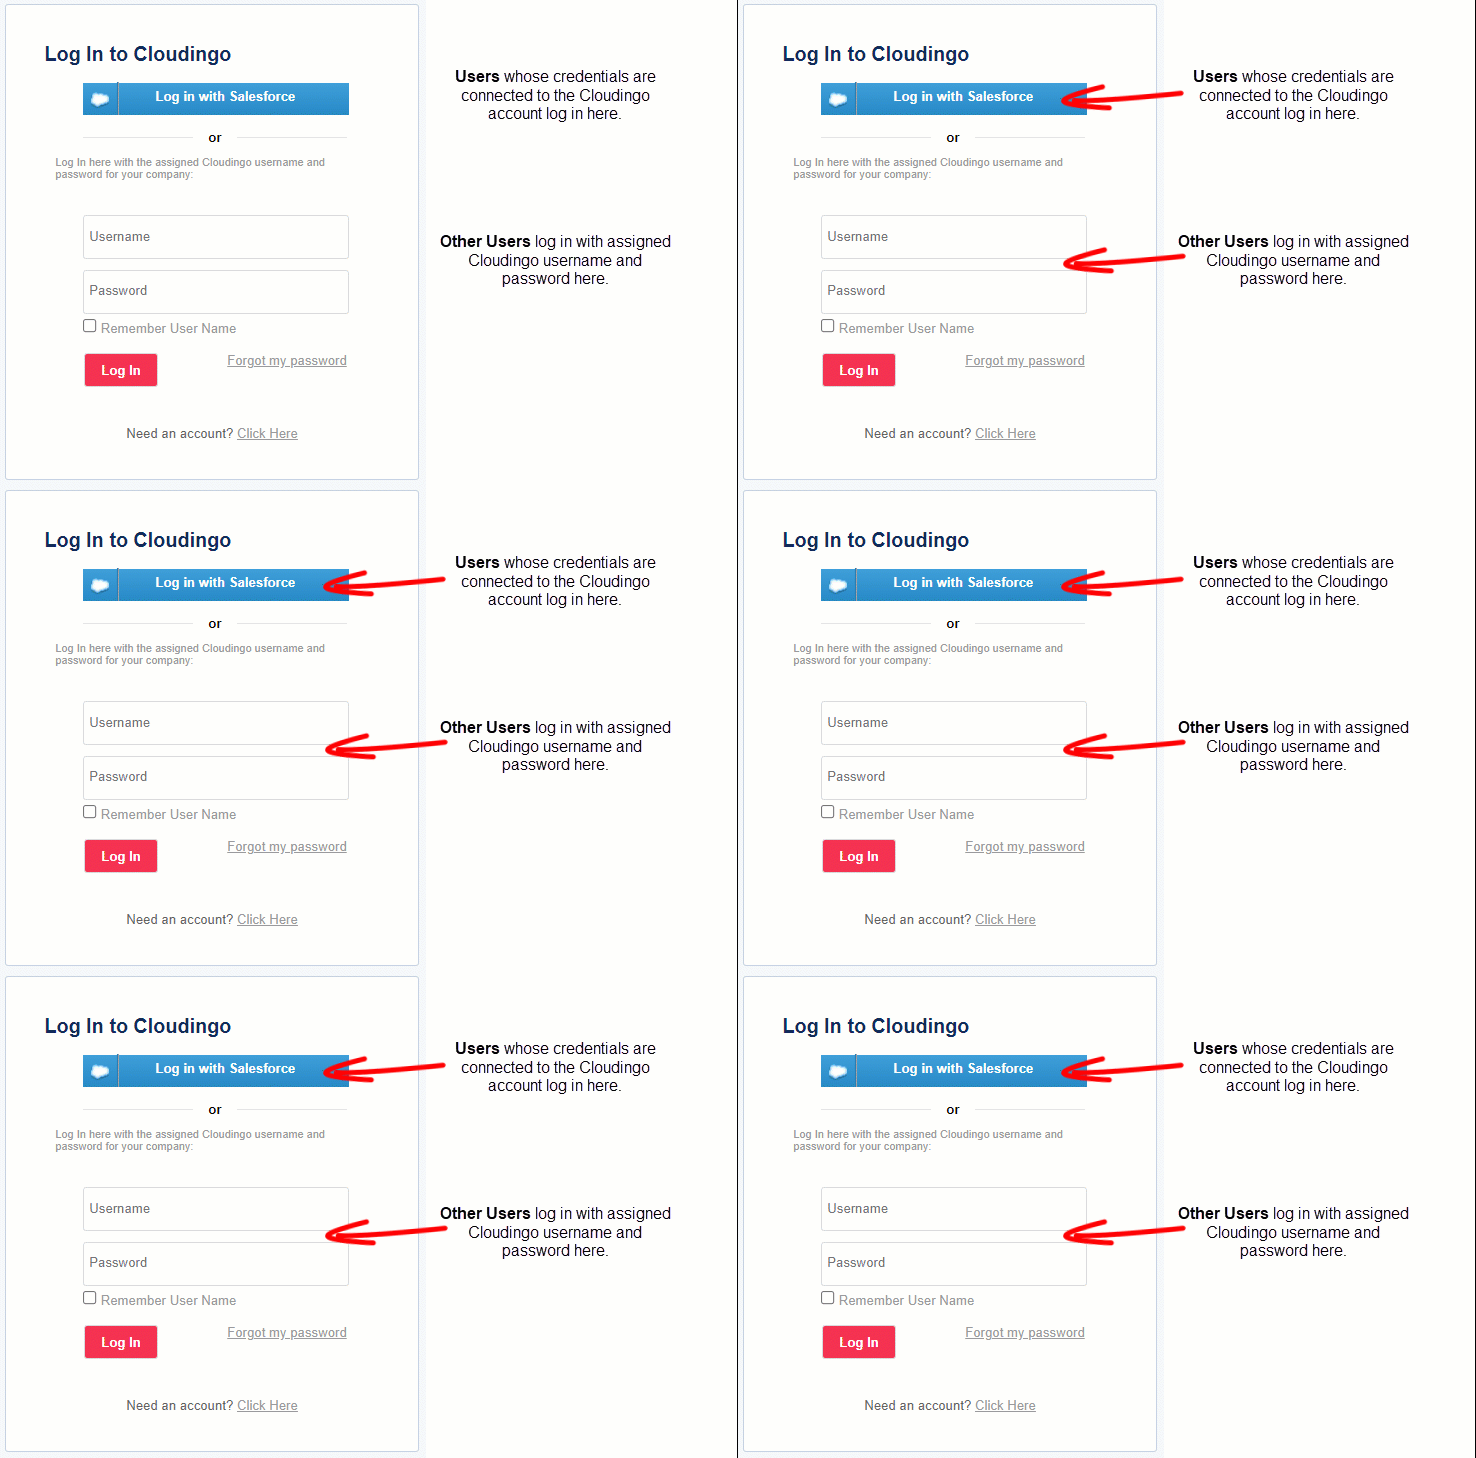
For Administrators:
- Log in to Cloudingo using the email used to register the account.
- If the password has been forgotten, reset the password here.
- If not already connected, use the 'Salesforce Account' option at the top left corner of the dashboard and choose 'Add Account'.
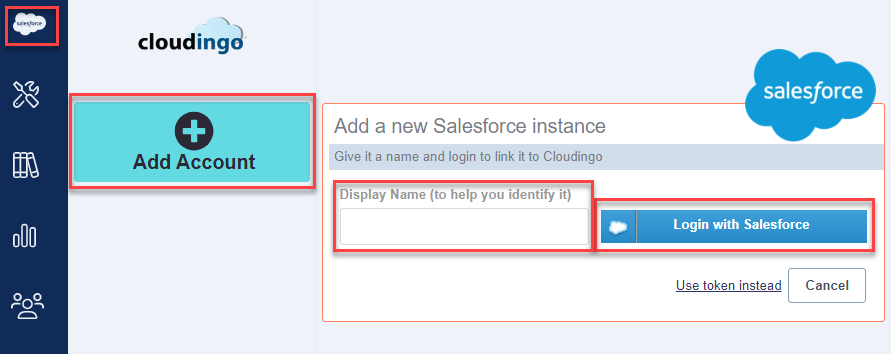
- Provide the connection with a display name (ex: Production or Sandbox).
- Use the 'Login with Salesforce' option and enter the desired Salesforce credentials to establish the connection.
- Ensure that the main user has appropriate Salesforce permissions.
For Secondary Users:
- An email will be sent to new users created by the Cloudingo administrator. Check the email for instructions from Cloudingo.
- Follow the instructions to activate the login and set up a password.
- Login to Cloudingo using the Cloudingo username and password. Do not use the ‘Login with Salesforce’ option yet.
- If the Cloudingo administrator set up Cloudingo to use individual connections:
- Choose the 'Salesforce Account' option at the top left.
- Choose the down arrow to expand the connection.
- Choose 'Change your Salesforce login'.
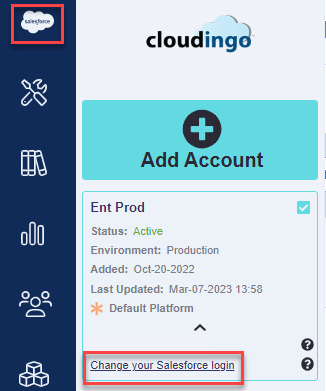
- Choose 'Change Login'.
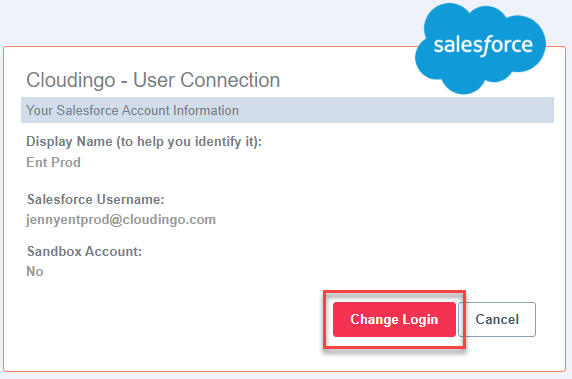
- Use the 'Login with Salesforce' option to connect using individual Salesforce credentials.
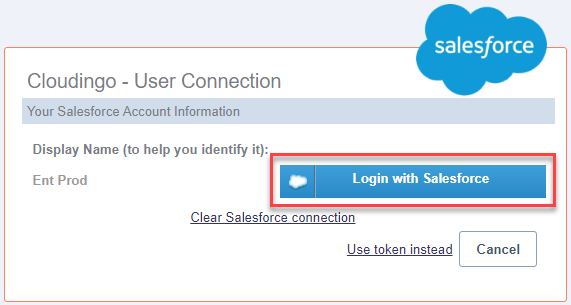 Note:If this option is not available, no action is necessary. The admin configured Cloudingo to use a shared connection. When using a shared connection, use the Cloudingo login at the login page instead of 'Login with Salesforce' option for future logins.
- Follow the instructions to activate the login and set up a password.
Step 4. Initial Indexing
Cloudingo will index the org data and field schema and then generate a dashboard of default filters showing the results of the initial duplicate scan.
Step 5. Use Existing Filters or Create New Ones
Use prebuilt filters from Cloudingo or create new ones.
Step 6. Set up Rules for Merging Records
Set up rules defining the master record selection and field value choices based on business requirements.
Step 7. Automate Jobs and Set Filters to Run on a Schedule
Start automation manually or use schedules to process merges. Make sure to preview results for accuracy before automating.
Troubleshooting Connection Problems
- Check if Cloudingo is installed in Salesforce.
- In Salesforce: 'Setup' → search for ‘Installed Packages'.
- If Cloudingo Agent is not listed, install the app from the Salesforce AppExchange.
- Make sure to use the same credentials used to log in to Salesforce.
- Make sure the connecting user has the appropriate Salesforce permissions. See below for permission requirements.
- Based on the Salesforce org’s security settings, whitelisting Cloudingo's IP ranges may be required. Note: The org's security settings determine if IP ranges need to be whitelisted. Consult with the Salesforce administrator for your organization if unsure.
- In Salesforce: 'Setup' → 'Security Controls' → 'Network Access' → 'Trusted IP Ranges'.
- Click the ‘New’ button.
- Enter the following under ‘Trusted IP Ranges’: Starting IP Address 169.61.150.226 to Ending IP Address 169.61.150.238.
- In some cases, whitelisting the IP range under the user’s profile is necessary as well.
- For more information, here is the full help article.
- If using a custom URL for Salesforce, configure it during the Cloudingo connection process. Cloudingo will auto-populate the URL if left blank as long as the connection is successful.
- If the connection forces credentials for the prior user (via SSO) and a new user connection is desired instead, contact Support.
- Apex classes must be enabled for the Cloudingo user's Salesforce profile:
- In Salesforce: 'Setup' → 'Manage Users' → 'Users'.
- Choose the Profile link for the Cloudingo user.
- Select Edit for Apex Classes.
- Select any classes beginning with 'Cloudingo' on the left side (disabled classes) and move them to the right to enable them.
- Save the changes and retry the previous actions to see if the problem is resolved.
Salesforce Permission Requirements
Cloudingo is designed as an Administrator tool and requires admin-level access.
Without proper access to Salesforce objects, fields, and related data, merges can fail or cause data loss. When merging, Salesforce automatically reparents related records (Contacts on Accounts, Opportunities, Notes, Attachments, custom objects, and more). Access to the merging objects alone is not enough. These are Salesforce permission requirements, not Cloudingo permissions. Please consult with your Salesforce Administrator.
- Cloudingo cannot troubleshoot issues caused by missing or insufficient Salesforce permissions. Salesforce permission models are highly customized and can contain hundreds of individual settings, making it the responsibility of your Salesforce Administrator to ensure all required access is granted.
- Insufficient permissions can prevent or disrupt imports, merges/conversions, updates, deletes, syncs, and other Cloudingo processes. Organizations choosing to connect Cloudingo with a non-administrator Salesforce user do so at their own risk and should thoroughly test all functionality before deployment.
- To avoid permission-related failures, Cloudingo strongly recommends using a dedicated Salesforce Administrator account for the Cloudingo connection. For multi-user licenses, users can securely inherit the required access through Cloudingo without direct access to the Salesforce Administrator credentials.
- Cloudingo's role-based permissions can then be used to restrict feature access on a user-by-user basis while maintaining the Salesforce permissions required for proper operation.
Warning: Salesforce Integration User license types are not supported by Cloudingo and may result in functionality failures.
Objects, Fields, and Record Types
Review the Salesforce schema for all objects involved in merging, including any related object lookups (fields and related lookup lists). Access to all related objects is required for successful record reparenting during merges.
For each object and related object:
- Enable all applicable Record Type Assignments.
- Enable all Object Permissions, including:
- Read
- Create
- Edit
- Delete
- View All Records
- Modify All Records
- View All Fields
- Ensure all eligible fields have both Read Access and Edit Access enabled.
Required System Permissions
The connected user must have:
- View All Users
- API Enabled
- View Setup and Configuration
Apex Class Access
Enable access to all Apex Classes that begin with "Cloudingo".
Connected App Access
At the profile level (or permission set level, if applicable):
- Ensure the Cloudingo Connected App is enabled and assigned.
Activity History Querying (Subquery)
Cloudingo queries related activity history to display information such as Last Activity Date, Opportunity Count, Case Count, and other related metrics. Salesforce only permits these activity-history subqueries when the View All Data system permission is enabled.
Important: Without the View All Data permission, related activity data cannot be retrieved for display in the merge preview.
If granting View All Data does not align with your organization's security requirements, contact Cloudingo Support to have subquery functionality disabled. This will not affect merge processing; however, related object metrics and activity-based fields will no longer appear in the merge preview.
Additional Permissions
Additional access may be required for certain Cloudingo features:
- Metadata access is required for Data Quality and Intelligence Dashboard functionality.
- Additional object and field permissions may be required when using Find Data or Data Maintenance (Update and Delete Jobs) against objects that are not enabled for deduplication.
Refer to the applicable feature documentation for specific requirements.
OAuth Policies
Navigate to Setup → Manage Connected Apps → Cloudingo
If Permitted Users is set to "Admin approved users are pre-authorized":
- Add the user's Profile and/or Permission Set to the approved list.
Alternatively:
- Set Permitted Users to "All users may self-authorize."
Session Settings
Required: Disable "Lock sessions to the IP address from which they originated."
This Salesforce security setting is not compatible with Cloudingo. Cloudingo processes data across multiple server IP addresses, and enabling this setting can prevent authentication and job processing from functioning correctly.
Improper Salesforce permissions can result in potential data loss, processing failures, or critical data sync failures.
Connecting to Additional Orgs
- Cloudingo licenses allow for one Production and one Sandbox connection to be connected simultaneously within the same Cloudingo Account.
- To add more than one Sandbox or Production instance, contact your Cloudingo Account Representative (contact@cloudingo.com).
- To add a second connection:
- Install Cloudingo in the org.
- When installing into a Sandbox from AppExchange, enter the Production credentials first. Then, choose the Sandbox for the environment to be installed.
- Log in to Cloudingo and add the new connection.
- Choose the 'Salesforce Account' option in the left-hand navigation options.
- Choose 'Add Account'.
- Give the connection a display name (such as "Production" or "Sandbox").
- Choose the 'Login with Salesforce' option to enter the Salesforce credentials for the org being connected.Note:The 'Use token instead' option should only be used if advised to do so by our Support Team.
- Install Cloudingo in the org.
- When the connection is successful, the indexing process will begin. Once indexing is complete, the dashboard will display standard filters.
- If the connection fails, refer back to the connection troubleshooting steps above.
- Toggle between the two environments using the checkbox.
- Choose the 'Make Default Account' link to default the desired connection for future logins.
Broken Connections
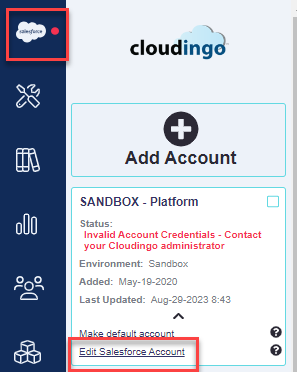
- If a connection is broken, errors will display on the main dashboard with a red dot next to the 'Salesforce Account' icon (top-left navigation icon).
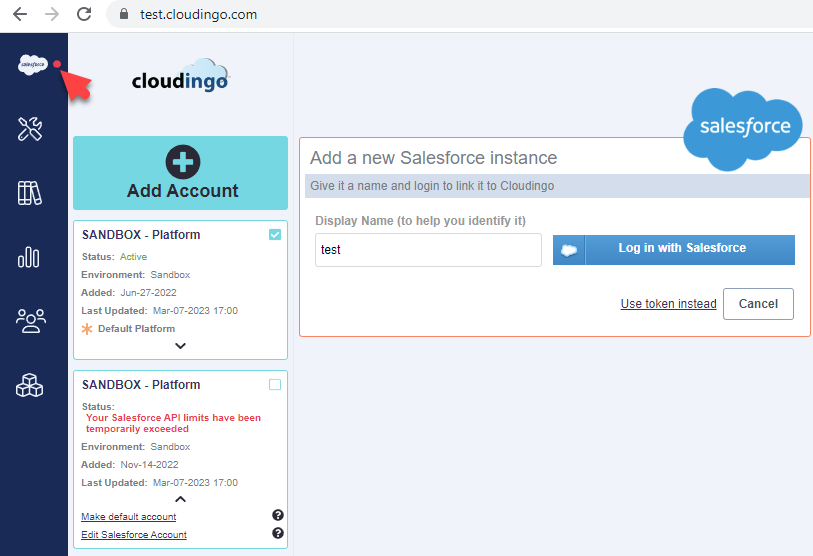
- “Invalid Account Credentials” or some other error alert will show as an alert in the Salesforce Account → Platform details.
- “Cloudingo Agent is not installed” may appear on the main dashboard.
- If errors appear, the connection to Salesforce has failed, and re-authentication is required. Some reasons for disconnects are:
- General communication errors.
- The connected user was deactivated in Salesforce.
- If the deactivated user is also set as the only (or the main) user, and no other users have a login to Cloudingo, contact Cloudingo Support.
- The Cloudingo agent may have inadvertently been uninstalled.
- The org has been refreshed (Sandboxes).
To Reconnect Production
- Log in to Cloudingo using the Cloudingo username & password instead of ‘Login with Salesforce’.
- Use the forgotten password link on the main cloudingo.com login page if the password is not known.
- Choose ‘Salesforce Account’ → ‘Edit Salesforce Account’ → ‘Edit Account’. Make sure to choose the appropriate environment (Production vs. Sandbox).
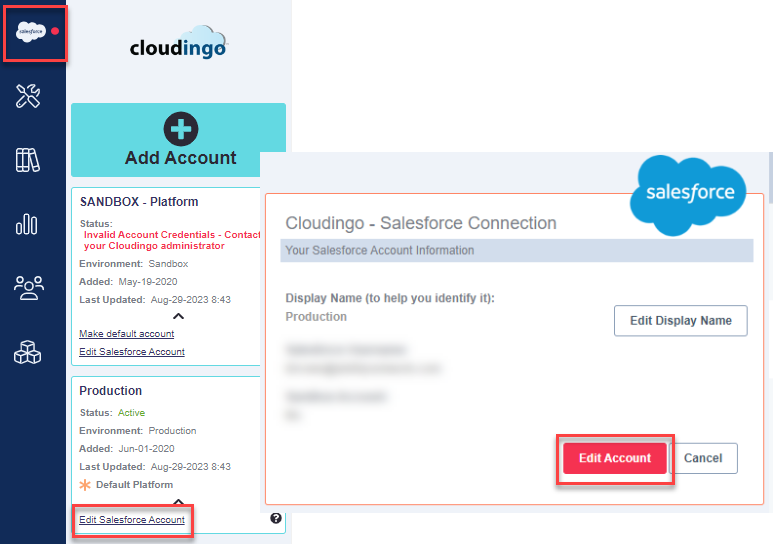
3. Use the ‘Login with Salesforce’ option to enter the desired credentials.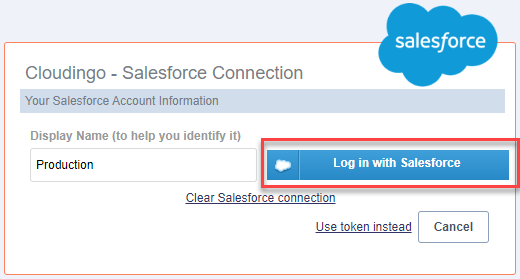
- If using the same credentials as the previously connected user, log in to Salesforce and verify the agent is installed (see troubleshooting steps above for connectivity issues).
- If the previously connected user has been deactivated in Salesforce, assign a new Admin to establish the connection.
- If switching the connection to a different user, click the 'Clear Salesforce connection' link before reconnecting under the new user.
To Reconnect Sandbox
- Log in to Cloudingo.
- Choose ‘Salesforce Account’ → ‘Edit Salesforce Account’. Make sure to choose the appropriate environment (Sandbox vs. Production).
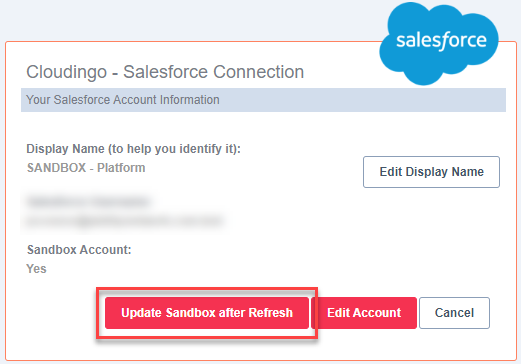
- Choose the ‘Update Sandbox after Refresh’ option.
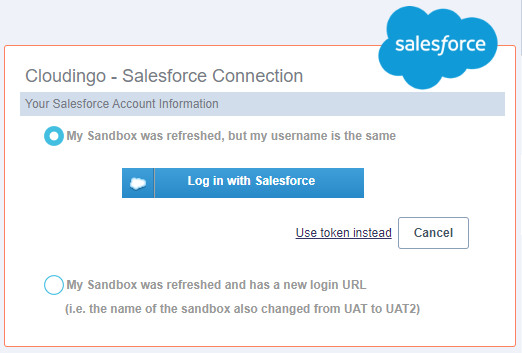
- If the username & URL are not changing (this is a straight reconnect to the same Sandbox using the same credentials), use the ‘Log in with Salesforce' button to re-enter the Sandbox credentials.
 Once the connection is successful, the Account should begin reindexing.
 - If the connection username and/or Sandbox URL are changing from what was previously connected, choose the 'My Sandbox was refreshed and has a new login URL' option.
- Enter the correct username & hit Next.
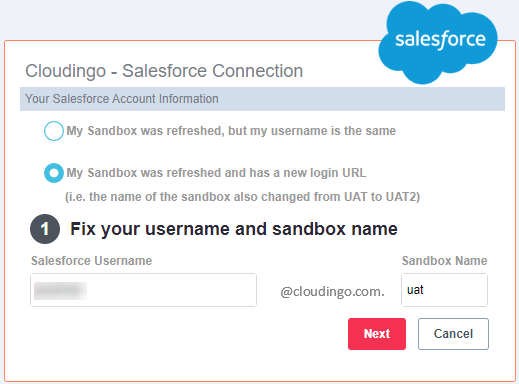
- If the main portion of the username domain is changing, this is hardcoded and cannot be updated manually. Contact Support to have it updated.
- Choose the 'Log in with Salesforce' option.
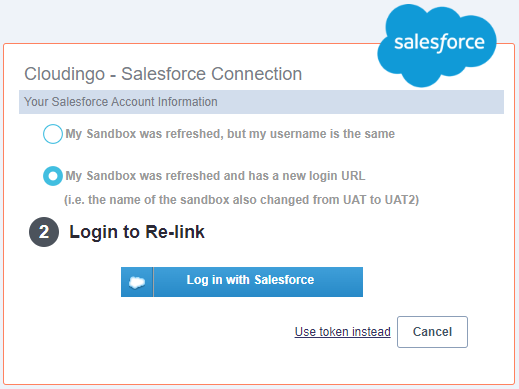
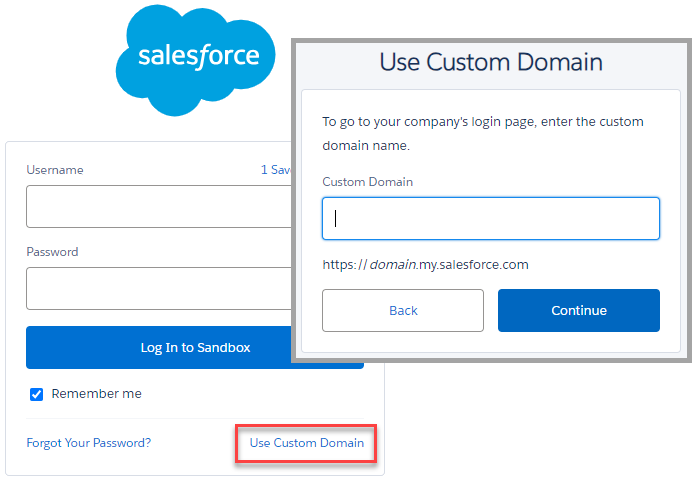
- If the custom URL is changing, choose the 'Use Custom Domain' (link at the bottom right of the login box). Enter the new custom URL & continue.
- If using the same credentials as the previously connected user, log in to Salesforce and verify the agent is installed (see troubleshooting steps above for connectivity issues).
- If the previously connected user has been deactivated in Salesforce, assign a new Admin to establish the connection.
- If switching the connection to a different user, click the 'Clear Salesforce connection' link before reconnecting under the new user.
- If the custom URL is changing, choose the 'Use Custom Domain' (link at the bottom right of the login box). Enter the new custom URL & continue.
- Enter the Sandbox credentials. Once the connection is successful, the Account should begin reindexing.
- Enter the correct username & hit Next.
- If the username & URL are not changing (this is a straight reconnect to the same Sandbox using the same credentials), use the ‘Log in with Salesforce' button to re-enter the Sandbox credentials.
- If the connection is successful, the indexing process begins.
- If the connection fails, refer back to our troubleshooting steps.
- If the connection forces credentials for the prior user (via SSO) and a new user connection is desired instead, contact Support.
- Production environments are not interchangeable. To switch the connection to a new Production instance, contact your Cloudingo Account Representative or contact@cloudingo.com.
- Sandbox environments are interchangeable and can be swapped out with other Sandboxes.
- If the Salesforce username/domain's main portion changes, contact Support. This will have to be rectified on the Cloudingo server side.