Overview
Cloudingo is a powerful tool that helps identify and merge duplicate records in Salesforce. Filters are the backbone of the Cloudingo application, and the search criteria can be customized to efficiently find duplicate records. This guide will walk through the steps required to create or edit filters in Cloudingo.
Navigation
To create or edit filters in Cloudingo, follow these steps:
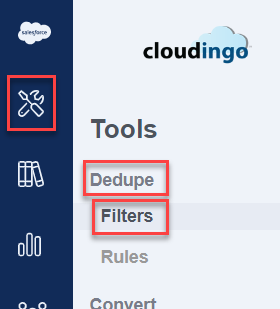
- Open the Filters window (this should be the default when logging in). Or choose the ‘Tools’ → ‘Dedupe’ → ‘Filters’ option from the left-hand-side navigation window.
- The top header options will sort the filters displayed by object (Lead, Account, Person Account, or Contact), or choose 'All' to view all filters for all objects on one page.

- Choose 'Create New Filter' to build a new filter.
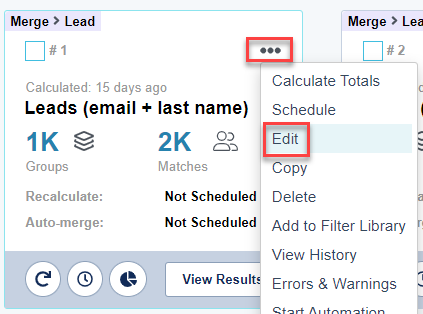
- Choose 'Edit' from a specific filter’s menu option to edit an existing filter.
Step 1: The basics
Set up the basics.
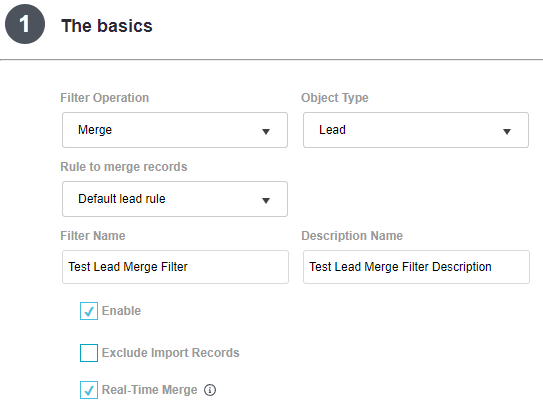
- Filter Operation: Choose the filter operation. This is not editable if editing an existing filter.
- Merge: Create a merge filter across the same object using same field comparisons.
- Cross-Matching Merge: Create a merge filter that checks two different fields against each other to find duplicate matches.
- When building a cross-match field filter, specify the fields to be cross-examined in Step 1 of the filter configuration. For example, Email & Alternate Email.
- Specify the Matching Style (Exact, Numeric Only, Phone North America, Phone International).
- At least one additional matching field is required in Step 2.
- Use this option if you only have one cross-field match to perform. Use regular merge if you need to perform multiple cross-matches (see more details below in Step 2).
- Object Type: Choose the object for the filter being created. This is not editable if editing an existing filter.
- Rule to Merge Records: Assign the merge rule to be applied to the filter.
- Cloudingo uses the default automation rule on all filters unless specified otherwise. If the same rule will be used for all merges, configure and use the Default rule to apply to all filters.
- Custom rules can be created and associated with the filter in this step as well. After saving this change, the filter results will always use the specified rule.
- Filter Name: Give the filter a descriptive name.
- Description Name (optional): Give a brief description of the filter.
- Enable: All filters are enabled by default. Disabling makes the filter inactive.
- Exclude Import Records: Choose this option if the rule should be accessible for import jobs.
- Cloudingo imports can use existing dedupe filters. Regular dedupe filters include import record matches by default. Choosing this option will prevent those records from appearing in regular dedupe filter results.
- This option will also disable the filter from appearing as an option to scan against in Step 5 of the import process.
- When using the same filter criteria for imports while working on regular dedupe efforts simultaneously, creating a second copy of the filter for the import process allows for dedupe dashboard filters to run independently while excluding the import records. Disable this option for the regular dedupe filter and enable this option for the import filter.
- Real-Time Merge: Choose this option to merge incoming duplicates automatically. Once enabled, real-time filters are actively running and prominently displayed on dashboards. Real-time merge can be temporarily or permanently disabled by unchecking this setting.
- Filter operates continuously; there is no need to recalculate, manually merge, or initiate automation.
- The feature should only be enabled using filters with reliable field matches to prevent false positives.
- The rule assigned to the filter is automatically applied during merge to determine the master & field value selections.
- Only one real-time filter per object can be enabled.
- Available with Professional and Enterprise level licenses only.
- Available for standard object merge filters only (Leads, Contacts, Accounts, and Person Accounts).
- Duplicate checks include a daily limit of 100,000 groups of duplicates processed within a 24-hour period.
- If limits are exceeded, an automation job is automatically created.
- The real-time feature cannot be enabled on the following filters:
- Filters using 'Match on Empty' settings.
- Cross-matching merge filters.
- Convert filters (Lead to Contact or Lead to Account).
- Custom object merge filters.
- Filter operates continuously; there is no need to recalculate, manually merge, or initiate automation.
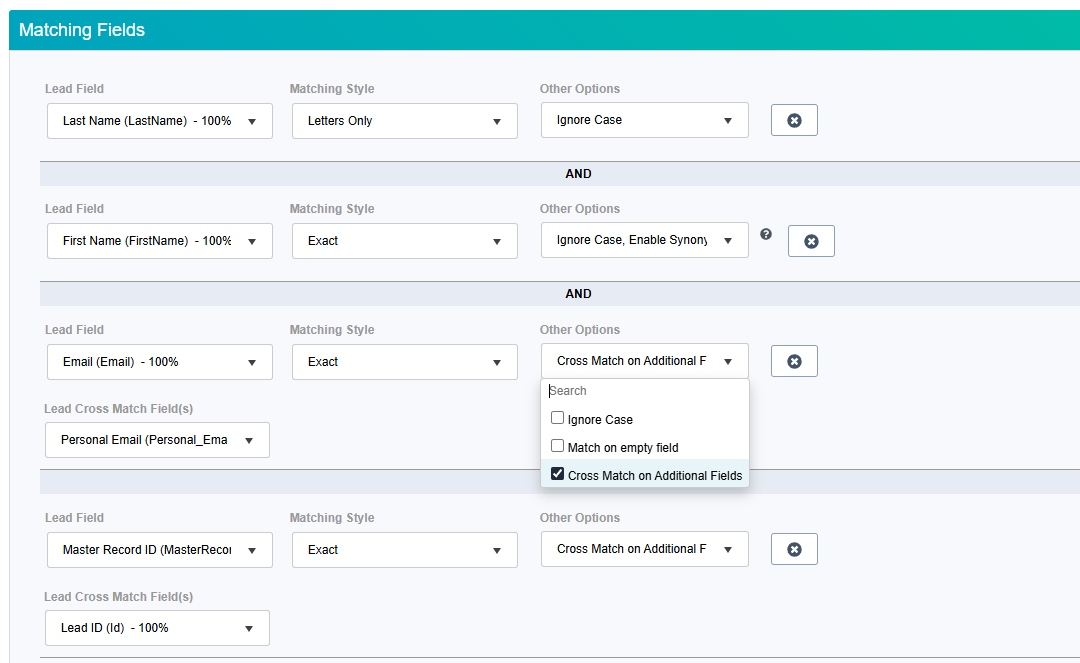
Step 2: Matching Fields
Choose which fields to match on to identify duplicates.
- Choose the 'Add Field' option to begin adding fields to the matching criteria.
- Fields to Dedupe Against: Choose all matching fields to use to identify record matches.
- The field list contains both standard and custom fields.
- Choose ‘Refresh Fields’ button to refresh the field schema. Use this option to find a field in the field list, especially for newly created fields. Alternatively, in Salesforce, check the connected user profile’s field permissions to ensure that the field is not ‘Read Only’ and that the field is editable from the object being merged.
- Specify matching criteria to locate duplicate records.
- Field selections initially use ‘And’ logic. All specified criteria must be met to be included in the filter results.
- 'Or' logic can be used when applicable. For example, to locate records with an Email or Phone match in one filter, use the 'Add Or' button to add logic to search both fields simultaneously.

- Use Cross Match on Additional Fields to cross examine multiple field values (e.g. phone vs. alternate phone).
 "Or" logic + Cross Match Limits
- 1 match condition must be supplied before 'Or' or 'Cross Match' opens up.
- Up to 5 'Or' or 'Cross Match' conditions can be used per filter.
- The ‘Group results by this field’ drop-down is the field value that will be displayed on the Merge Preview page when listing each unique group’s name. Choices will only consist of fields that have been added for matching.
- Enable the 'Show Field Usage Percentage' optional setting to view field usage percentage in the field list drop-down.

- The percentage provides an estimate of the number of records that have values populated vs. blank values for the selected field.
- Percentages are based on the last run Field Analysis.
Matching Styles
Matching Style: Choose a matching style to use in assessing field value matches. Matching options include:
| Alpha Numeric Only | This option strips out special characters, symbols, and spaces for comparing values. |
| Company Name Cleaned | This option strips out standard corporate suffixes and articles, like Inc., Incorporated, Co., Company, The, A, etc. To have Cloudingo to also strip out all spaces for comparing values, select the ‘Remove Spaces’ checkbox. Example: BestBuy vs Best Buy, Inc.; ‘company clean’ alone would not catch this scenario because it only strips out the ‘, Inc.’ for comparison. With the remove spaces option enabled, Cloudingo would find the match. See more details regarding this matching option in bullet points below. |
| Email (Username) | This option matches the username portion of a string of text (text preceding an @ symbol) for comparing values. |
| Email/Web (Domain) | This option matches the domain portion of a string of text (text that follows after an @ symbol) for comparing values. |
| Exact | This option uses an exact match of field data for comparing values (no extra logic applied). |
| First N Characters Last N Characters | This option looks at the first or last number of characters for comparing values. N stands for “number.” The number of characters to evaluate is user-defined. Example: if the variable set is 4, Cloudingo will only look at the first or last 4 letters of the field value. |
| First N Words Last N Words | This option looks at the first or last number of words for comparing values. N stands for “number.” The number of words to evaluate is user-defined. Example: if the variable set is 2, Cloudingo will only look at the first or last 2 words of the field value. |
| Fuzzy | This option uses a calculated algorithm to find likely matches based on a threshold of similar characters in the string. Note: Using this option last is recommended after several passes on the data as it returns the widest set of possible matches. See more details regarding this matching option in bullet points below. |
| Letters Only | This option strips out any non-letter characters, symbols, and spaces for comparing values. Example: ABC, A B C, A.B.C. would all be matches. |
| Numeric Only | This option strips out any non-numeric characters, symbols, and spaces for comparing values. Example: 414, 4 1 4, 4.1.4 would all be matches. |
| Phone International | This option uses a fuzzy matching algorithm specific to international phone numbers that accounts for differences in formatting and spacing. |
| Phone North America | This option uses a fuzzy matching algorithm specific to North American phone numbers that accounts for differences in formatting and spacing. |
| URL | This option matches a web site URL address. It will look at the main portion of the web address between the / and .com for example. |
Notes Regarding Fuzzy & Company Clean:
- Fuzzy: The fuzzy matching option should only be used as a last resort to find any remaining duplicates on non-street fields. This algorithm estimates how something would sound if pronounced out loud and is useful for finding deeply hidden matches that may have a simple misspelling in the value. However, it can also return false positives, so it is not recommended as the first matching option. To use Fuzzy, at least two field matches must be specified, and it can only be chosen as a secondary field matching style within the filter configuration. Be sure to add a separate field within the criteria first in the list when using Fuzzy on a field.
- Fuzzy (Street): Cloudingo provides a configurable fuzzy logic option for Street address fields. This feature ignores specific portions of the field value, such as "St." vs "Street," to find matches based on the remaining value. Access to view or edit the pre-set list through the Libraries → Synonyms section from the left-hand navigation window. Then, choose Address Synonyms from the drop box at the top of the page.
- Company Clean: Cloudingo uses a pre-defined set of words to find additional matches when using Company Clean. Access to view or edit the pre-set list through the Libraries → Synonyms section from the left-hand navigation window. Then, choose Company Clean from the drop box at the top of the page.
- Words can be added to the list to better accommodate business industries. However, it is important to carefully consider the consequences before adding or removing words from the list as this could affect the accuracy of the matching algorithm. The pre-defined list includes options to remove words from the beginning, middle, or end of the company name, or anywhere within the name.
Options
- Other Options include:
- Ignore Case: If enabled, Cloudingo will ignore differences in upper- and lower-case letters. A=a, B=b.
- Match on Empty Field: If enabled, Cloudingo will first look for matches between records that contain values or have a blank value in the selected field. With Match on Empty selected, Cloudingo returns the following matches:
- One or more records match for the field value.
- One or more records have a matching field value, and one or more records have a blank field value.
- All records are blank for the field value.TipCloudingo limits to two ‘Match on Empty’ fields per filter. To achieve best results, cleanse the data first without enabling ‘Match on Empty,’ and then select it for a later scan and cleanse of the data.
- Enable Synonym Matching: This option is available for standard fields such as first names, state/province, country, street, and company name. Synonym matching uses a standard lexicon that matches familiar and formal versions of names such as names (Ex: Mike vs. Michael) and spelled out states/provinces or countries with their standard abbreviations. Access to view or edit the pre-set synonym list for each category through the 'Libraries' → 'Synonyms' section from the left-hand navigation window. Then, choose Name Synonyms, State Synonyms, or Country Synonyms from the drop box at the top of the page.
- For First Name, State, & Country: Choose ‘Exact’ in the Match drop-down menu first, then enable the ‘Enable Synonym Matching’ box.
- When using the ‘Fuzzy’ matching style on standard street fields or the ‘Company Clean’ matching style on account or company name fields, Cloudingo will automatically use a preset synonym list. The ‘Enable Synonym Matching’ option is not required or editable when using these fields & matching styles. Access to view or edit the pre-set synonym lists through the 'Libraries' → 'Synonyms' section from the left-hand navigation window.
Tip: Matching on Email Username
To find Salesforce duplicates based on the email username (the portion of an email before the @ sign), create a formula text custom field in Salesforce called ‘Email Username’ using the following formula:
LEFT(Email,FIND("@",Email) - 1)
In Cloudingo, add the Email Username field to matching fields. It is recommended to also use additional filter criteria such as name or company name to improve accuracy.
Step 3: Limit Records
Cloudingo will narrow down the scope of a filter’s scan by defining subsets of data for filtering and deduplication in Step 3 & 4. Cloudingo can also assign one merge rule to most of the merges while having a custom rule to define the master or field selections differently for the subset data.
When limiting records in Step 3, all records within the match group must meet the specified criteria.
- Choose the 'Add Field' option to begin adding criteria to limit record matches.
- (Object) Field: Choose the field to limit records.
- Condition: Choose the condition (such as Equal, Not Equal, Has a Value, Contains).
- Value: Enter the values to limit records if applicable. Some conditions do not require a value to be set.
- Or has no value: Enable this option to allow blanks to pull into the results. Criteria must either meet the value specified or be blank.
- If all desired limitations have been set, save the filter without recalculating by clicking 'Save' or save and recalculate the filter results by clicking 'Save & Run'.
- ‘Save & Run’ will only calculate (query) the filter results. It will not make changes to data.
- To further limit groups, move on to Step 4.
- When using a Salesforce ID number, set the operator to ‘Starts With’.
- When using ‘Equal’ or ‘Not Equal’, ‘Contains’, ‘Does Not Contain’, ‘Starts With’, or ‘Ends With’: multiple values using “or” logic can be applied. Specify multiple values, separated by commas - no spaces necessary.
- If using strings that contain a comma (such as Nike, Inc.), use quotation marks to enclose each value that should be separated.
Example: To find Accounts named Nike or Nike, Inc., useEquals "Nike","Nike, Inc.". Nike, Inc. will be treated as one complete value.
Whereas,Equals Nike,Nike, Inc.will result in separate strings (Inc. would be treated as a separate value without the quotation marks).
- If using strings that contain a comma (such as Nike, Inc.), use quotation marks to enclose each value that should be separated.
- Multi-picklist field options include 'Excludes Value(s)' and 'Includes Value(s)'.
- Limit record matches to only records that have a specific record type (using Record Type Equals and specifying the record type ID).
- Limit record matches to only records where all records contain a certain value for a field.
- Limit record matches to only records where Status is not equal to a specific status.
Tip: Limiting Email Domains
To exclude multiple email domains (the portion of the email after the @ sign) from the duplicate search, create a formula text custom field in Salesforce called Email Domain using the following formula:
RIGHT(Email, LEN(Email) - FIND("@", Email))
Then, add the Email Domain field in Step 3 and choose ‘Not Equal’ in the dropdown. Type in the domains to be excluded, separated by commas with no spaces.
Step 4: Limit Groups
Cloudingo will narrow down the scope of a filter’s scan by defining subsets of data for filtering and deduplication in Step 3 & 4. Cloudingo can also assign one merge rule to most of the merges while having a custom rule to define the master or field selections differently for the subset data. There are two options to limit groups:
- Limit Group Size: The 'Limit group size' option limits results to only the groups that have less than, greater than, or within a certain number of matching records. This is useful when the filter returns results with a large group of records and the desire is to focus on smaller groups. For example, view only smaller groups that contain only 2 or 3 matches vs. larger groups with more than 3 matches.
- Add Group Rule: Further narrow down group results by adding a group rule. Specify a field within Salesforce and set a rule for that field. With this scope, specify criteria to only see records where at least one record or only one record in the group meets a certain criterion, whereas Step 3 requires all records meet the criteria.

- Choose the 'Add Group Rule' option to add criteria to limit the groups.
- (Object) Field: Choose the field to limit groups.
- Condition: Choose an applicable condition (such as 'Only one', 'One or more', 'One or fewer', 'All', or 'None').
- Rule: Choose the conditional rule (such as 'have a value', 'has an exact value of', 'have a date greater than or equal to', etc.).
- Value: Enter the values to limit groups if the rule chosen requires a value, if applicable. Some conditions do not require a value to be set.
- Or Has No Value: Enable this option to allow groups with blank values to pull into the records (as well as those that meet the value criteria).
- Option is available only for specific and applicable limit group settings.
- Or ALL records have No Value: Enable this option to allow groups with all blank values to pull into the results. Criteria must either meet the value specified or be entirely blank.
- Or Has No Value: Enable this option to allow groups with blank values to pull into the records (as well as those that meet the value criteria).
- Once all desired limitations have been set, save the filter without recalculating by clicking 'Save' or save and recalculate the filter results by clicking 'Save & Run'.
- ‘Save & Run’ will only calculate (query) the filter results. It will not make changes to the data.
- If using a multi-picklist field, choose between 'One or more records excludes a value' and 'One or more records includes a value'.
- Setting up multiple criteria for the same field is possible. For example, ‘One or more records has a value’ for a specific field and ‘One or more record does not have a value’ for the same field.
- Limit record matches to only groups where one or more have a modified date greater than the last week, on a specific date, or within a date range.
- Limit record matches to only groups where one or more have a Status equal to a specific value; allowing other records without the same value to pull in, but at least one record must have the value specified.
- Limit record matches to only groups where one or more have a specific record type.
Indexing
When creating or editing a filter with new fields, Cloudingo initiates a re-indexing process on the object that may take time. To avoid this, users can pre-set a list of fields they will be using in their filters by going to 'Account' → 'Settings' → 'Manage Objects' from the top right toolbar.
Choose the ‘Edit’ button in the specific object to add fields for indexing and 'Save' once all fields have been added.
- Adding additional fields to the list will trigger a one-time re-index, but it will prevent further re-indexing during filter configurations.
- Users should be cautious when setting up filters to use formula, calculated, or related object field values, as changes to the field value may not trigger syncs to Cloudingo. Using calculated fields on an ongoing basis may require re-indexing the object by Cloudingo support.
What is Next?
After mastering filter configurations, it is time to set up rules to tell Cloudingo how you want to merge duplicates by defining the master record and field selections.