- 17 Jun 2024
- 5 Minutes to read
-
PDF
Automating & Scheduling
- Updated on 17 Jun 2024
- 5 Minutes to read
-
PDF
Why Use Automation?
Automating jobs is the most efficient use of time and API resources when it comes to deduping. Automating jobs eliminate human error and provide the most accurate way to merge true duplicate records. However, when creating automation rules, it is important to take the time to consider all fields and how they need to be managed. Confirm that the settings are building the record or update values correctly by configuring filters and rules and manually checking. Once confidence in the automation process has been established, Cloudingo will consider field requirements upon each job submitted.
When to Use Automation
It is recommended to automate the process for filters or jobs that have a high confidence level to save time. Automation jobs should be scheduled to run outside of normal business hours. They may be scheduled to run as frequently as every day (if data is changing rapidly) or at any other interval based on how regularly data is changing. However, only one schedule can be set per filter.
When to Avoid Automation
Avoid automation prior to carefully considering the automation settings and reviewing filter results carefully. For dedupe, do not automatically merge based on loose fuzzy matching algorithms and filters with a low confidence level. These filters have a greater probability of finding false positives as well as duplicates that may be hard to find. Manual review is likely needed.
API Limits
The Salesforce org limits the number of API calls an org can use within a rolling 24-hour period. When this limit is reached, Cloudingo is unable to call in to perform any further actions.
To check available API calls, go to 'Setup' → 'System Overview'.
Check which applications are using API calls (and how many) using the Administrative Salesforce Report labeled “API Usage Last 7 Days”.
If necessary, request additional APIs from Salesforce directly.
Limit the number of API calls Cloudingo can use within a 24-hour period from within Cloudingo's throttle settings.
Consult with your admin to determine if preventative measures need to be put in place.
How Many API’s Does Cloudingo Use?
Cloudingo uses at least 2 API calls per group of records merged (same object merge).
One call is used to query the master/field values.
One is used to submit the merge request.
Additional API calls may be required for notes or actions during the merge.
If there are notes or actions, there will be close to 2-3 API calls per group of records merged.
The API count for conversions (Lead to Contact or Lead to Account) generally ranges from 2-4 APIs per group of records converted (depending on whether notes or field rules are involved).
For the Undo/Restore feature, an additional API call is used per record to query the schema for related objects, and one API is used for Notes.
With older attachments, queries can be run directly, and size is limited to a smaller size, while newer attachments require more queries.
Cloudingo also uses a minimal number of APIs when syncing.
Run Window and Throttle Settings
The Run Window and Throttle settings control the number of Salesforce API resources allocated to Cloudingo and define the time-frame in which an automation job can run. Halting all automation jobs can also be managed through the Run Window settings.
Start Automation (one time job)
There are three ways to start automation for a one-time job.
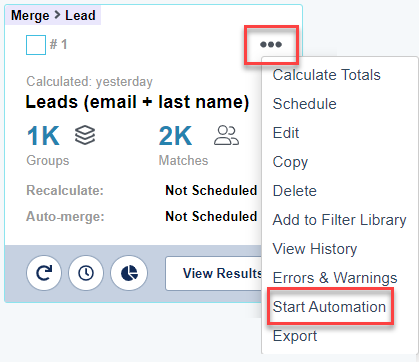
To start automation from the Filter Menu: Choose 'Start Automation' from the drop-down menu on any filter needing to be processed.
To start automation from the preview page: Choose ‘Start Automation’ from the 'Automation' drop-down menu at the top of the dashboard.

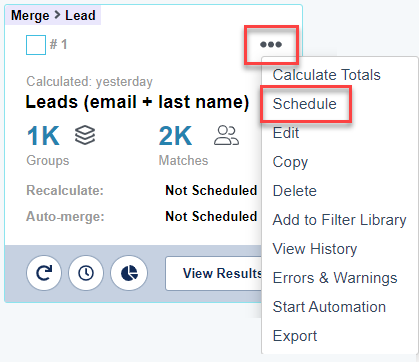
To schedule automation to run one time at a specific date/time: Choose ‘Schedule’ from the Filter menu on any filter that needs to be processed. See more details below regarding scheduling jobs.
On the next page, the following will appear:
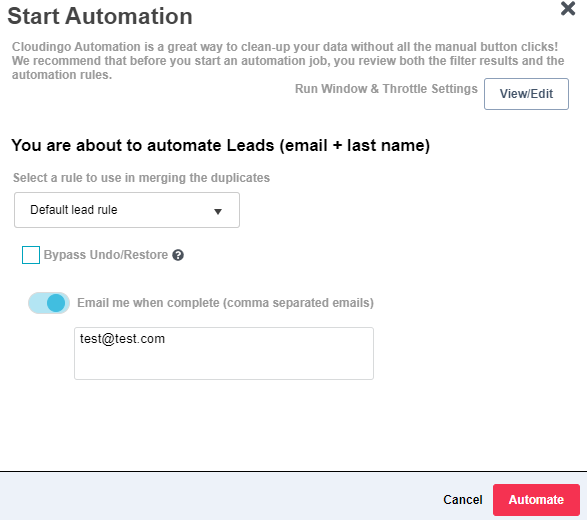
Confirm the correct rule is being applied.
Enable the ‘Bypass Undo/Restore’ option to process the job without creating a backup plan.
Toggle the 'Email me when complete' setting on to get notified when the automation job is completed.
Multiple email addresses should be separated by commas.
Choose ‘Automate’ to begin automation.
A confirmation box will be shown next. Verify the filter and rule again and choose ‘Automate’.
If the job does not start within a reasonable time frame, check the Run Window & Throttle Settings.
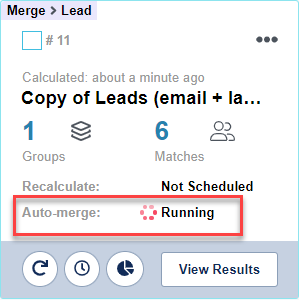
Once the job begins, a small spinning icon next to the ‘Auto-Merge’ will appear and the status will show ‘Running’.
Scheduling Automation
Schedule any filter to process at a specified time and date or specify a frequency to keep the job running at a specified time.
Choose ‘Schedule’ from the filter’s menu options.
Enable the Schedule by toggling the dot to the right.
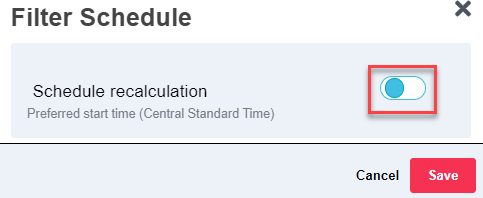
Specify a frequency.
To start a job ‘Once’:
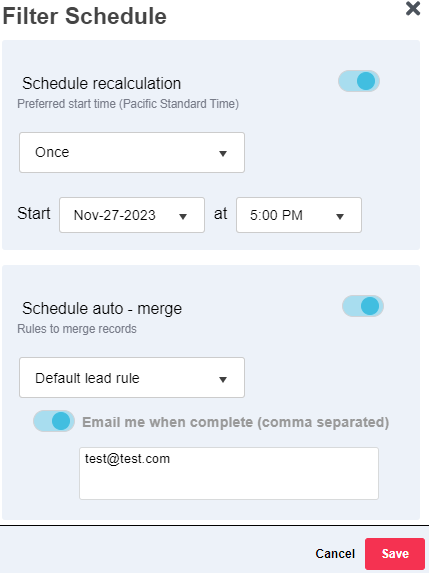
Set a Start date & time.
Toggle the dot to the right to ‘Schedule auto – merge’. If disabled, the job will calculate only and not process.
Toggle the dot to the right to 'Email me when complete' to receive an email notification when the job has completed.
Multiple emails should be separated by commas.
Choose 'Save'. The filter will process at the specified time.
To start a job ‘Daily’:
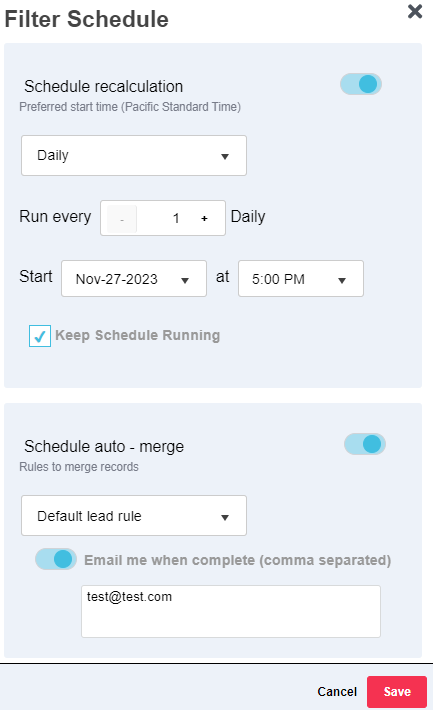
Set the number of days the job should run (ex: every day would be ‘1’, every three days would be ‘3’).
Set a Start date & time.
The ‘Keep Schedule Running’ option must be enabled to allow the job to continue running at the scheduled time.
Toggle the dot to the right to ‘Schedule auto – merge’. If disabled, the job will calculate only and not process.
Toggle the dot to the right to 'Email me when complete' to receive an email notification when the job has completed.
Multiple emails should be separated by commas.
Choose 'Save'. The filter will process at the specified time.
To set a job to run ‘Weekly’:
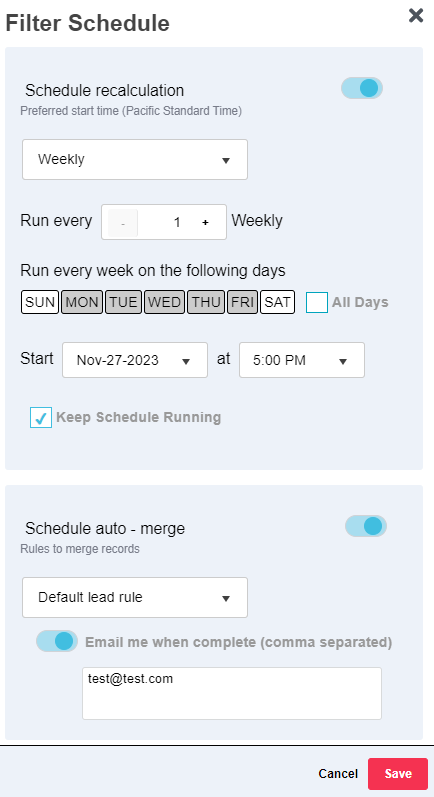
Set the number of weeks the job should run (ex: every week would be ‘1’, every three weeks would be ‘3’).
ii. Set the days of the week that the job should run (at least one day per week is required).
iii. Set a Start date & time.
iv. The ‘Keep Schedule Running’ option must be enabled to allow the job to continue running at the scheduled time.
v. Toggle the dot to the right to ‘Schedule auto – merge’. If disabled, the job will calculate only and not process.
vi. Choose 'Save'. The filter will process at the specified time.
Note:
Be sure to check the Run Window & Throttle Settings to ensure that the run window will allow the job to process inside the specified run window time ranges.
Reports
Manually review critical reports to monitor progress on automated jobs.
Review the 'Activity Stream Errors/Warnings Report' to check for merge failures that need attention.
The report can be scheduled to email to a user-defined list of emails to monitor progress.
Review the 'Dedupe Automation Report' to monitor the overall progress of the automation jobs.
What is Next?
If all records that can be mass merged have already been managed, it is time to start finding more matched records that have looser filter criteria.
Often these filters must be reviewed manually since they cannot be safely automated.
Learning tricks to help with the manual filters that need to be reviewed is a good next step. Visit our Excluded Records help article on recommended filtering options to learn more.
If conversions have not yet been started, now is a good time to start looking over the convert filters (Leads with matching Contacts and Leads with matching Accounts).
.png)

