Overview
Cloudingo offers two different dedupe filter options that check Leads with existing Contacts or Accounts. Lead to Contact dedupe filters should be processed before Lead to Account dedupe filters to avoid creating duplicate Contact records. See details in our Ways to Convert Leads help article on the recommended order of operation.
Navigation
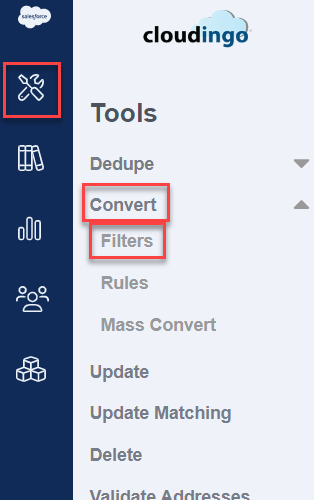
- Choose the ‘Tools’ → ‘Convert’ → ‘Filters’ option from the left-hand-side navigation window.
- Choose ‘Create New Filter’ to build a new custom filter.

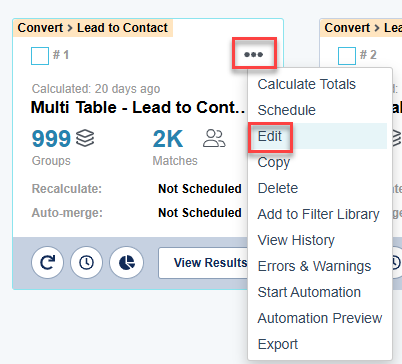
- Choose ‘Edit’ from a specific filter's menu options to edit an existing filter or to view the filter's configuration.
- Choose ‘Create New Filter’ to build a new custom filter.
Actions & View Options
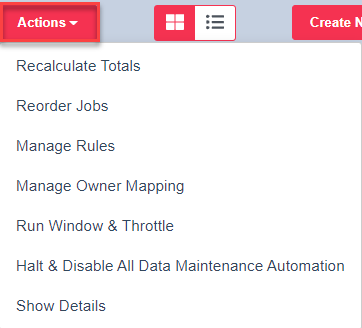
- The 'Actions' menu provides a variety of options.
- Recalculate Totals: Recalculates (queries) all filters at one time.
- Reorder Filters: Choose this option to reorder the filters for display.
- Manage Rules: Choose this option to get directly into the Manage Rules page.
- Manage Owner Mapping: Choose this option to get directly into the Owner Mapping page.
- Run Window & Throttle: Choose this option to get directly into the Run Window & Throttle page.
- Halt & Disable All Dedupe Automation: Choose this option to temporarily stop all currently running or future automation jobs.
- Jobs currently running can take time to completely stop.
- Show Details: Choose this option to show additional filter details (such as the filter description, fields used, and the rule applied if applicable.
- Choose 'Hide Details' from the 'Actions' menu to return to the regular filter view.
- Choose 'Hide Details' from the 'Actions' menu to return to the regular filter view.
- Toggle between Tile View or List View to control how filters are displayed.

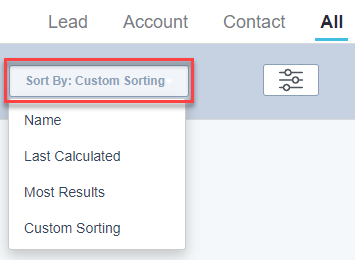
- Sort By: Choose from a variety of sort options to display filters.
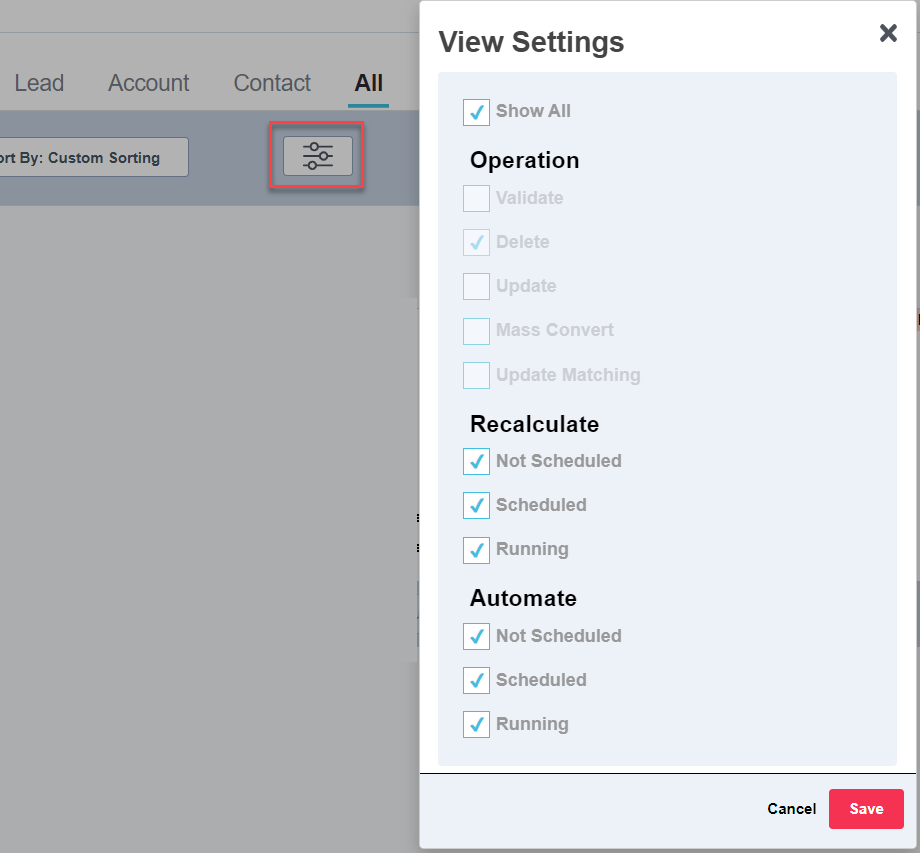
4. View Settings: Choose from a variety of view settings to display filters.
Filter Configurations
Filter configurations work very similarly to the Dedupe merge filters. Be familiar with the Dedupe merge filters or refer to that article for more help. Convert filters have a few small differences from Dedupe merge filters:
Step 1: The Basics
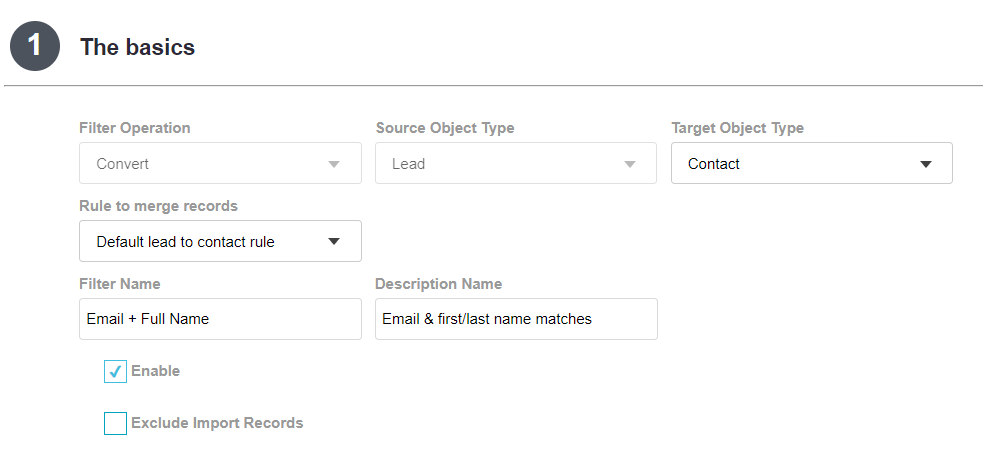
- Choose ‘Convert’ for the ‘Filter Operation’.
- Choose ‘Lead’ for the ‘Source Object Type’.
- Choose ‘Contact’ or ‘Account’ for the ‘Target Object Type’.
- Know the difference between Lead to Contact and Lead to Account job types before configuring.
Step 2: What fields do you want to match on?
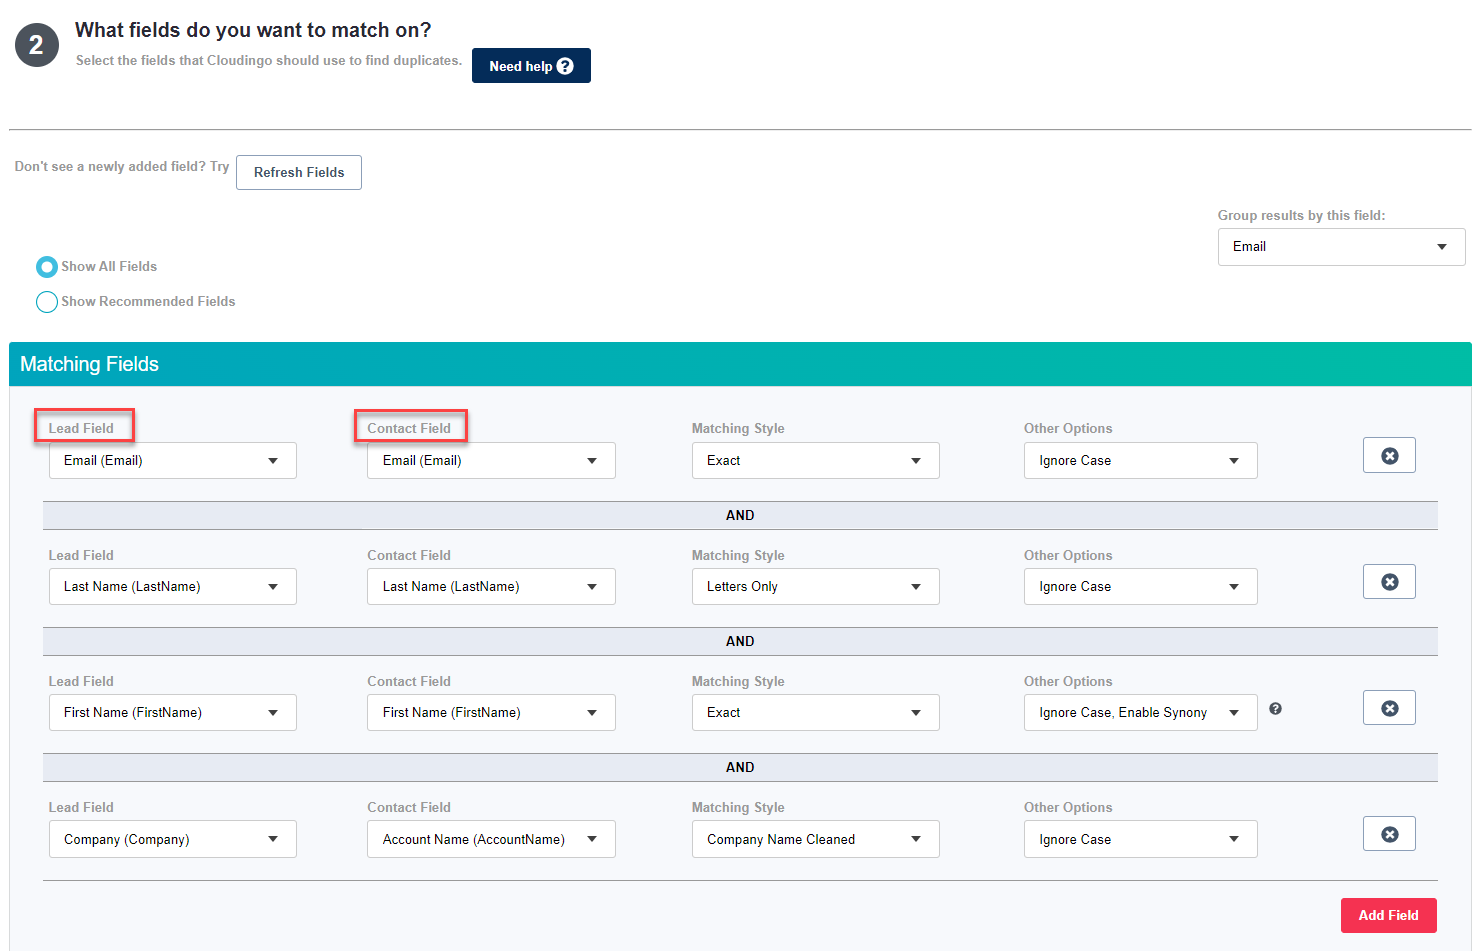
- When adding fields to the matching criteria, both object fields will be required.
- Map the corresponding Contact or Account field that data should be compared against.
- Example: Lead Email could map to Contact Email.
- Example 2: Lead Company could map to Account Name.
Step 3: Limit your records
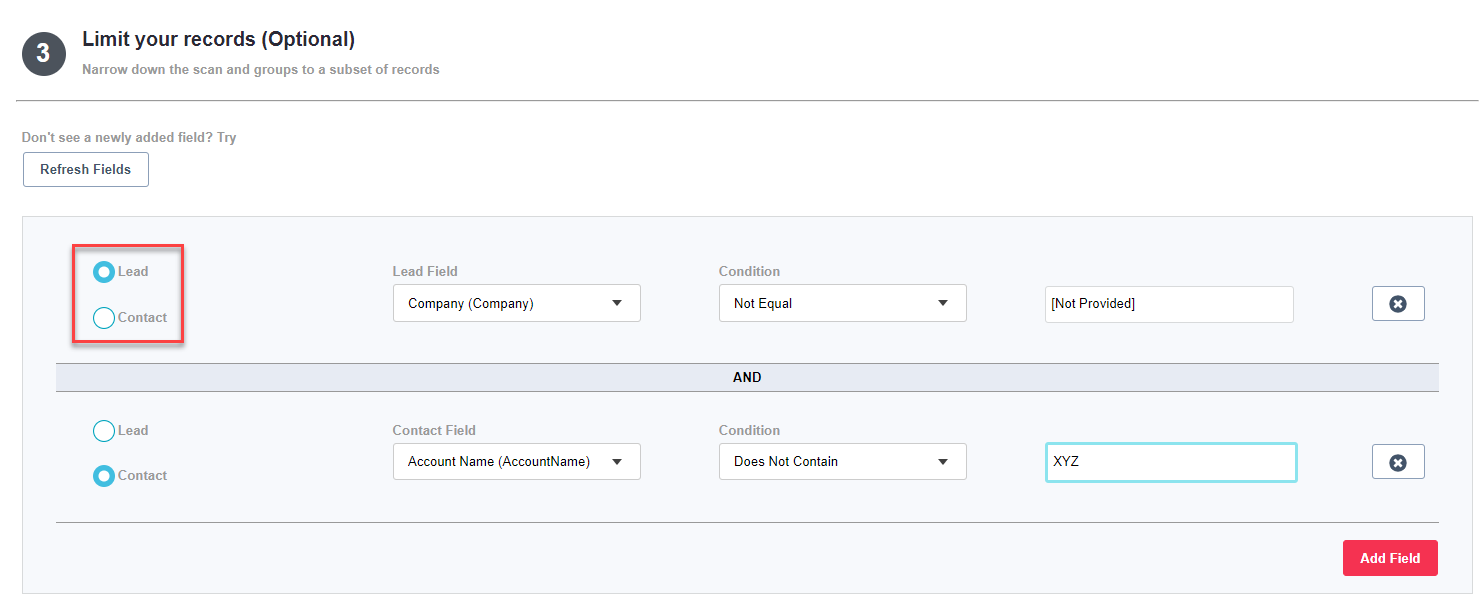
- Specify limits using either Lead fields or Contact/Account fields (depending on which convert option was chosen).
- Use the toggle options on the left side to choose ‘Lead’ or ‘Contact’ to control the field list available. Then, set condition(s) and value(s) as required.
Step 4: Limit your groups
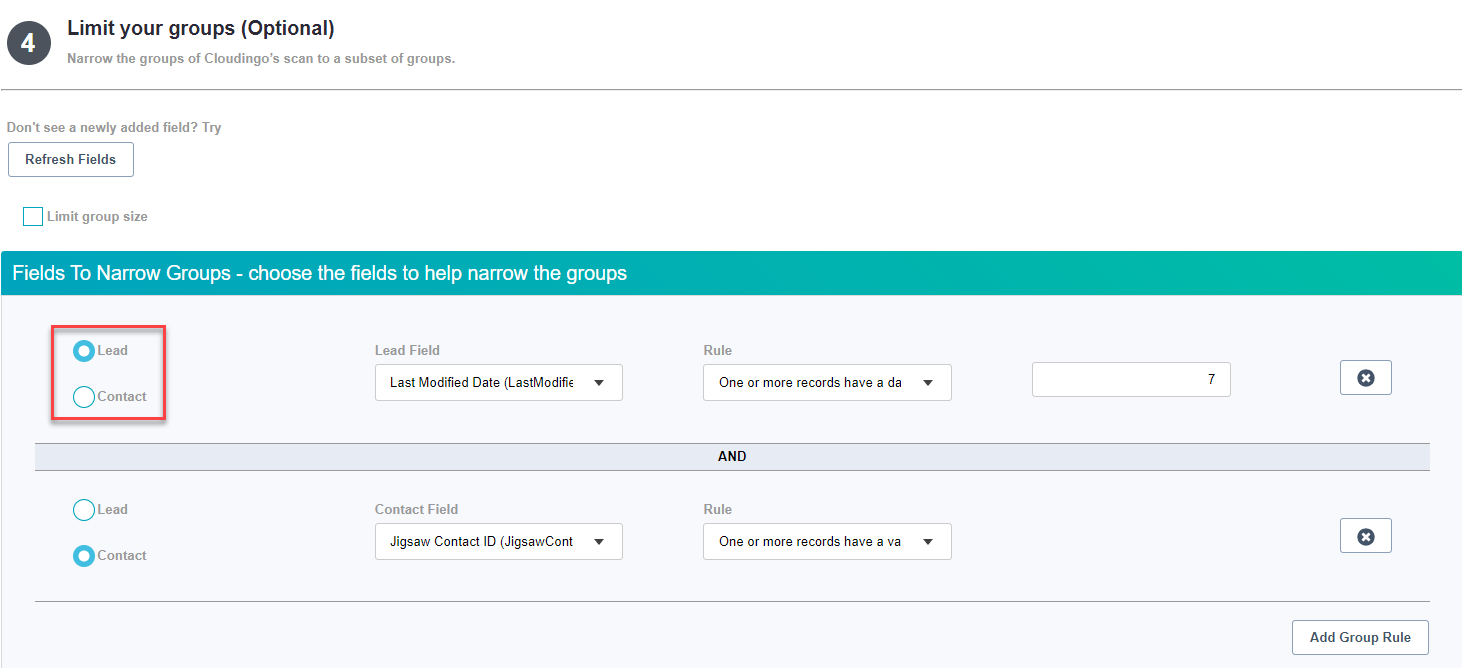
- Specify limits using either Lead fields or Contact/Account fields (depending on which convert option was chosen).
- Use the toggle options on the left side to choose ‘Lead’ or ‘Contact’ to control the field list available. Then, set rule(s) and value(s) as required.
Indexing
When creating or editing a filter with new fields, Cloudingo initiates a re-indexing process on the object that may take time. To avoid this, users can pre-set a list of fields that will be used in filter configurations by going to ‘Account’ → ‘Settings’ → ‘Manage Objects’ from the top right toolbar.
Convert Rules
Cloudingo also requires that convert filters be assigned to a convert rule to set the default converted status. Convert rules can also be configured to accommodate field overrides if desired. See more details in our Rules (Convert): Selecting Values for Convert help article. A few points to keep in mind:
- The Contact or Account record is always the master (depending on which convert type was chosen).
- Cloudingo will use the native Salesforce conversion process if specific field rules are not configured to override.
- Make sure that the assigned rule has the appropriate Convert Status defaulted.
Preview Results for Accuracy
As with merge filters, Convert filters should be viewed using the Merge Preview page to ensure accuracy. Preview to check that the filter is pulling in safe matches and the rule is applying field rules as desired (to override the Contact if applicable). Convert filters will preview the same as merge filters with a few exceptions.
- The Merge Preview page will display the Lead records on the right side of the page and the Contact record on the left side of the page.
- A blue column with the final record preview will not be present in a convert filter’s Merge Preview page. Field values that will be overwritten on the Contact will display an informational icon. Hover over the icon to see the old value being overwritten.

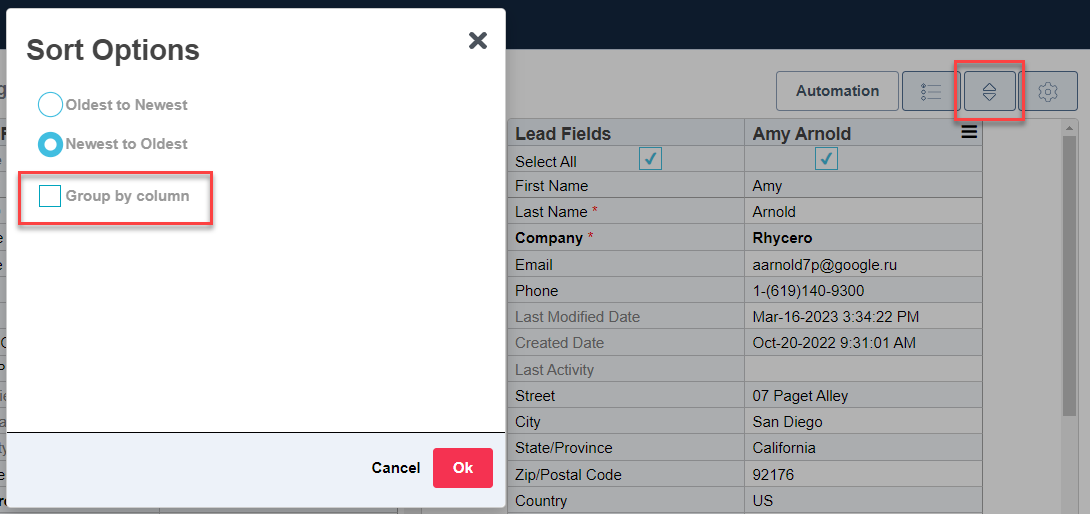
- There is an option to ‘Group by Column’ in the 'Sort Options' when previewing convert filters. When enabled, the Lead and Contact or Account fields will attempt to line up fields with same or like names for easier viewing.
Converting Records
Cloudingo offers three ways to convert records.
- Manual Convert: Converts one record at a time.
- Manual conversion works the same way the manual merge does except for an additional screen during the manual conversion process.
- The additional screen displays the same options presented when converting leads inside Salesforce.
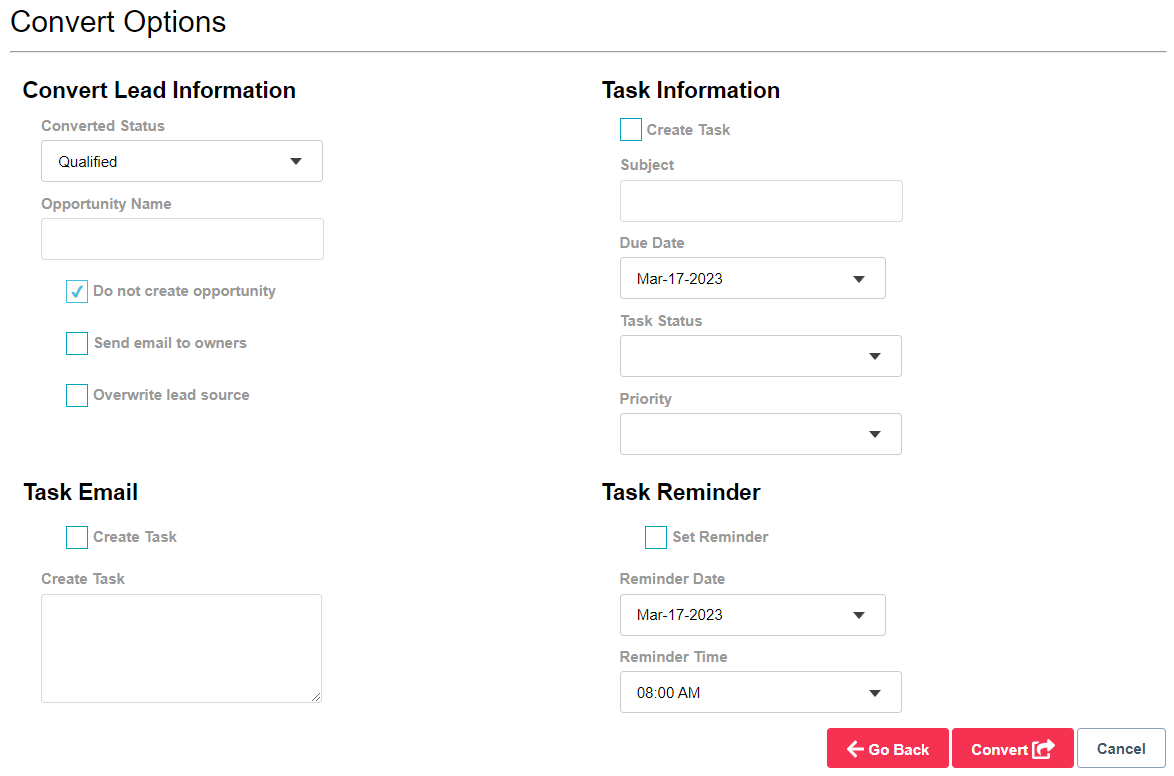
- Choose a 'Converted Status'.
- Cloudingo will pre-set the default convert status defined in the convert rule.
- Assign a new record owner, create an opportunity, set a task, or send a notification email.
- These options are defaulted to be disabled. Cloudingo dedupe conversions are not part of a typical Sales process.
- Choose a 'Converted Status'.
- Mass Convert: Converts records one page at a time by choosing the checkbox options and the ‘Mass Convert’ option from the Merge Preview page. See more details in the Mass Merge help article if unfamiliar with mass merging/converting.
- Automation: Converts all records in a filter using a one-time or scheduled automation job. See more details in the Automating & Scheduling help article if unfamiliar with automation.